Basic Information
Overview
Basic Information lets you configure frontend agent display, related datasets for model learning, Recommend Dashboard behavior, recommended questions, guided questions, Personalized Memory, and Insight switches.
Basic Configuration
Agent Display Settings
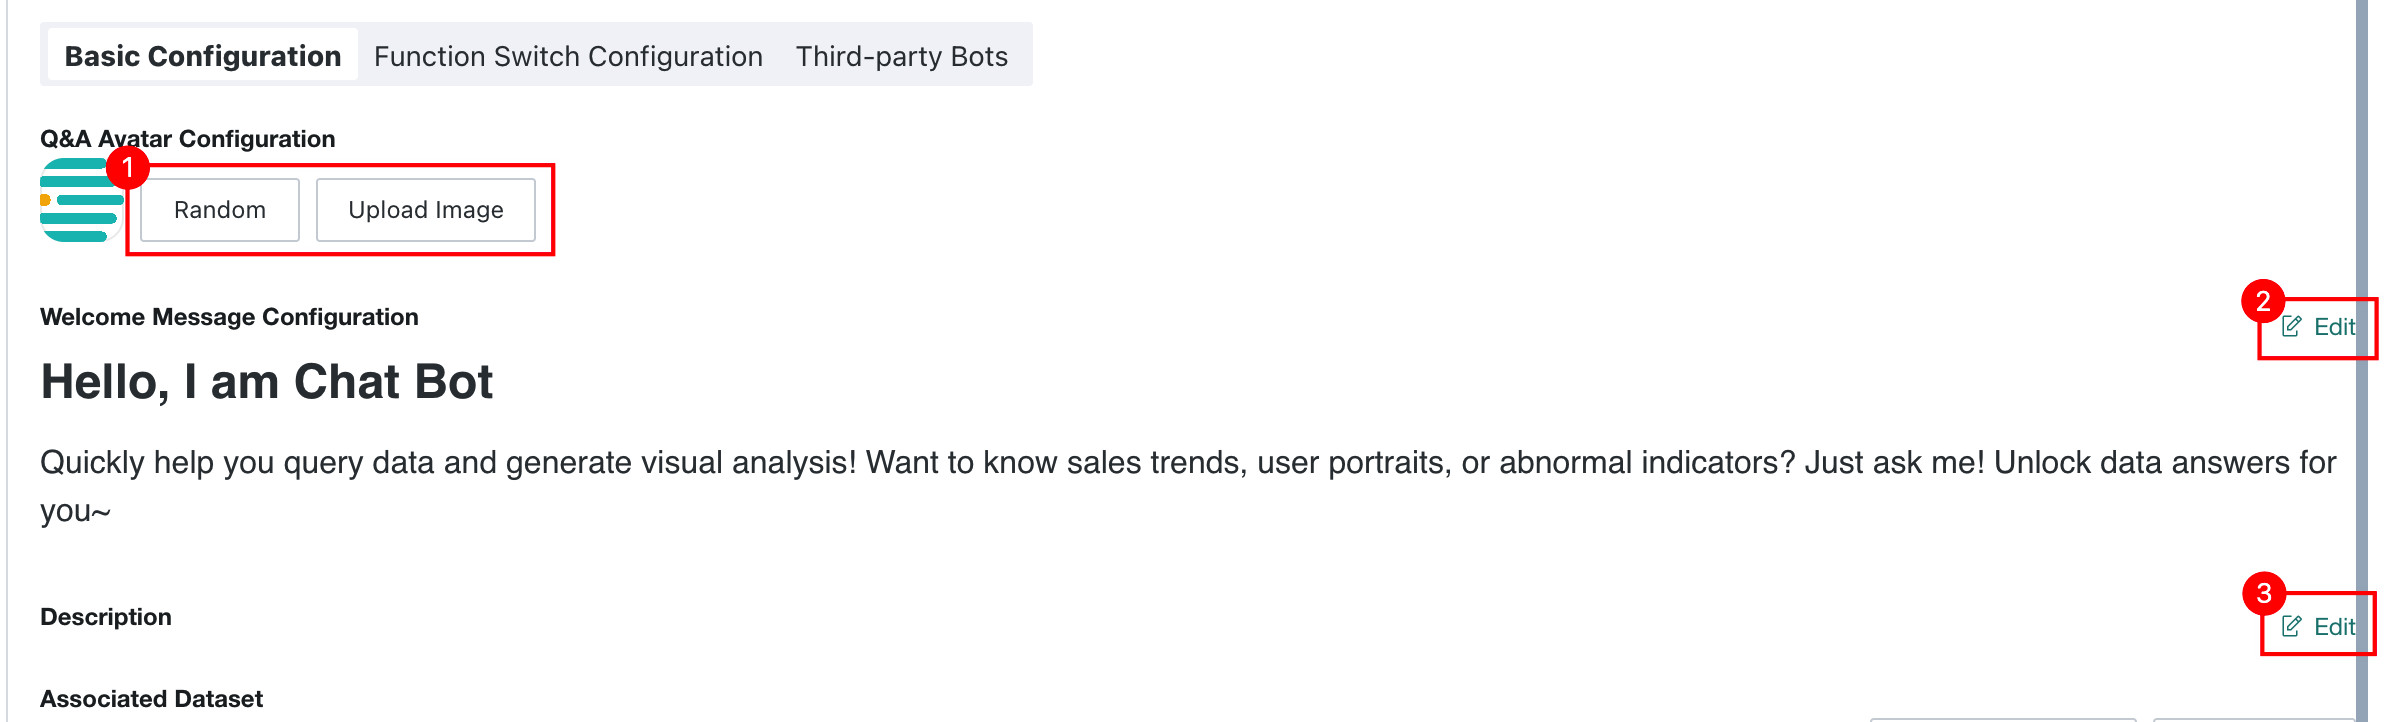
This section shows the basic configuration of the current agent. You can modify the avatar, welcome message, and Agent Description here.
| No. | Description |
|---|---|
| 1 | The Q&A avatar defaults to the Guandata logo. Click Upload Image to change the frontend avatar, or click Random to let the system generate one automatically. Clicking the avatar opens a configuration panel where you can quickly choose an icon and background color.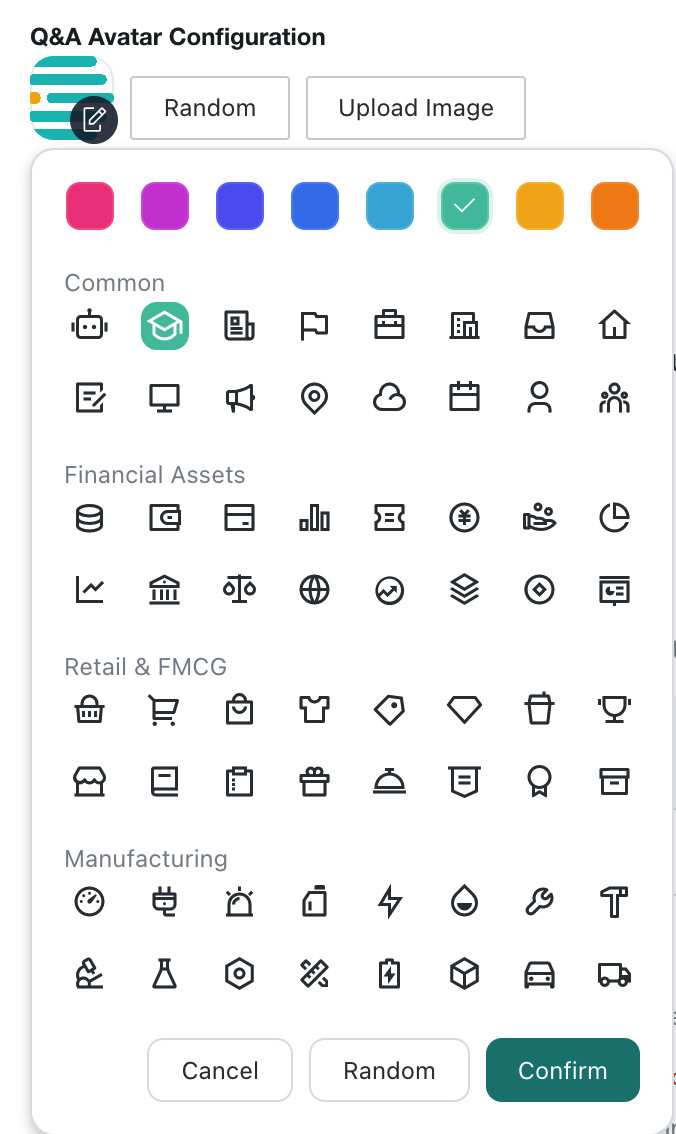 |
| 2 | Click Edit to modify the frontend welcome message. The welcome message supports rich-text editing and references to specific attributes.User Attributes and dataset update times. |
| 3 | Click Edit to modify the Agent Description. |
Dataset Configuration

Manage Datasets
-
Add Dataset
Click
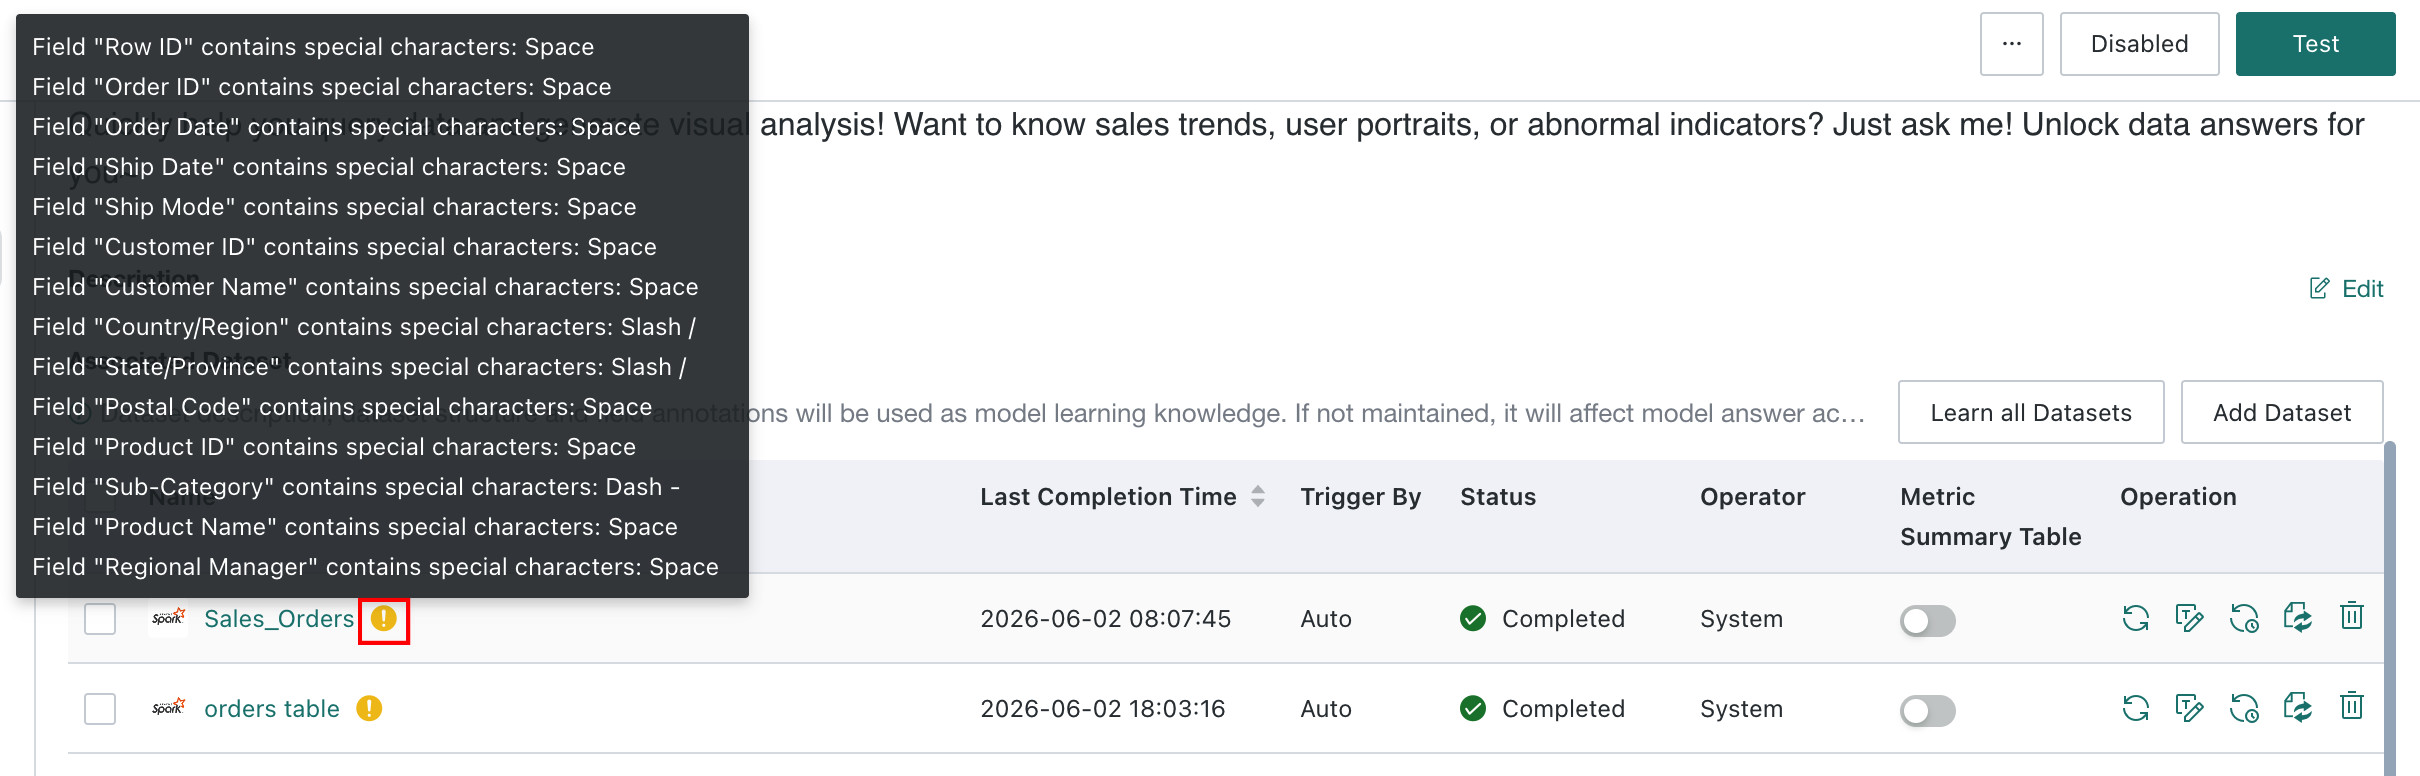
Add Datasetto add a new dataset to the agent. If the dataset name contains any of the following special characters, the dataset cannot be added because special characters seriously affect the model's ability to generate accurate table names. We recommend renaming BI datasets before adding them to the agent. This does not affect downstream card or ETL references.Special character list:
[" ", "\t", "\n", "\r","-", "+", "*", "/", "%", "^", "&", "|", "~", "=", "<", ">", "!", "?",",", ".", ":", ";", "'", "\"", "`", "(", ")", "[", "]", "{", "}","@", "#", "$","¥", "€", "£", "¢", "¤","「", "」","(",")"]NoteDatasets that have already been added to the agent are not affected.

-
Dataset Quality Validation
After datasets are added, the system automatically performs quality checks. Datasets that still contain anomalies after validation are marked in the related dataset list.
-
View Dataset Details
To view dataset details, click a dataset to jump to the
Data Preparation > Datasetdetail page. For the description of that page, see View Dataset.
-
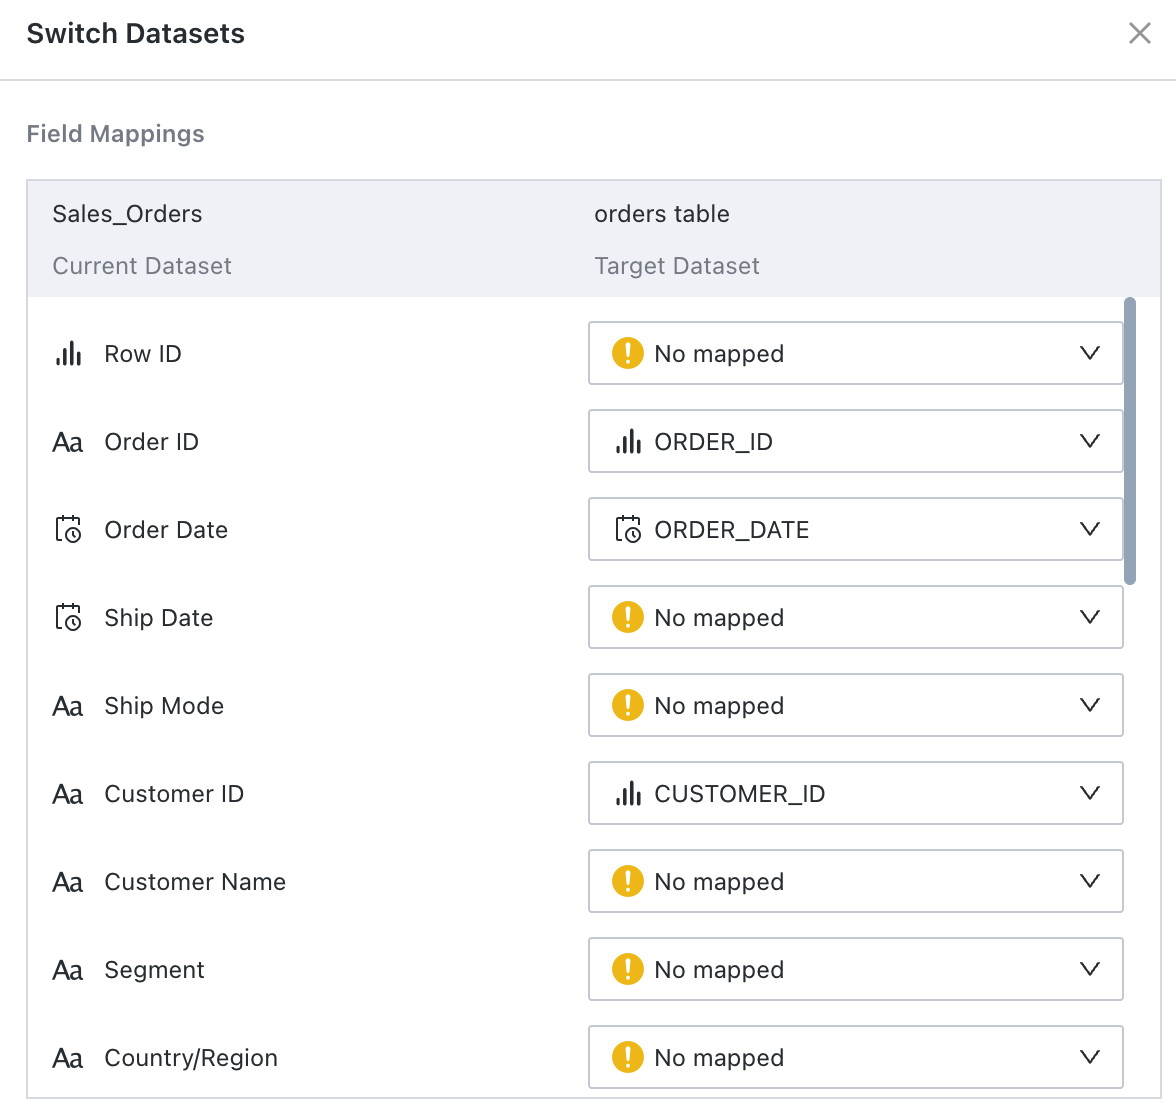
Switch Dataset
Click the button to switch datasets. After selecting the target dataset, users can map fields from the current dataset to fields in the target dataset. After confirming the mapping and clicking
Confirm, entries inQ&A Sampleand the test answer set that reference the current dataset and fields are replaced with the target dataset and mapped fields. The related sample SQL is then revalidated and the SQL validity status is updated.
-
Delete Dataset
Click the button to remove the related dataset. The delete operation requires a second confirmation to avoid accidental deletion.

Learn Datasets
-
Automatically Trigger Dataset Learning
When datasets are created or modified for an agent, the system automatically triggers dataset re-learning. In the list, you can view
Latest Learning Completion Time,Trigger Method, andDataset Learning Status. If learning fails, the failure reason is shown.NoteAutomatic learning is triggered once per day.

-
Manually Trigger Dataset Learning
-
Single dataset learning: click
Refreshin the action column of a dataset to trigger learning for that dataset only.
-
Batch dataset learning: select multiple datasets, enter batch operation mode, and click
Learn Selectedto trigger learning for all selected datasets.
-
Learn all datasets: click
Learn Allin the upper-right corner to trigger re-learning for all datasets.
-
-
Field Enumeration Learning
Click
Field Learning Configurationin the action column of a dataset. In the dialog, select the fields to learn and clickConfirmto trigger enumeration value learning for those fields.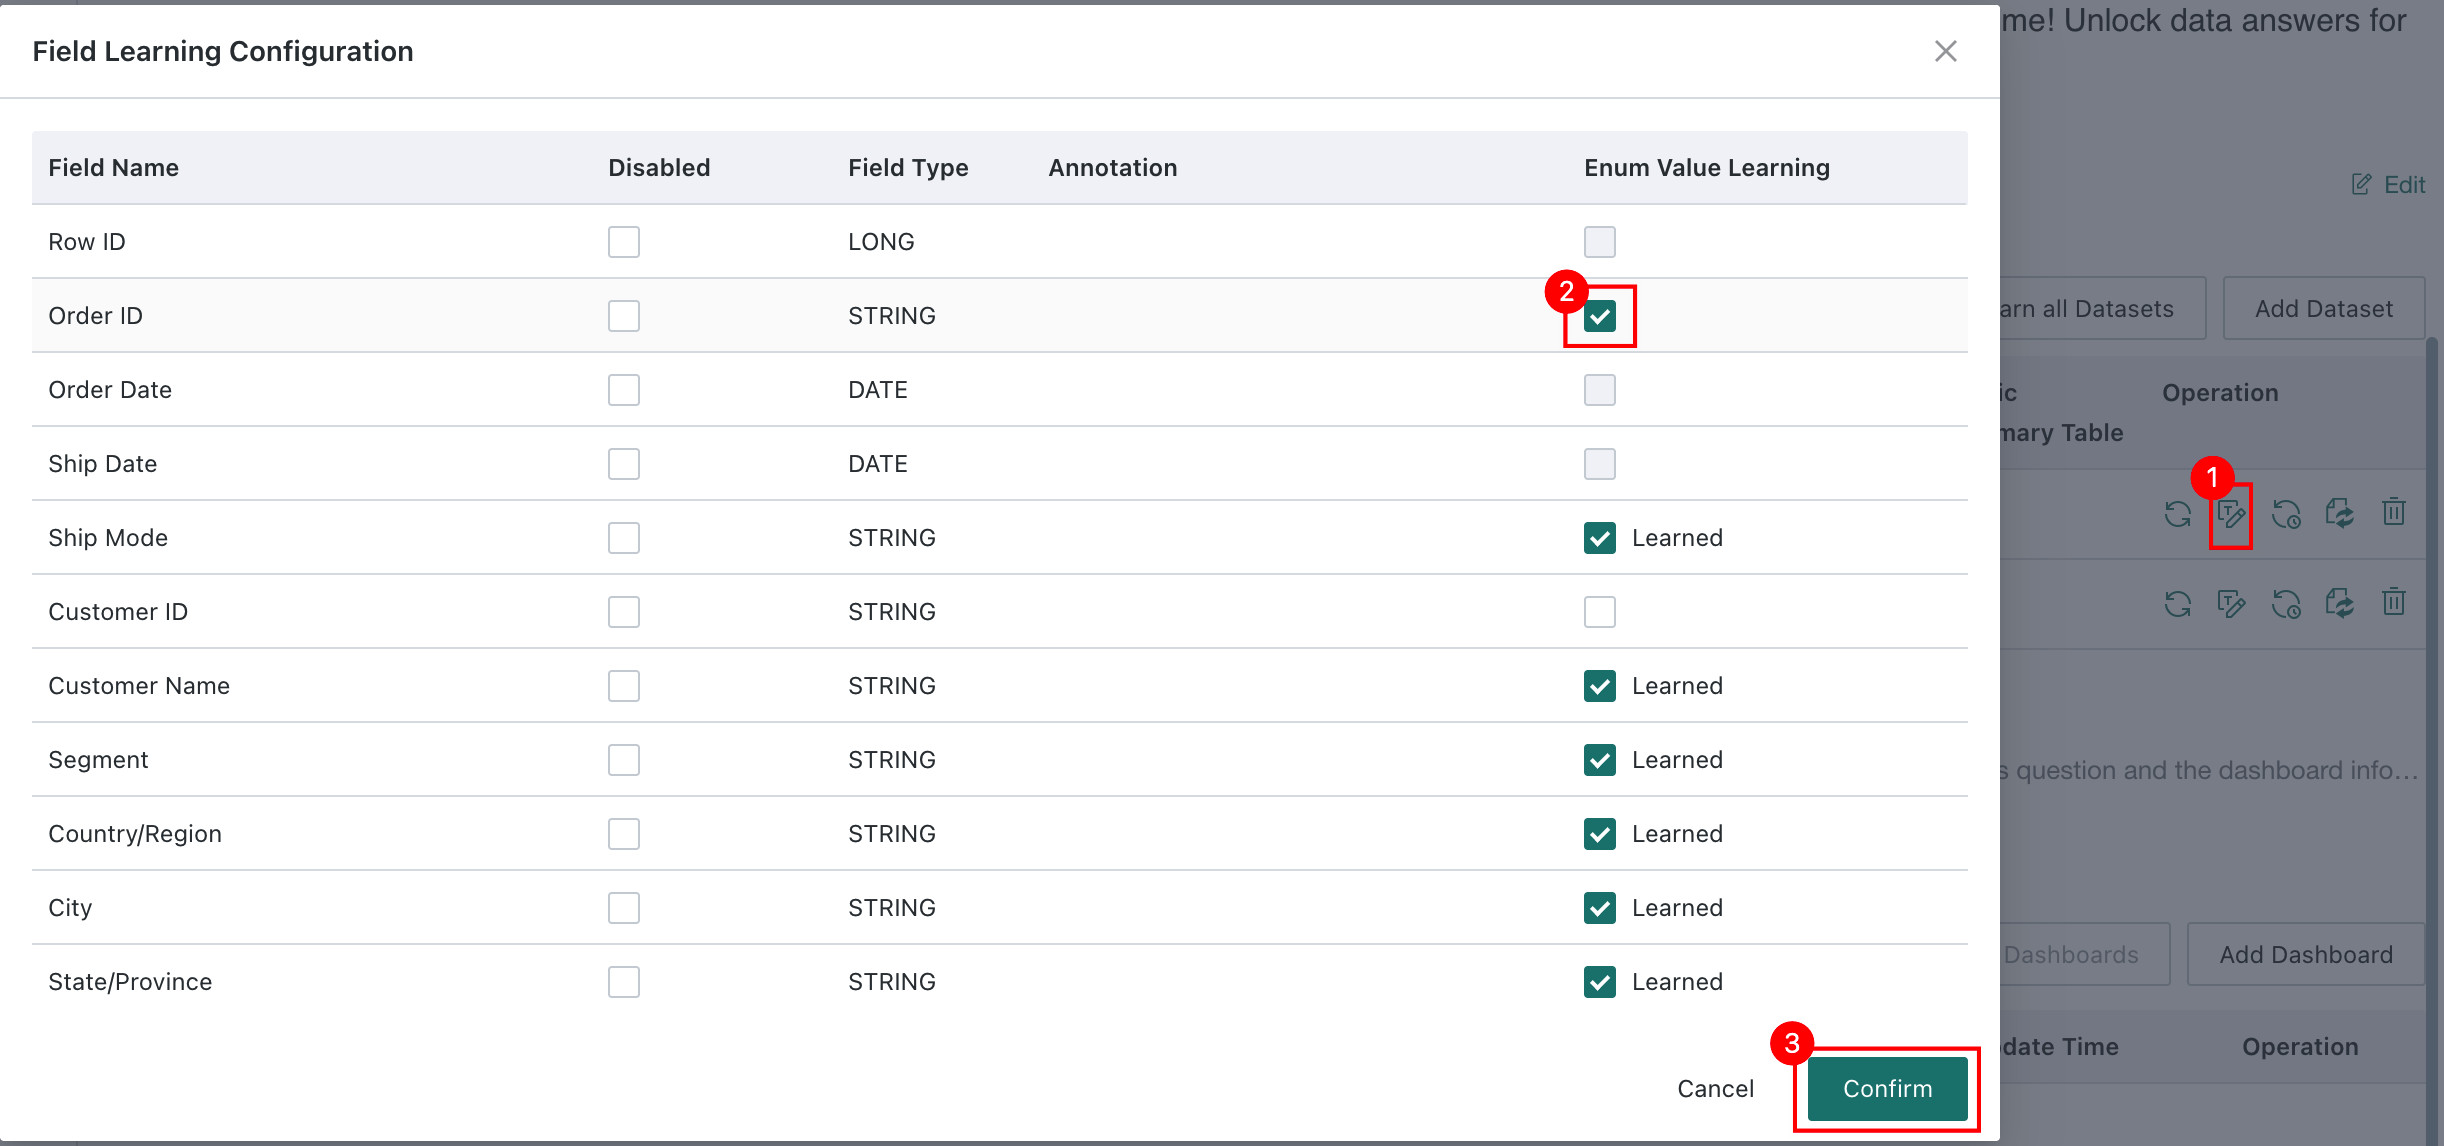
If you do not want a field to be learned by the model, enable
Disabled. Disabled fields are excluded from model-generated queries, which helps reduce interference from irrelevant fields, improve query accuracy, and protect sensitive fields from being queried.
-
View Learning History
Click
Learning Historyin the dataset action column to view learning records for the past 30 days.
Metric Summary Table
Metric Summary Table is used for datasets with a metric-dimension structure. After it is enabled, the system converts the metric dimension in query results from rows to columns, making it easier for users to analyze the data as a standard two-dimensional table.

Switch Behavior Comparison
| Status | Effect |
|---|---|
Disabled (default) | The table is treated as a normal dataset, and SQL query results are displayed directly without transpose logic. |
Enabled | The table is treated as a metric summary table, and the system automatically transposes query results by turning the metric dimension from rows into columns. |
Applicable Scenarios
Metric Summary Table is mainly used to process EAV (Entity-Attribute-Value) datasets. For example, if the original data stores metric names in one column and metric values in another column, enabling this feature converts each metric name into an independent column and produces a standard two-dimensional table for easier querying by column name.
Example
Original data format (EAV):
| Customer | Metric Name | Metric Value |
|---|---|---|
| A | Sales Amount | 1000 |
| A | Profit | 200 |
| B | Sales Amount | 1500 |
| B | Profit | 300 |
After transpose (standard 2D table):
| Customer | Sales Amount | Profit |
|---|---|---|
| A | 1000 | 200 |
| B | 1500 | 300 |
- The
Metric Summary Tableswitch should be configured before dataset learning. For datasets that have already been learned, trigger learning again to ensure the transpose rule takes effect. - If the dataset does not contain a
metric dimensionfield, enabling this switch has no actual effect.
Recommend Dashboard
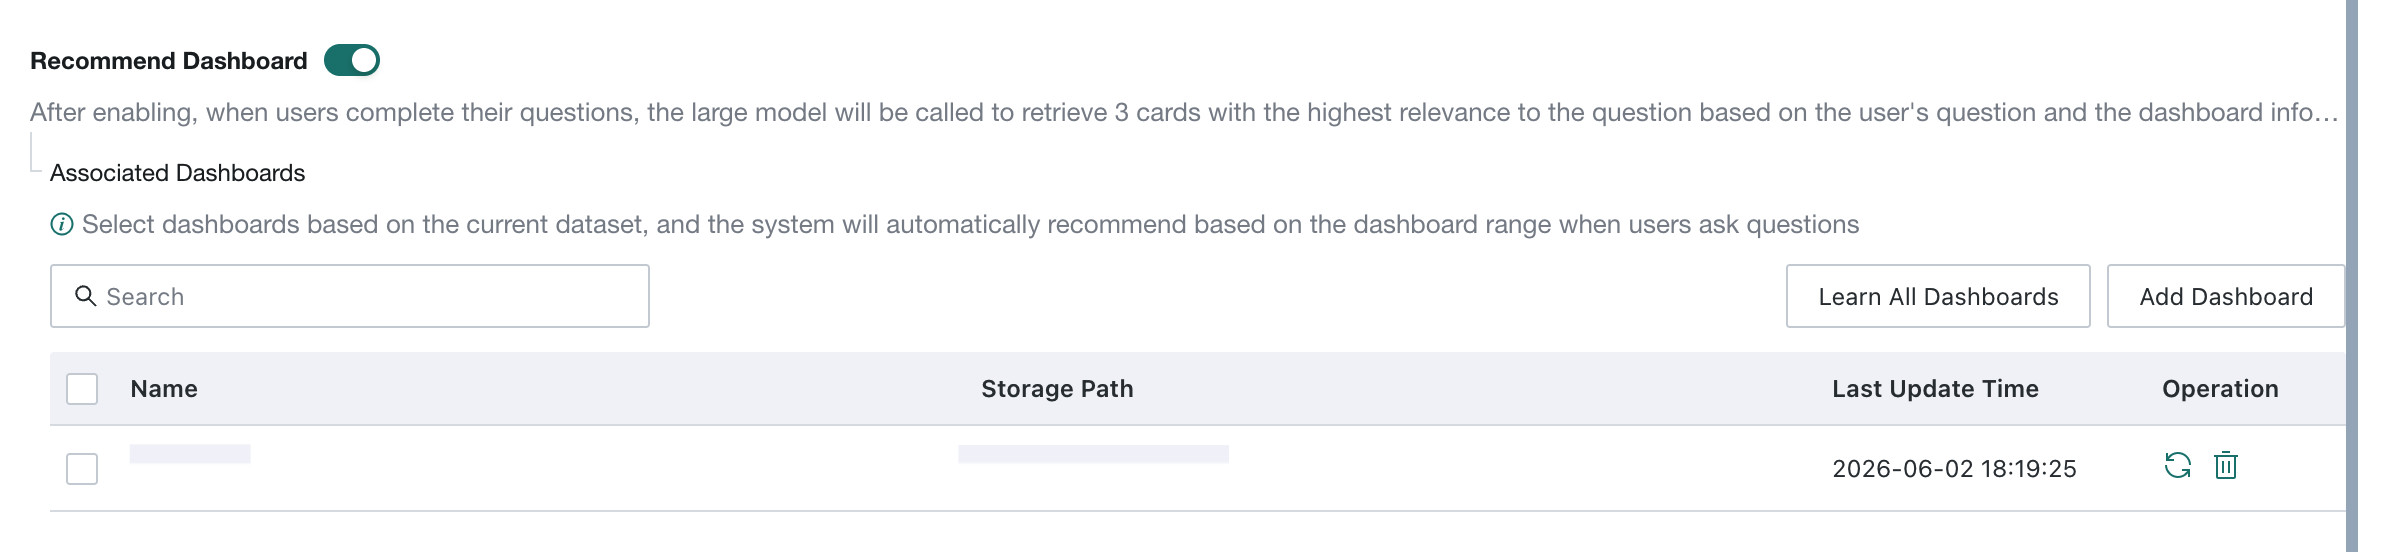
Recommend Dashboard intelligently matches user questions with dashboards already associated with the agent. It is disabled by default.
After the feature is enabled, when an end user completes a question, the system uses the LLM together with the user question and the preconfigured dashboard scope to recommend up to three highly relevant analysis cards. This helps guide users into deeper data exploration.
Feature Switch
- After an agent is created, the
Recommend Dashboardfeature can be enabled or disabled on theAgent Detail Settings > Basic Informationpage. - After it is disabled, related learning tasks can still be triggered, but dashboard card recommendations are no longer shown when users ask questions.
Set the Recommendation Scope (Related Dashboards)
- Add dashboards: click
Add Dashboardon the right to manually select one or more dashboards from the existing list and include them in the recommendation scope. The system then searches only within that scope for relevant cards.- Manage added dashboards:
- Search: when the list is long, enter keywords in the
Searchbox at the top to quickly locate a dashboard. - Remove: find the target dashboard in the list and click the
Deleteicon (🗑️) under theActionscolumn to remove it from the recommendation scope. - Learn: click the learning icon (♻️) in the list to relearn the current dashboard.
- Search: when the list is long, enter keywords in the
- Manage added dashboards:
- Learn all dashboards: click this button to relearn all dashboards in the list. Relearning everything can take a long time and incurs additional model usage, so use it cautiously.
- Batch operations: available when dashboards are selected
Learn Selected: relearn the selected dashboards.Delete Selected: remove the selected dashboards in batch.
Notes
- The currently selectable dashboards are all dashboards the user has permission to access, regardless of whether they were built on datasets added to the current agent. However, for better recommendation quality, we recommend selecting dashboards built on datasets already added to the current agent.
- Dashboard learning is triggered only when dashboards are added or manually relearned. If dashboards are updated after being added, relearn them to avoid inaccurate recommendations.
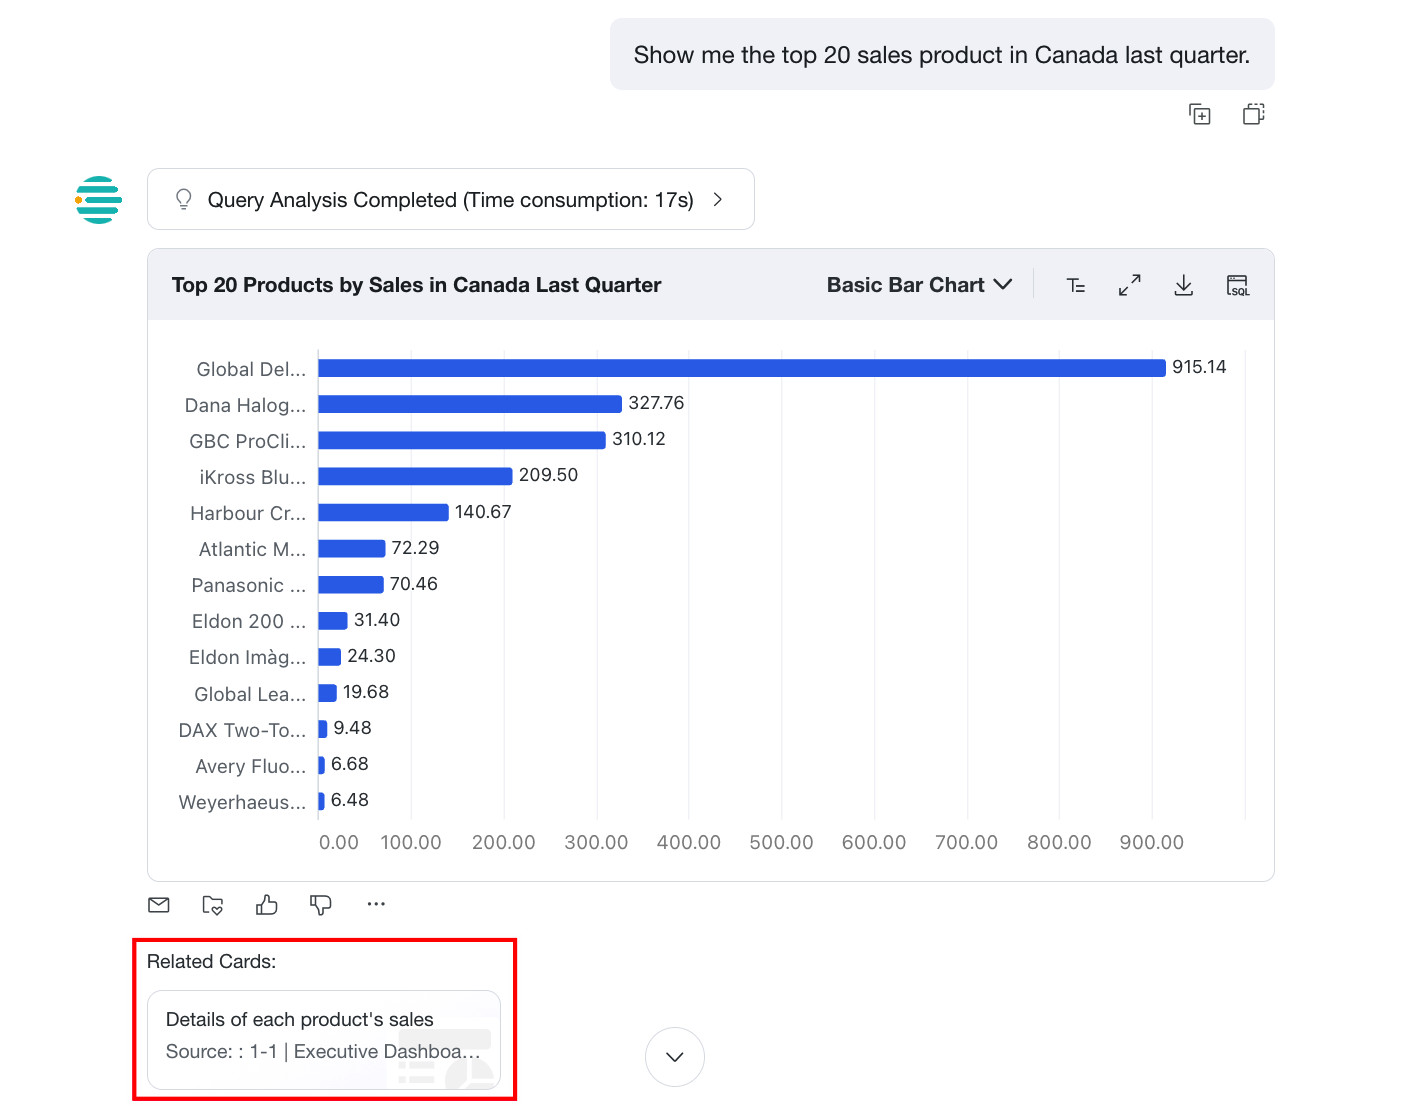
Display Effect
After a user gets a direct answer, the system displays three cards related to the question. Clicking a card jumps directly to the corresponding dashboard card. If a recommendation is inaccurate, users can click Not Interested to provide feedback, and the algorithm will continue optimizing based on that feedback.
- If the user question is not related to any dashboard cards associated with the current agent, no recommended cards are shown.
- This feature is currently not supported on mobile.
Feature Switch Settings
On the Basic Information page, click the Feature Switch Settings tab to enter the feature switch settings page. The following sections explain each switch in detail.
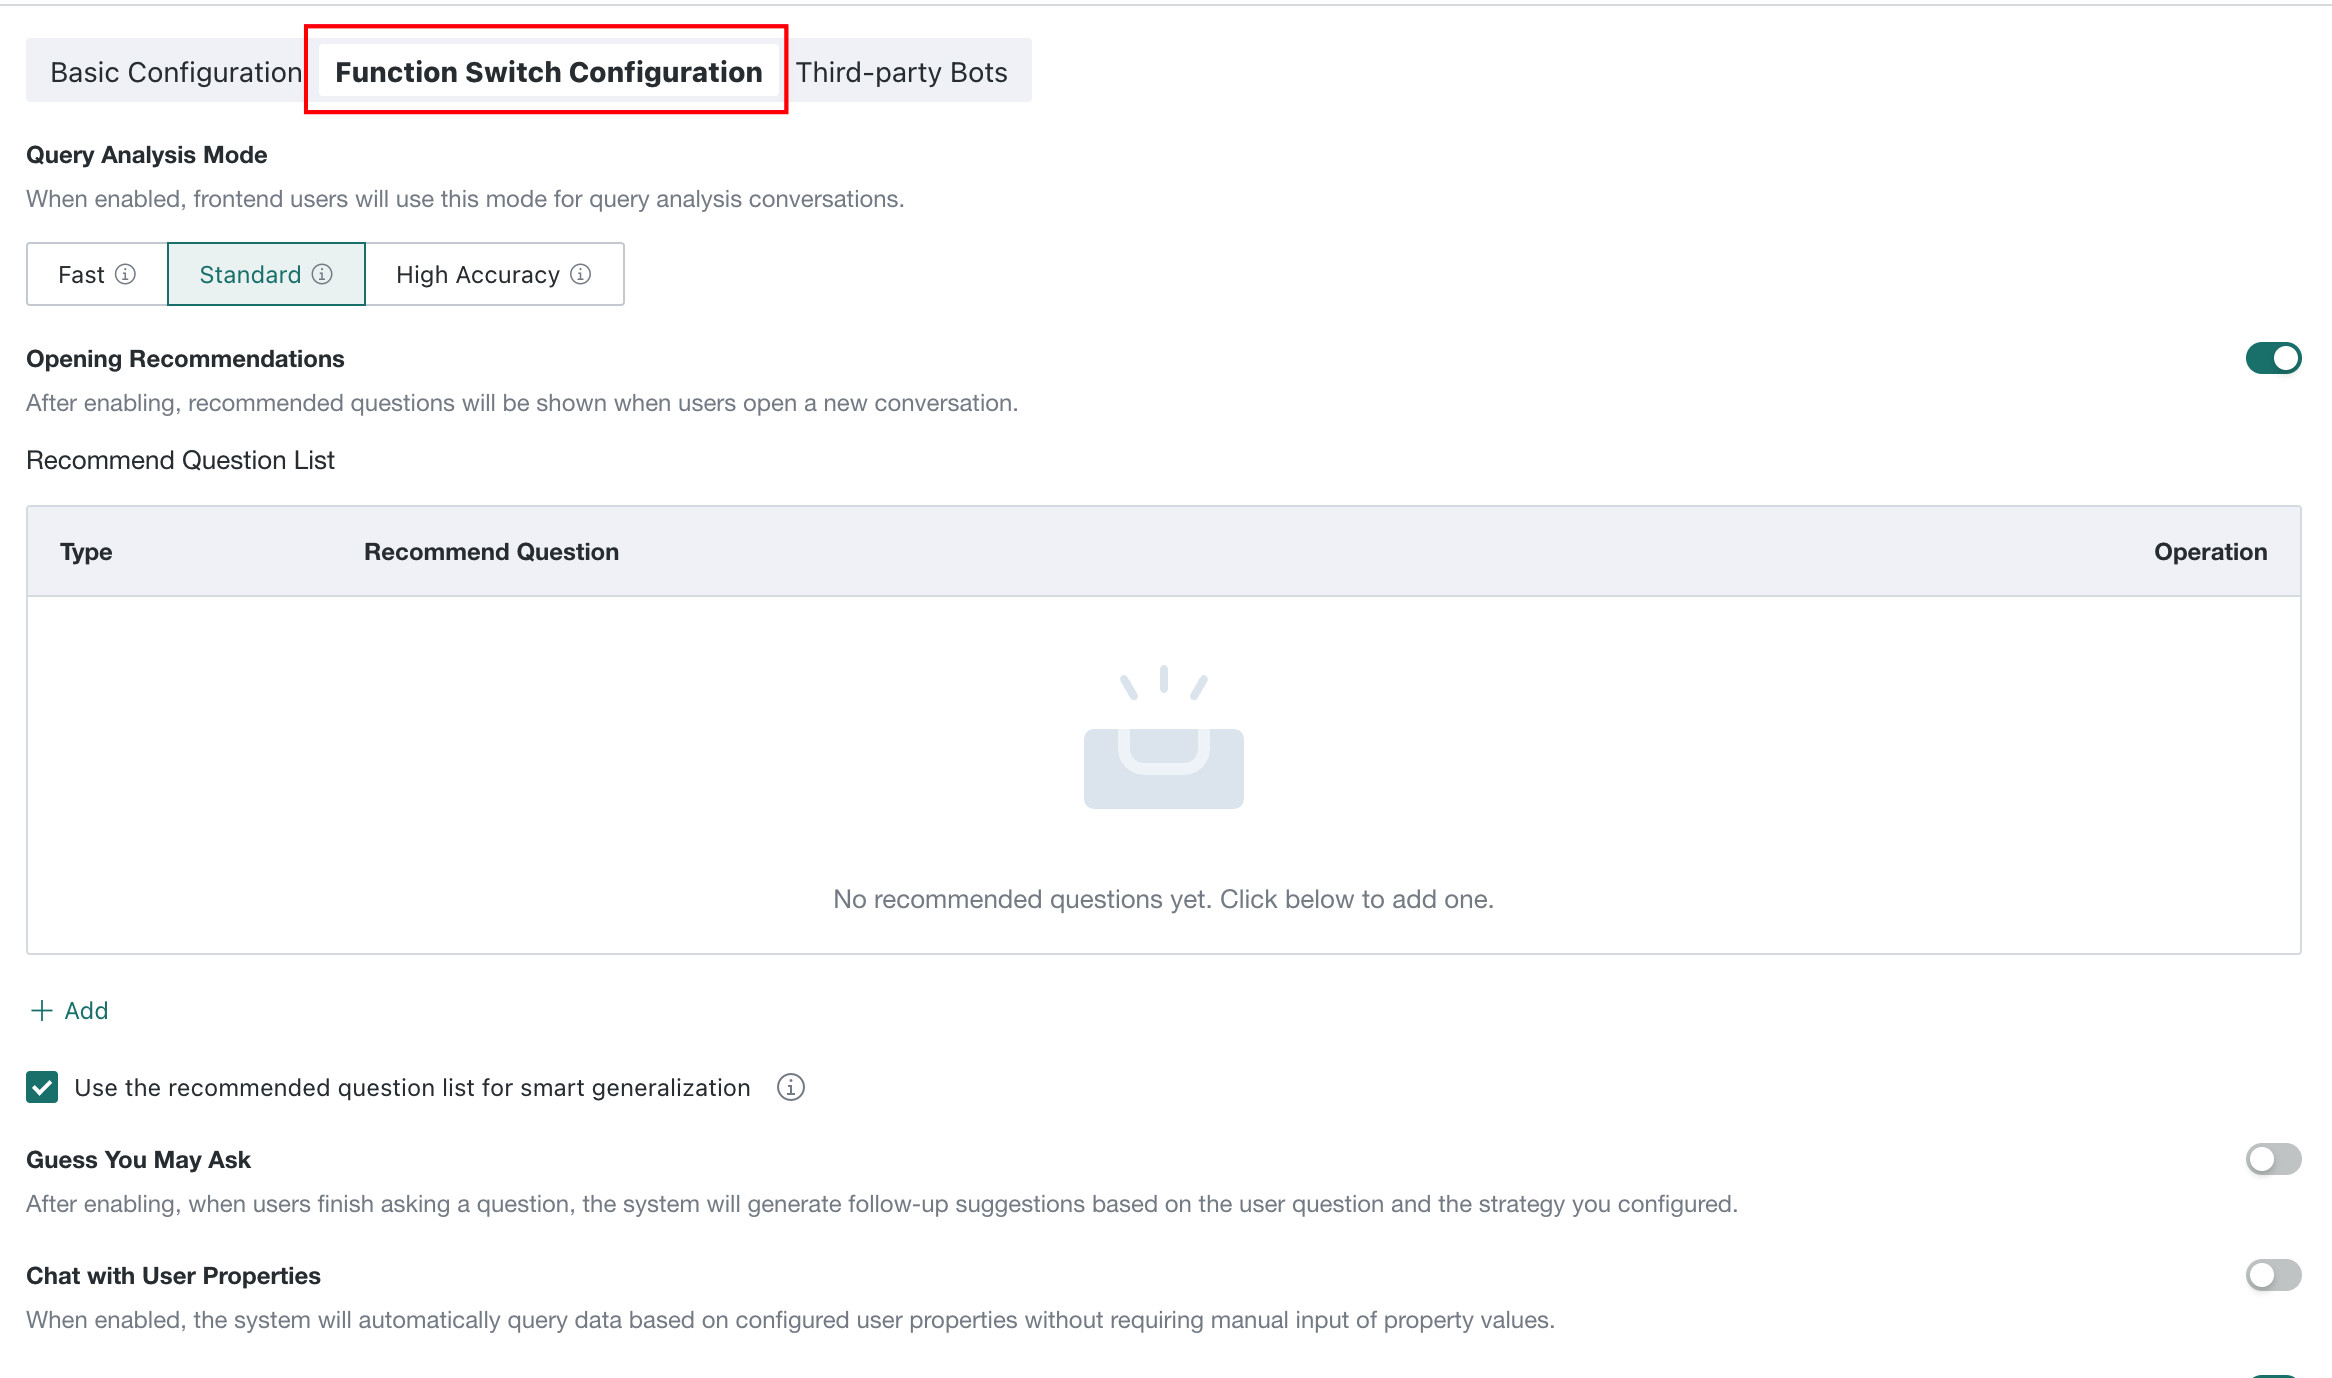
Query Analysis Mode
Query Analysis Mode determines which answer-processing mode is used when frontend users perform query analysis. The following three modes are supported:

| Mode | Description |
|---|---|
| Fast | Fastest response speed, suitable for simple query scenarios. After Fast mode is enabled, intelligent visualization is disabled by default. Query results are output only as tables, and numbers are displayed with two decimal places and thousand separators.If visualization is needed in Fast mode, enable Fast mode visualization on the Agent Management > Management Center > Feature Switch Settings page. |
| Standard | Balances response speed and answer quality. This is the default mode. |
| High Accuracy | Best answer quality, suitable for complex analysis scenarios. If High Accuracy mode is selected, the system automatically generates multiple SQL statements for each frontend question and cross-validates them with LLM capability, then executes the SQL with the highest confidence to improve accuracy. |
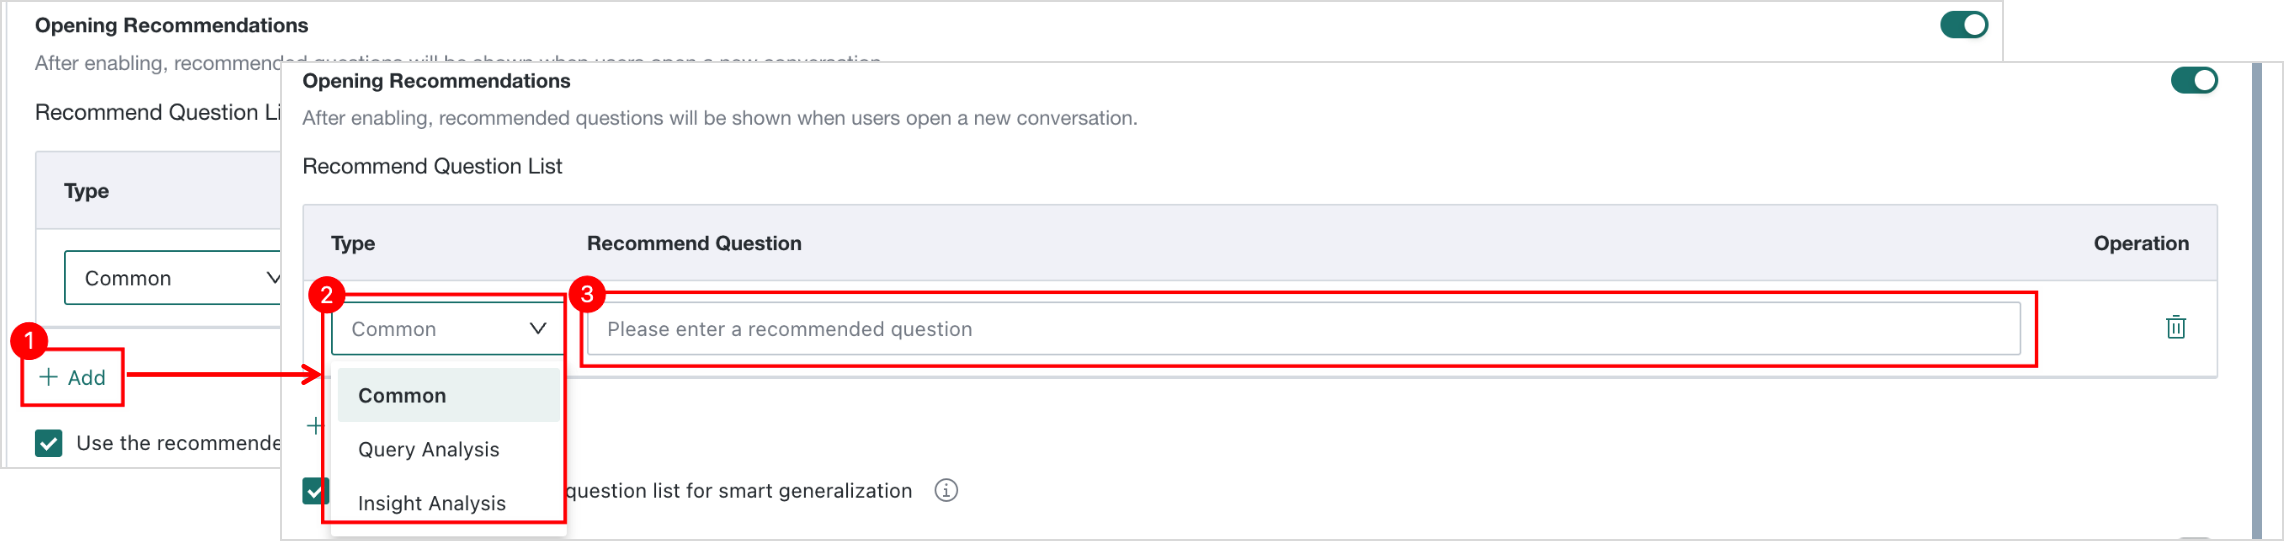
Opening Recommendations
After it is enabled, recommended questions are displayed when the user opens a new conversation. Different recommendations can be configured separately for L1 Query and L2 Insight.
Add Recommended Questions
Click Add below, then select the question type and fill in the question description in the dialog.
Up to 20 recommended questions are supported. When the limit is exceeded, the Add entry is no longer displayed.
Choose Whether the Model Can Generalize the Recommended Questions
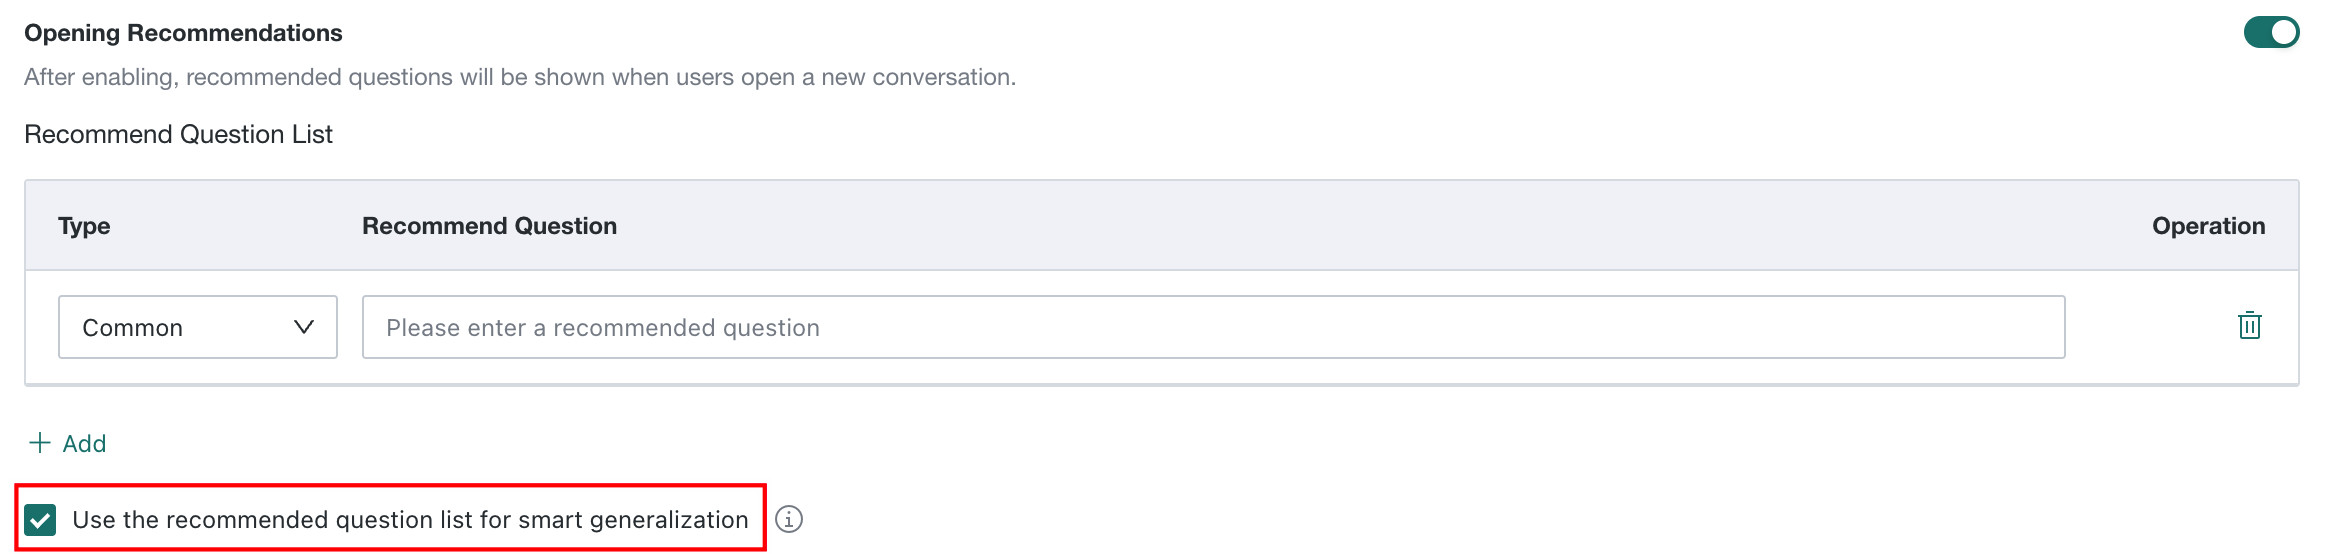
| Switch Status | Question Type | Description | Display effect |
|---|---|---|---|
| Disabled | Fixed Question | After configuration, the frontend directly displays fixed recommended questions when users start a new conversation. The model does not regenerate or rewrite them. | Display fixed recommended questions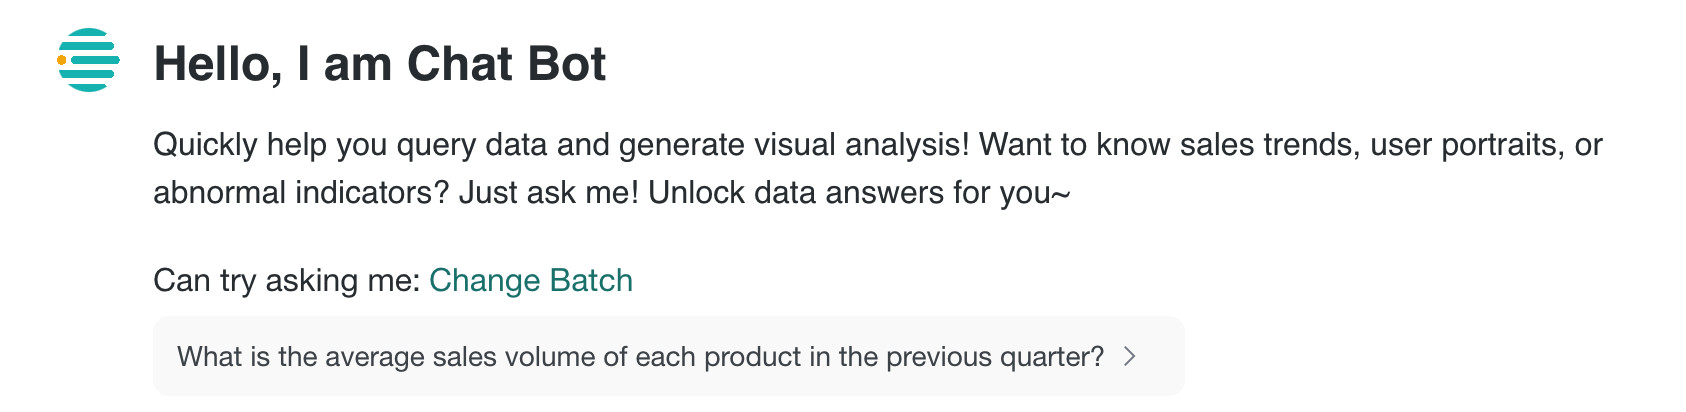 |
| Enabled | Model-Generalized Question | After configuration, when the user opens a new conversation, the LLM automatically generates three recommended questions based on the configured examples, user history, user attributes, and dataset structures in the current agent. | LLM automatically generates 3 recommended questions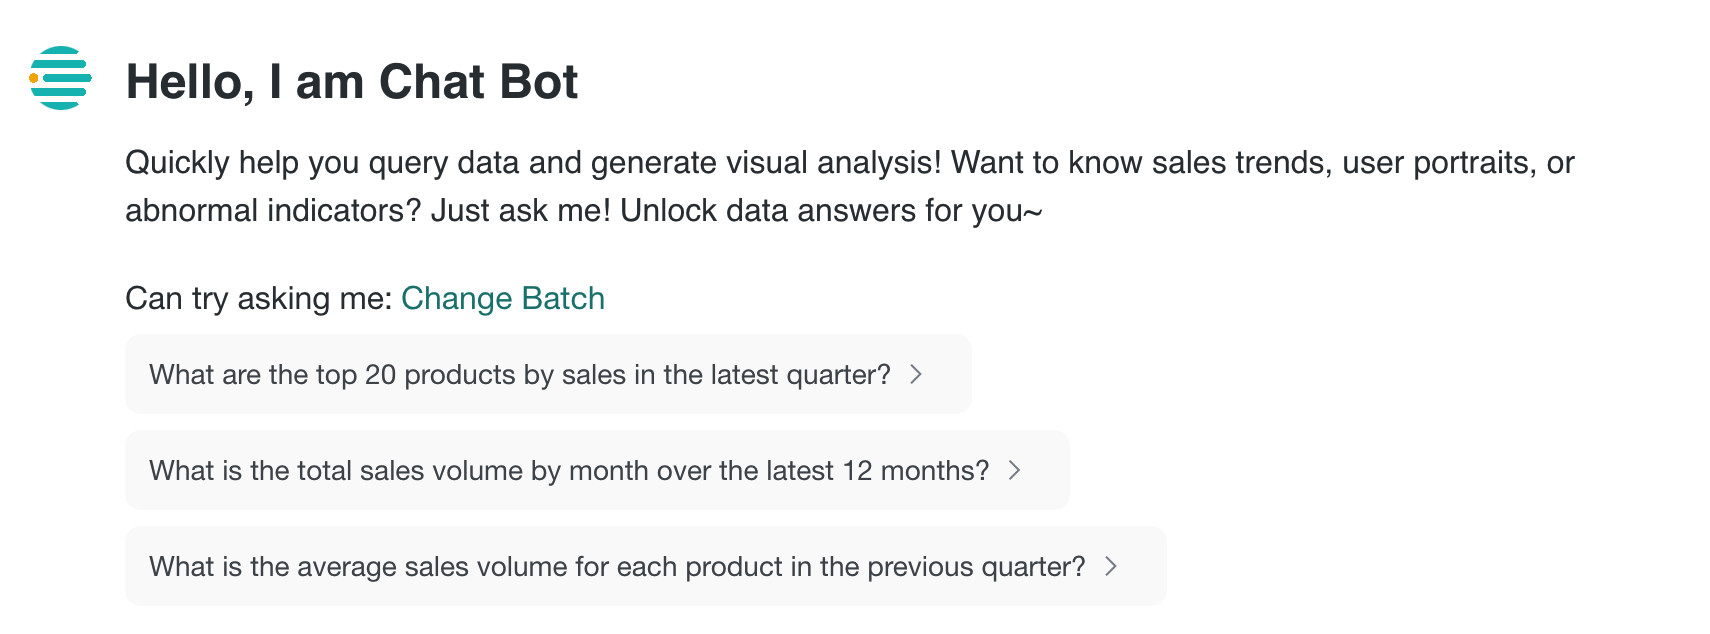 |
Guess You May Ask
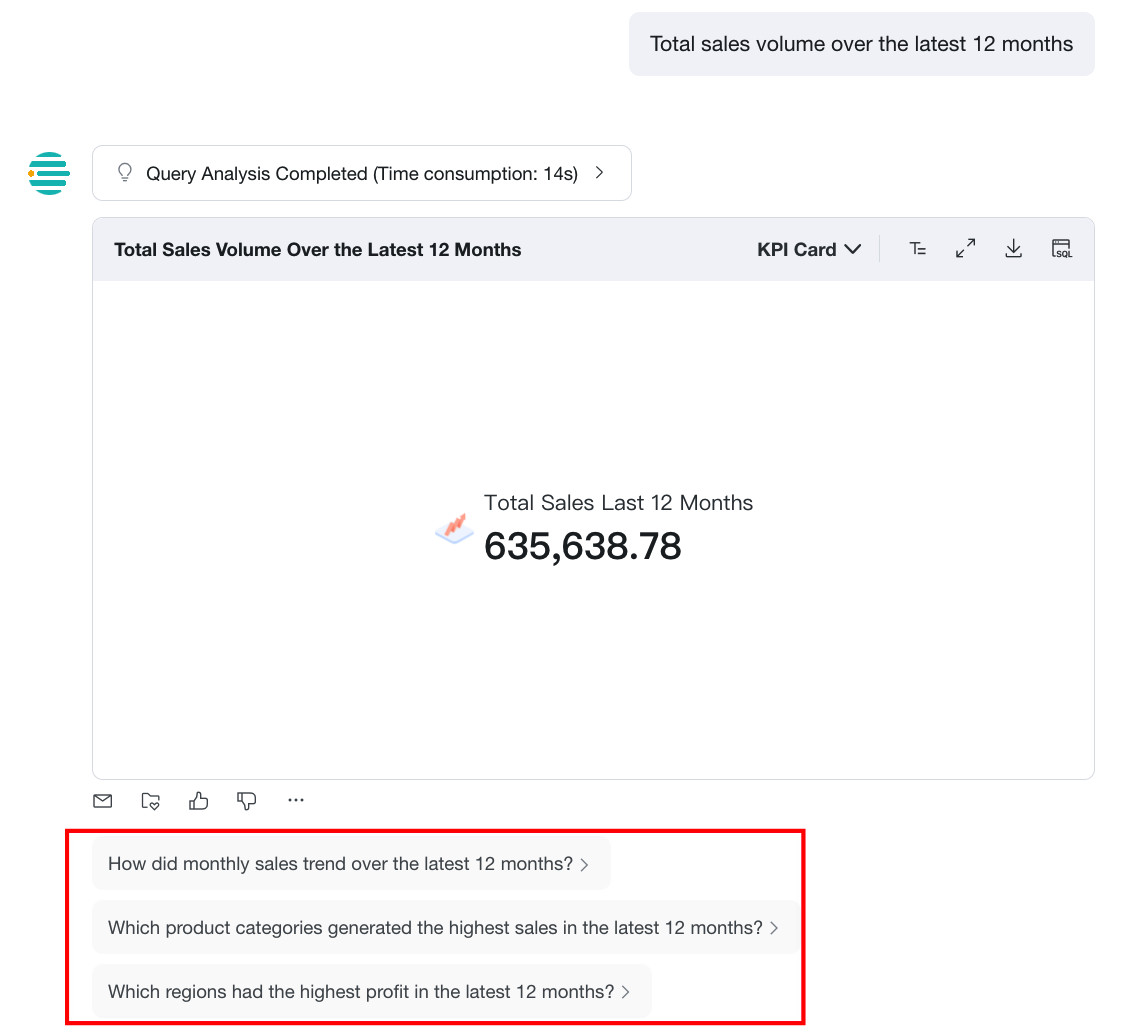
Administrators can define recommendation logic for Guess You May Ask. After a user question is completed, the system references the current question and the configured strategy to generate follow-up questions that the user may be interested in.
Guess You May Ask supports cases where standard Query returns table or chart results. It does not support:
- analysis results in
Insightmode - single-value query results, including single values presented as text
For example, administrators can define a strategy such as "When users analyze sales-related data, recommend questions related to revenue and gross profit metrics." The system will then generate guiding questions according to that strategy.

Display effect: when a user asks about monthly sales, the system automatically recommends related questions such as revenue and cost after returning the main result.
Inject User Attributes into the Q&A Process
After Inject User Attributes into the Q&A Process is enabled, the system passes the current user's attribute values to the model when the user asks a question. The model then uses those attributes to generate SQL more accurately. For example, if a user asks What is my sales amount?, the system can automatically apply the current user's region or store ownership attributes without requiring the user to specify those filters explicitly.

Prerequisites
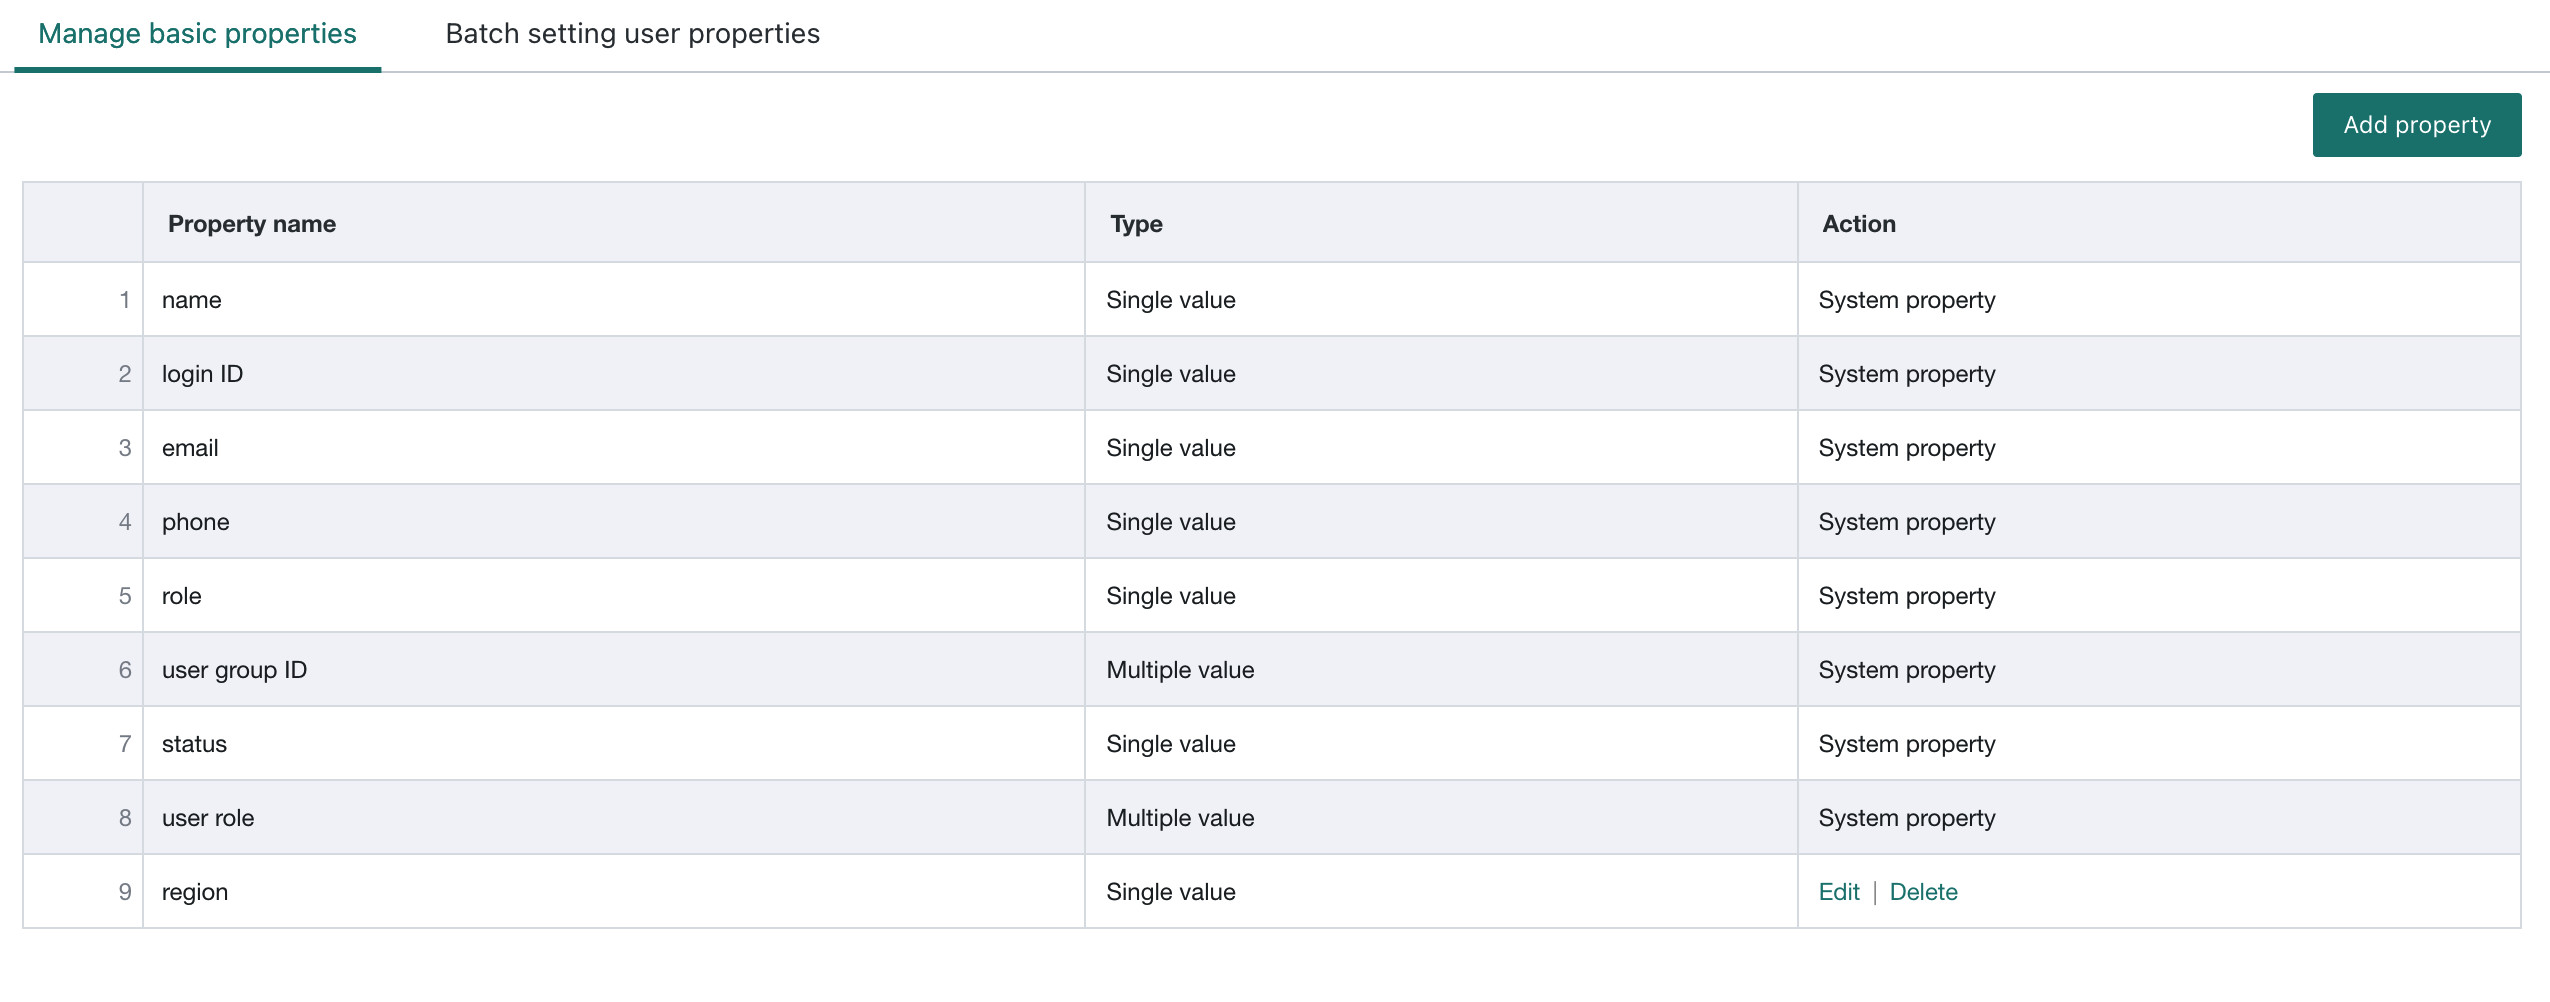
Before using this feature, make sure User Basic Attributes have already been configured in the BI Management Center. These include built-in attributes such as name, email, and mobile phone number, as well as administrator-defined attributes.
-
For basic attribute management, see BI Platform User Basic Attribute Management.
-
To configure user attributes: in BI
Management Center > User > Basic Info, edit user attributes.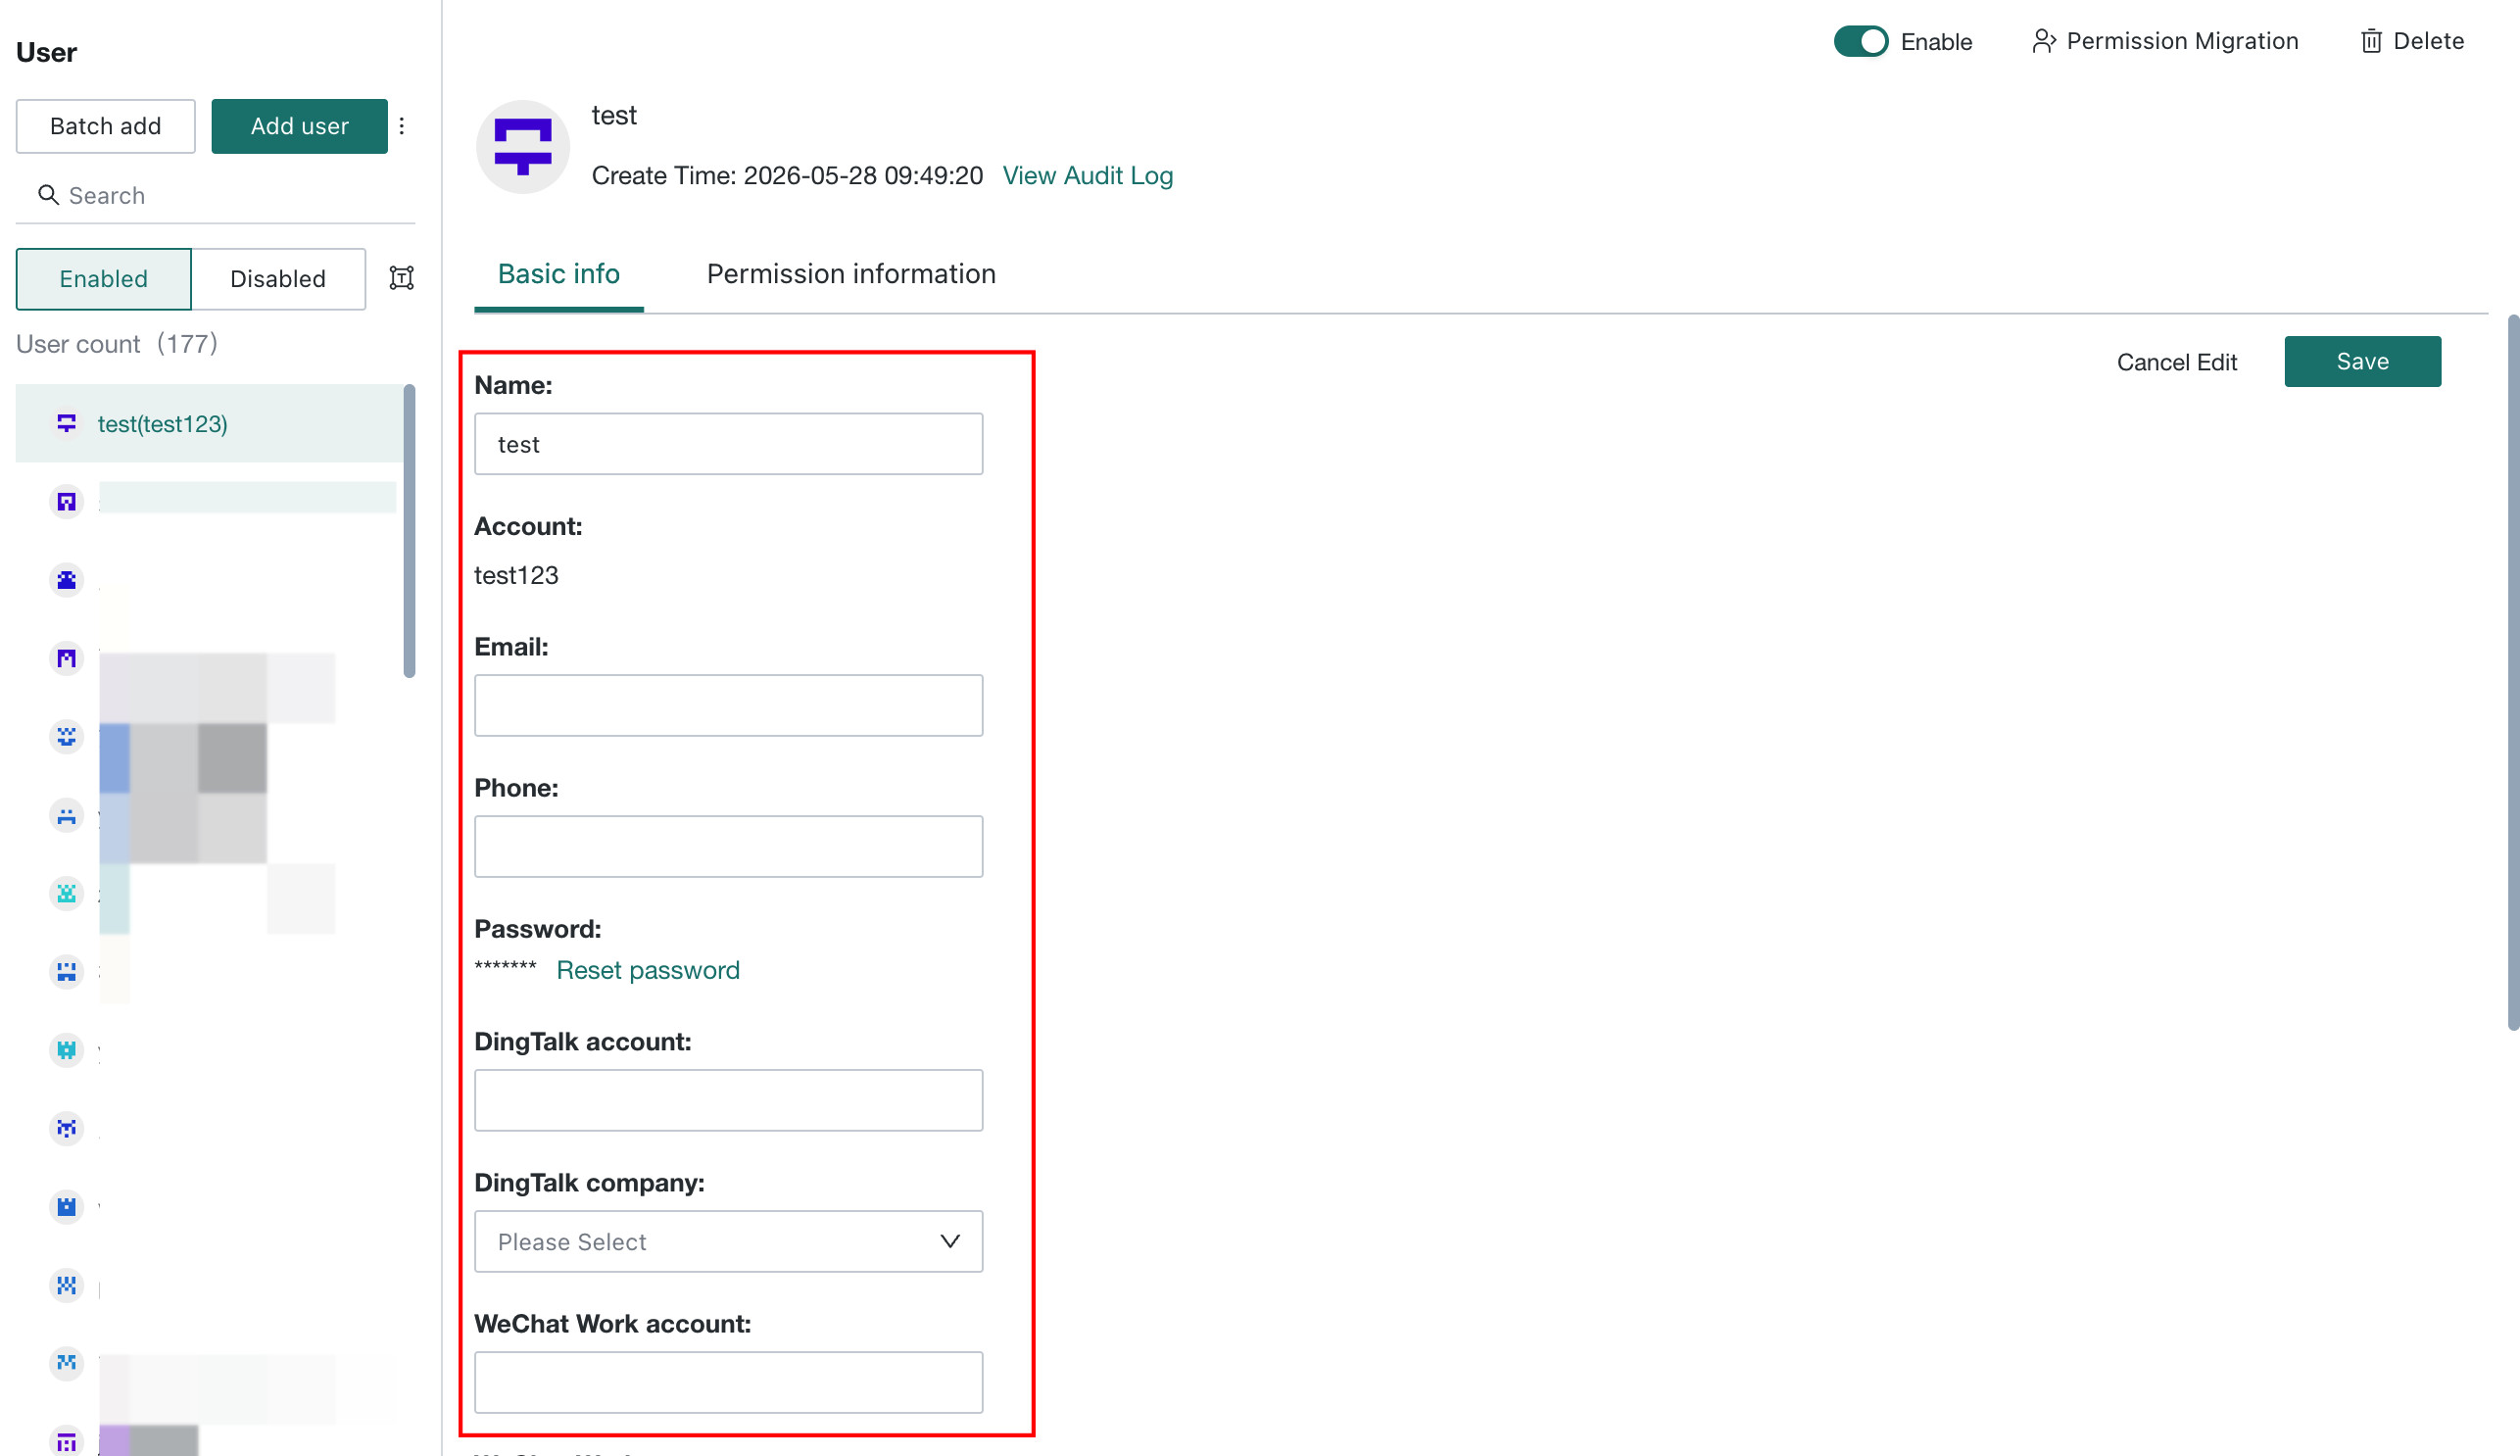
Configuration and Effect
- On the
Feature Switch Settingspage, find and enableInject User Attributes into the Q&A Process. - After it is enabled, the system automatically injects the current logged-in user's attribute information into the Q&A workflow.
- When generating SQL, the LLM automatically applies the related filter conditions based on user attributes, improving personalization and accuracy.
- If user attributes are not configured or attribute values are empty, this feature does not take effect and Q&A continues using the standard logic.
Notes
- User attribute configuration and management must be completed in the BI platform under
Management Center > User Management > UserandManagement Center > User Management > User Basic Attribute Management. - This feature depends on the BI platform's user attribute system. If the required user attributes are not configured in BI
Management Center, the switch has no effect after being enabled. - Before using this feature, verify that target user groups have correct attribute values maintained.
Automatic Number Units
After this feature is enabled, the system automatically chooses units such as ten-thousand and hundred-million based on the numeric value. If scaling has already been calculated in the dataset, do not enable this feature.

If scaling has already been handled in the dataset, do not enable this feature, or the displayed unit may be converted twice.
Example: suppose the dataset already uses ten-thousand as the scaling unit, and the original value 200000000 yuan is displayed as 20000 ten-thousand yuan after calculation. If Automatic Numeric Scaling is enabled again, the system will rescale 20000 and display it as 2 ten-thousand ten-thousand yuan, resulting in incorrect output.
Sample Matching
After this feature is enabled, when a user asks a question, the system automatically matches the question against the sample set. If a highly similar sample is found, the system rewrites SQL based on the correct SQL in the sample set to improve answer accuracy.
Personalized Fixed Reply
After this feature is enabled, when a user question involves unauthorized data, the system directly returns the fixed reply message without executing the query, avoiding empty results or free-form generalization by the LLM.
Prerequisites
Inject User Attributes into the Q&A Process must be enabled on this page. The system relies on user attributes to determine whether a question exceeds authority.
Usage Guidance
Create Reply
Click Create Reply to configure fixed reply rules:
- **Reply **: the fixed message returned to users after the trigger rule is matched, e.g., "The current question is beyond your region."
- Rule: set matching rules between user attributes and question content. For example, trigger when the scope mentioned in the question is outside the user's attribute range.
- User Property Names: select a maintained user attribute as the basis for unauthorized-data judgment.
After configuration, click Confirm to save. The rule appears in the rule list.

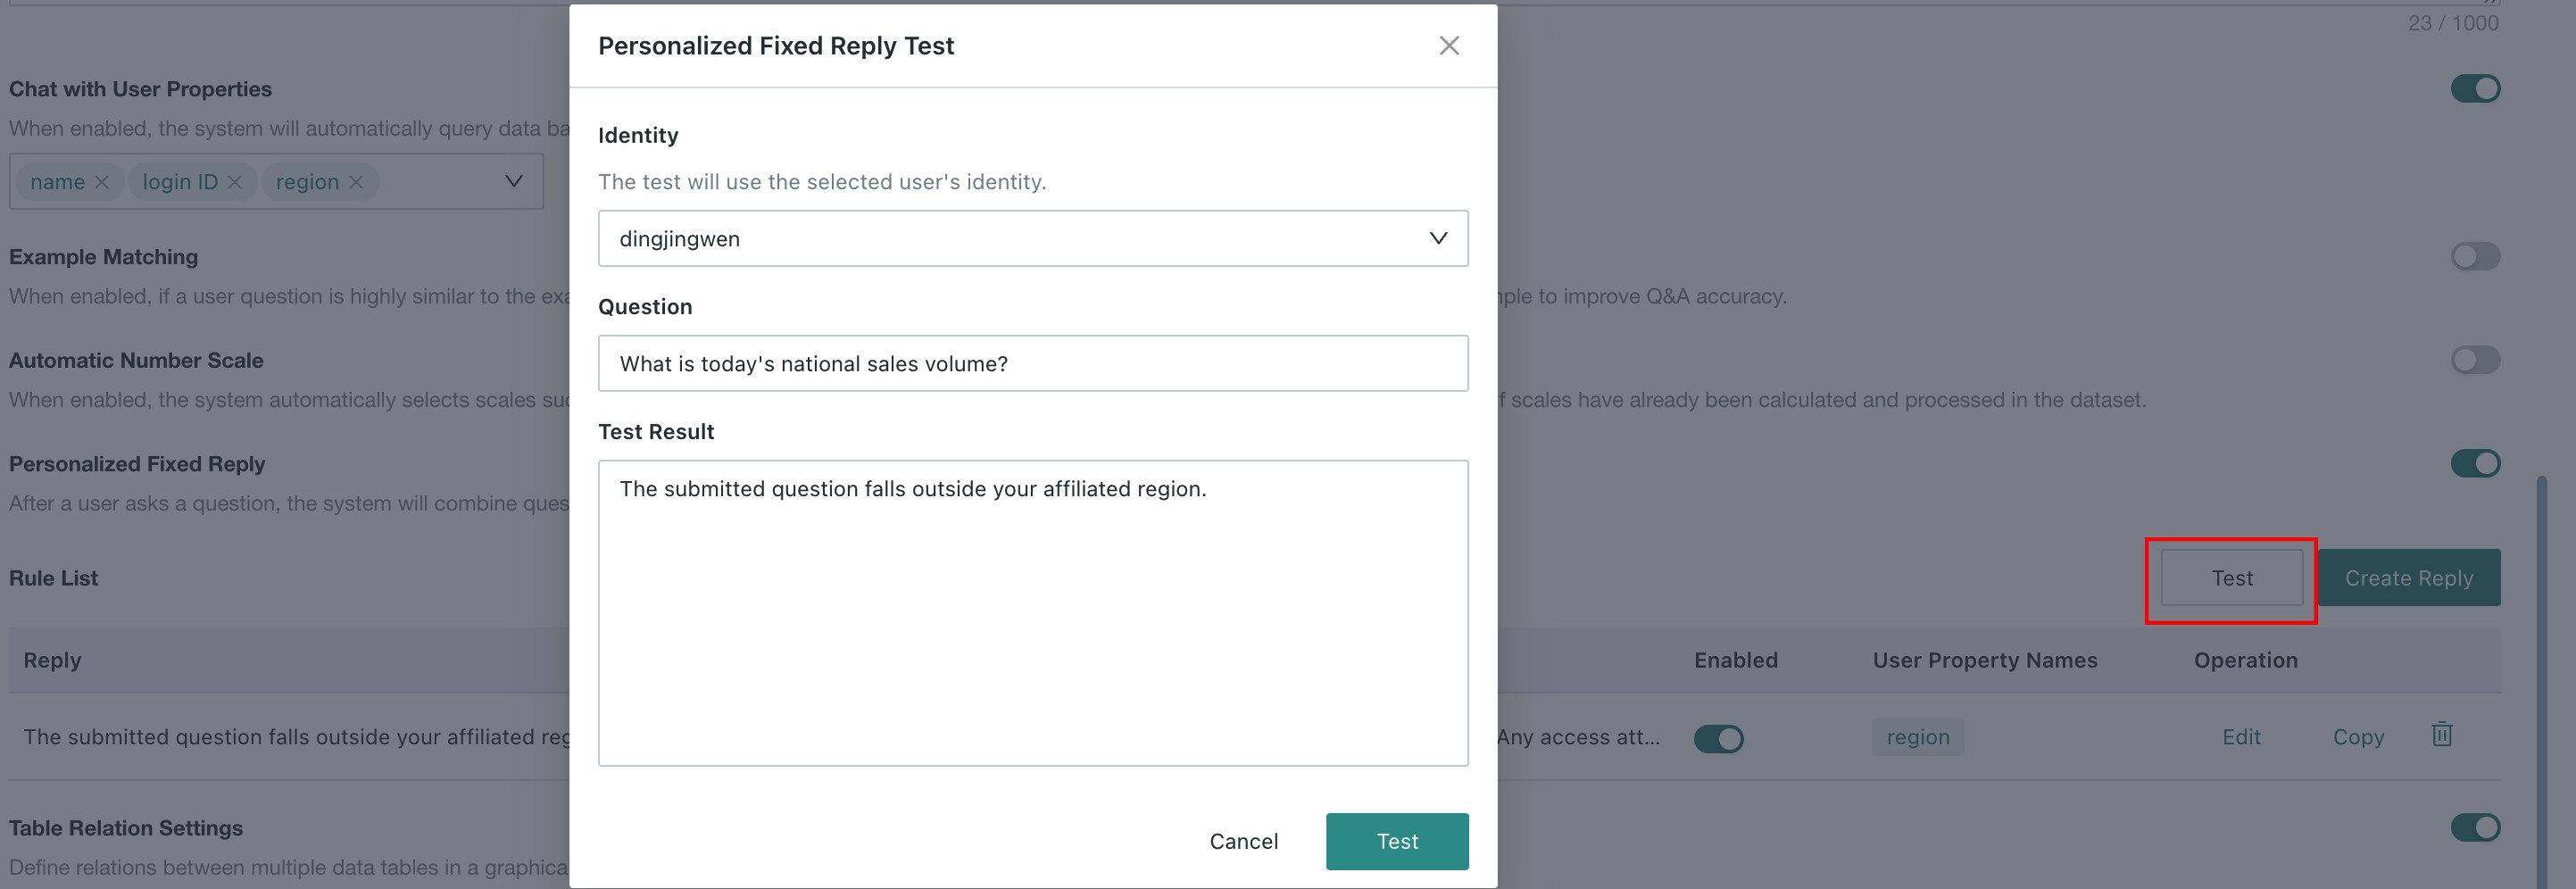
Test Rule
Click Test in the upper-right corner, enter a simulated user question, and check whether the rule is matched:
- Rule matched: the configured reply message is returned.
- Rule not matched: normal Q&A flow continues.
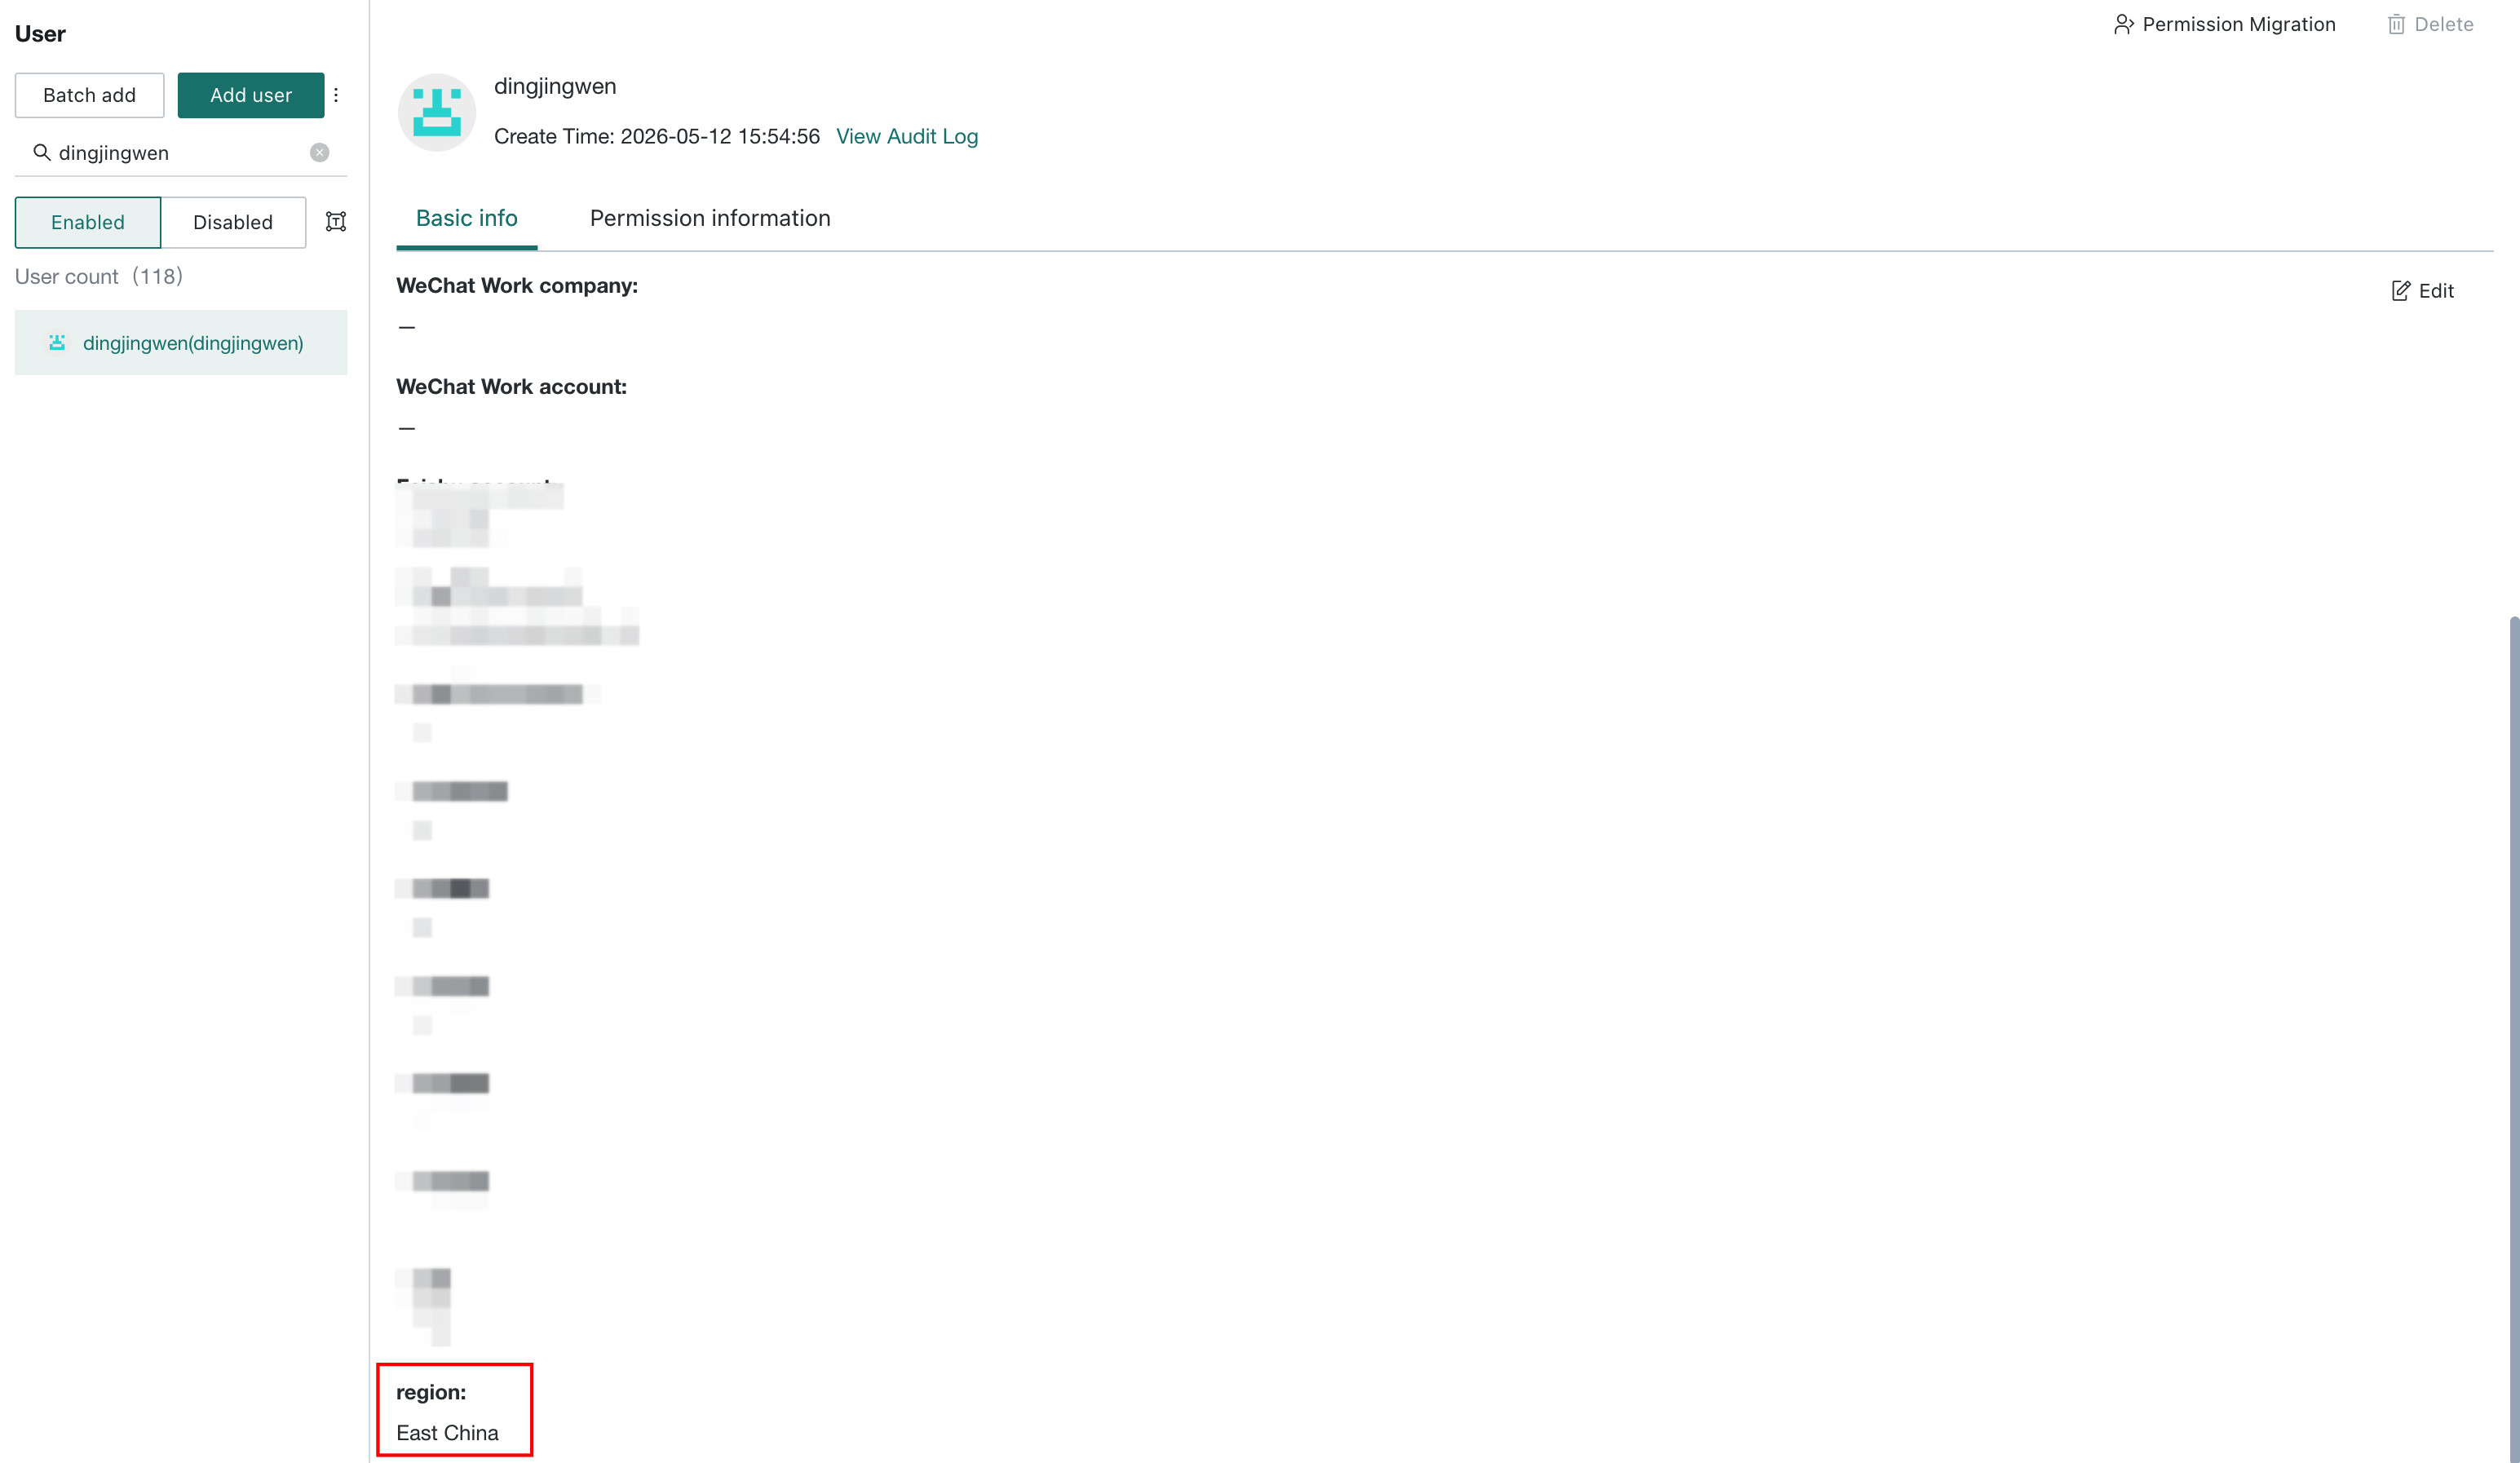
For example: if the current user's region attribute is set to East China, and the user asks "What are the national sales?", the rule is matched and the system returns the configured reply message.
Enable/Disable Rule
Each rule can be enabled or disabled individually:
- Enable: the rule takes effect, and the fixed reply is executed when matched.
- Disable: the rule is temporarily inactive, and questions are still handled by the normal Q&A flow.

Frontend Display Effect
When an end user's question matches an enabled fixed reply rule, the frontend directly displays the configured reply message without querying data.
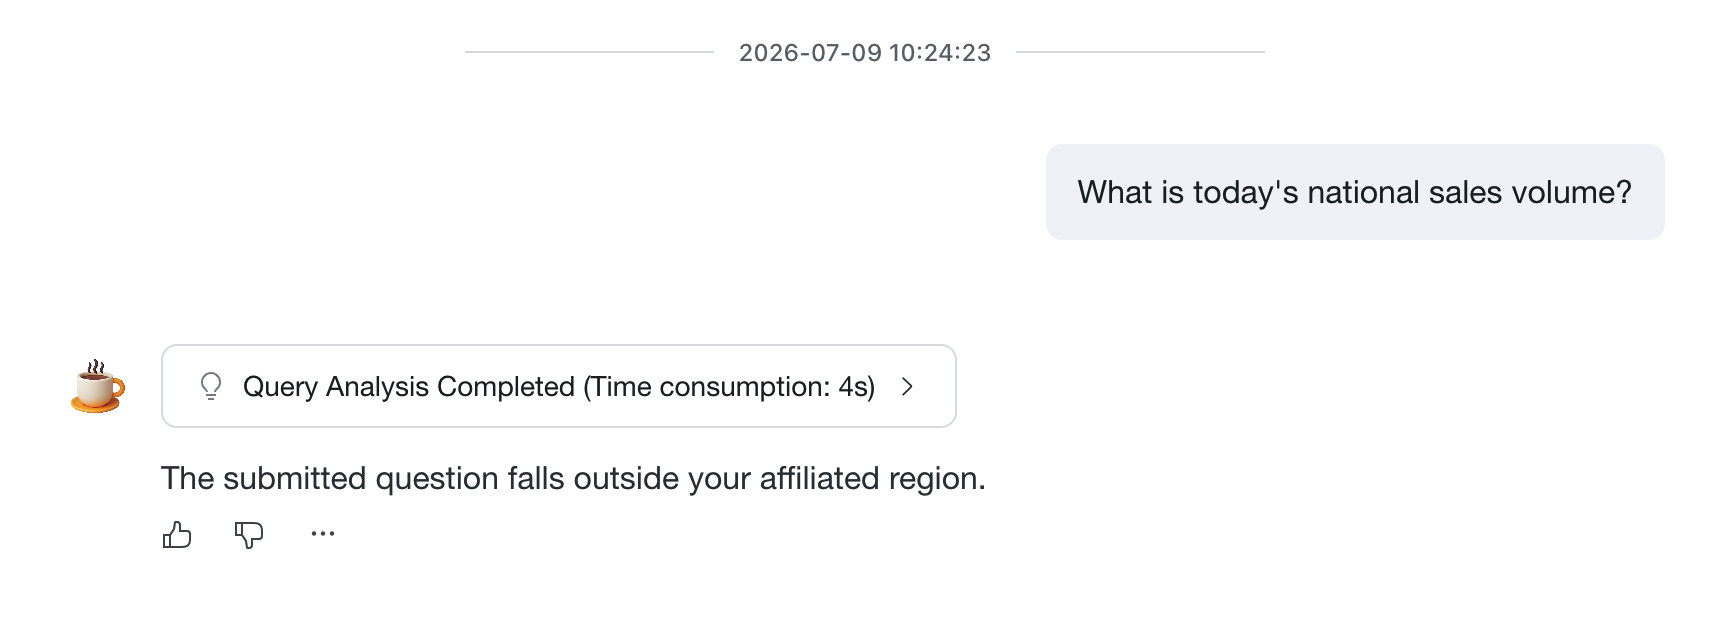
Table Relation Settings
After this feature is enabled, table relationships between multiple data tables can be defined and configured through a graphical interface to support knowledge for multi-table analysis. See Table Relation.

Personalized Memory
After this feature is enabled, the system automatically extracts knowledge mentioned by users during conversations and applies that memory in future Q&A across all agents for the same user. For detail, see Personalized Memory

Insight
After this feature is enabled, users can select the current agent on the Insight Agent page for insight analysis. The LLM uses knowledge base information and tools flexibly to perform data queries and analysis, then generates insight results.
-
Supports
Search Web. After it is enabled, the system is allowed to access the internet and combine the latest public information into answers.
-
Supports
Planning Mode. After it is enabled, theInsight Agentdoes not directly output a report at first. Instead, it confirms the analysis approach with the user before generating the report.
-
Supports
File Upload. After it is enabled, files can be uploaded as analysis input inInsight Analysis. See Upload a File for Analysis.