Data Quality
Overview
Data Quality automatically validates datasets or database tables before their data is used in reports and business analysis. You can create reusable data quality models, define filters and validation rules, trigger validation manually, on a schedule, through an event, or from an Offline Dev task, and review exception details and receive alerts from run instances.
Use Cases
- Check critical tables for common issues such as missing required fields, null values, duplicate values, and invalid enumeration values.
- Validate numeric ranges, string formats, or custom business rules.
- Add quality gates to Offline Dev tasks to prevent invalid data from flowing downstream.
- Continuously monitor data quality through schedules and alerts.
Prerequisites
Before using Data Quality, make sure that:
- You have permission to use the dataset or database table to be monitored.
- To monitor a database table, you also have access to the corresponding data account and table.
- To configure alerts, the notification channels and recipients are available.
- To reference a model in an Offline Dev task, you are the model owner, a collaborator, or a user.
Roles and Permissions
Your platform role determines whether you can create and manage data quality models. Your model role determines which operations you can perform on a specific model.
Platform Roles
| Platform Role | Available Capabilities |
|---|---|
| Administrator | Can view all objects available for monitoring and create, maintain, and run models within their permission scope. |
| Regular User | Can view and monitor datasets or database tables they are authorized to use and maintain models within their permission scope. |
| Read-Only User | Can only view models, instances, and run results by default. |
Model Roles
| Operation | Owner | Collaborator | User |
|---|---|---|---|
| View details | Supported | Supported | Supported |
| Edit the model | Supported | Supported | Not supported |
| Configure schedules and alerts | Supported | Supported | Not supported |
| Run the model | Supported | Supported | Supported |
| Reference the model in Offline Dev | Supported | Supported | Supported |
| Delete the model | Supported | Not supported | Not supported |
| Manage model roles | Supported | Not supported | Not supported |
The model creator automatically becomes its only owner. Ownership can be transferred, but owners cannot be added or removed. A collaborator can be an administrator or regular user. A user can be an administrator, regular user, or read-only user.
View and Find Models
On the Data Quality Model list, you can view each model's name, monitored object, number of rules, schedule status, alert status, most recent run time, and last modified time.
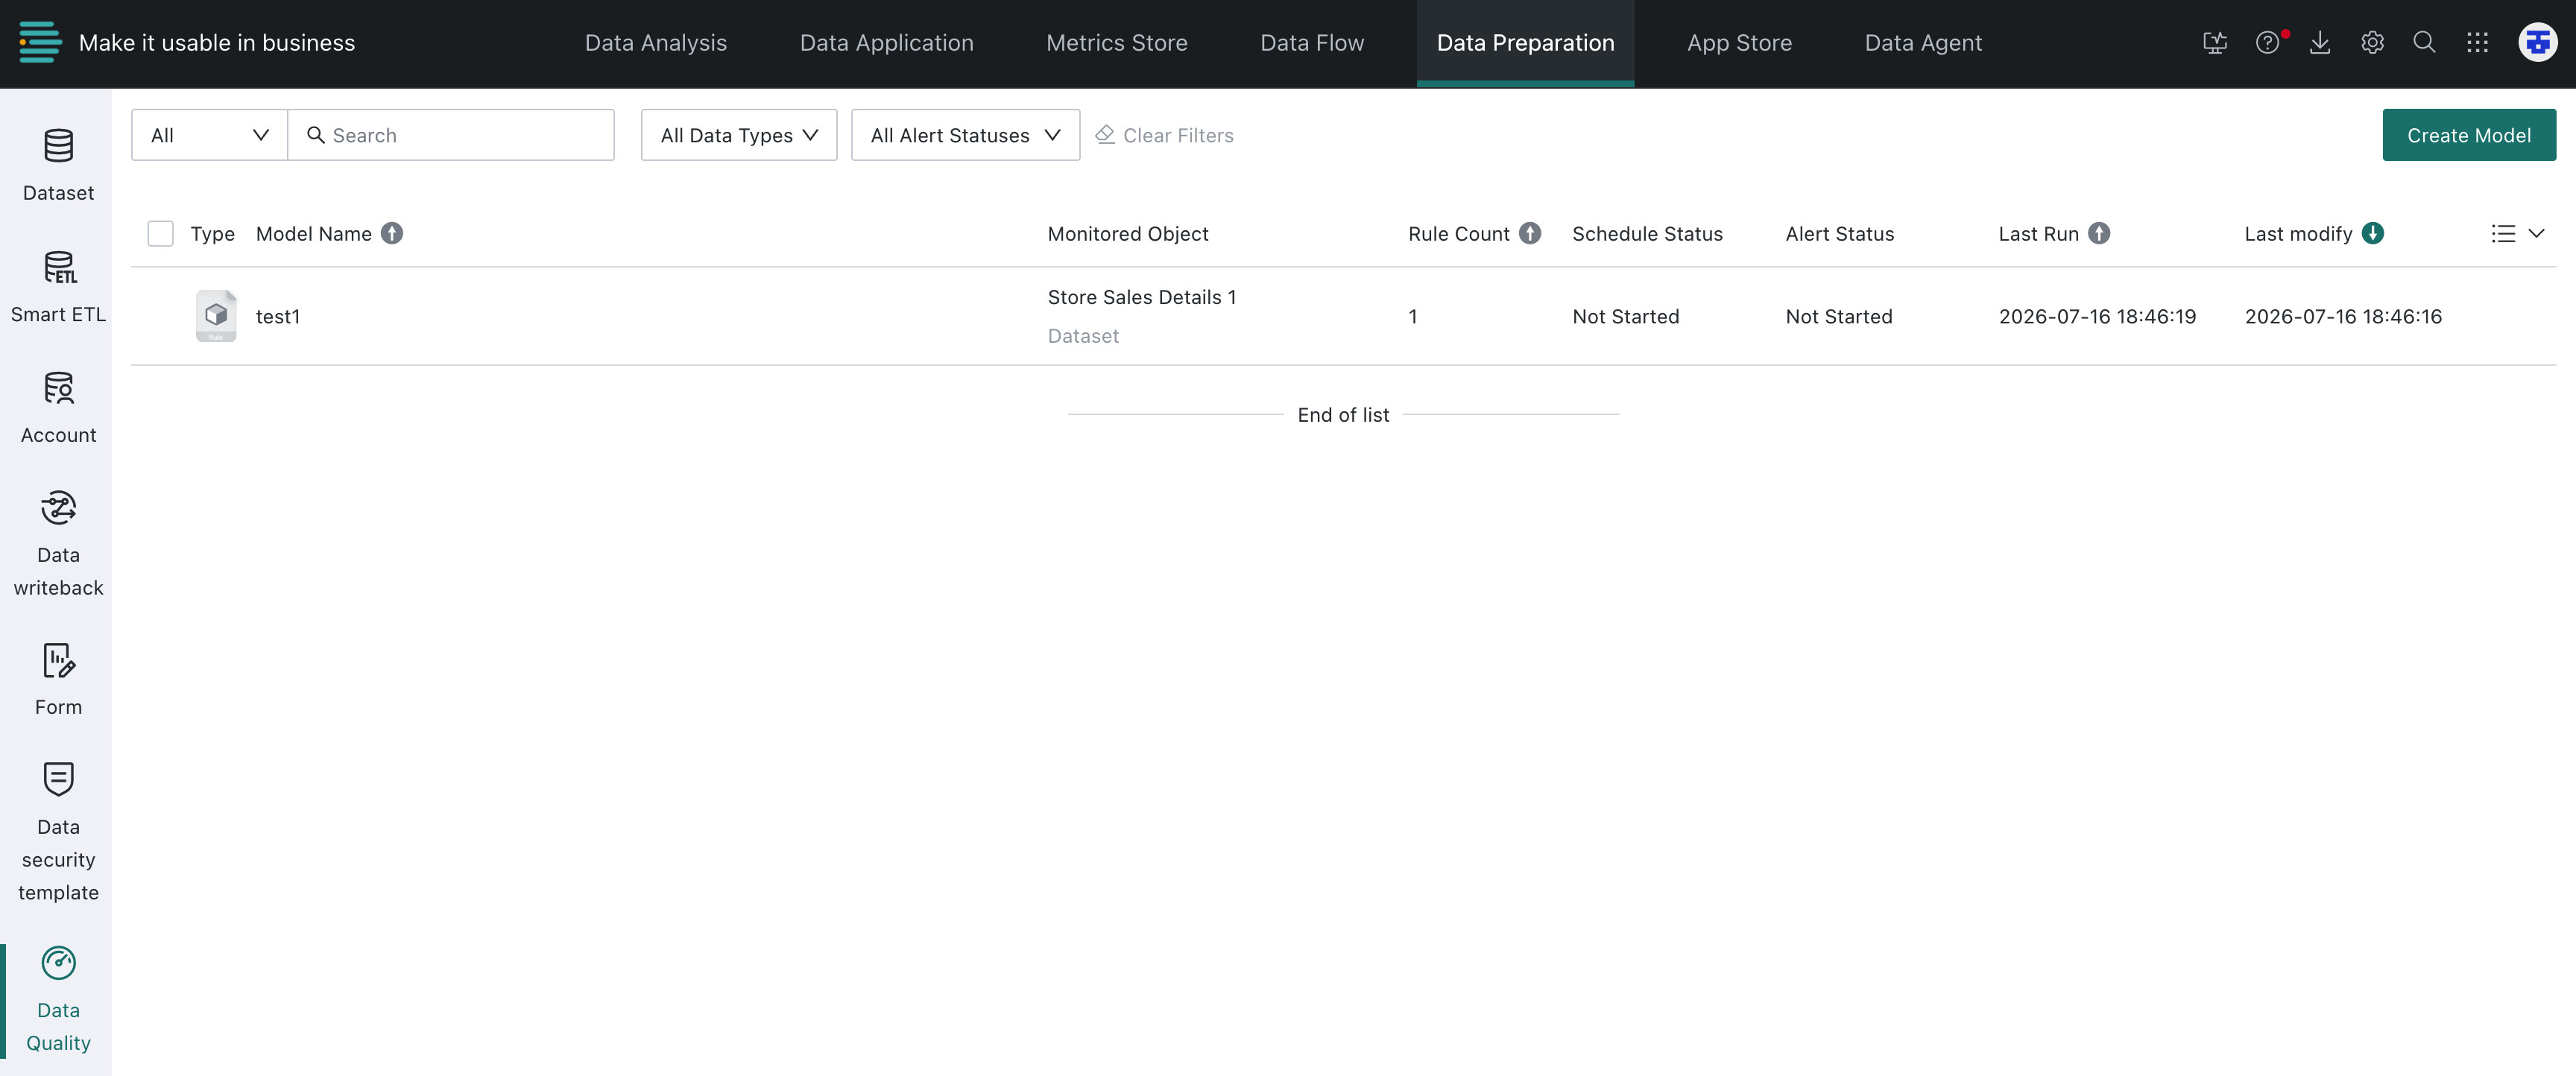
You can:
- Search approximately by model name or monitored object name.
- Filter by monitored object type, alert status, or last modified time.
- Sort by the most recent run time or last modified time.
- Scroll to the bottom of the list to load more data.
- Click a model name to open its details, or use the actions to edit or run the model and view its instances.
- Click
Clear Conditionsto restore the default filters and sorting.
Create a Data Quality Model
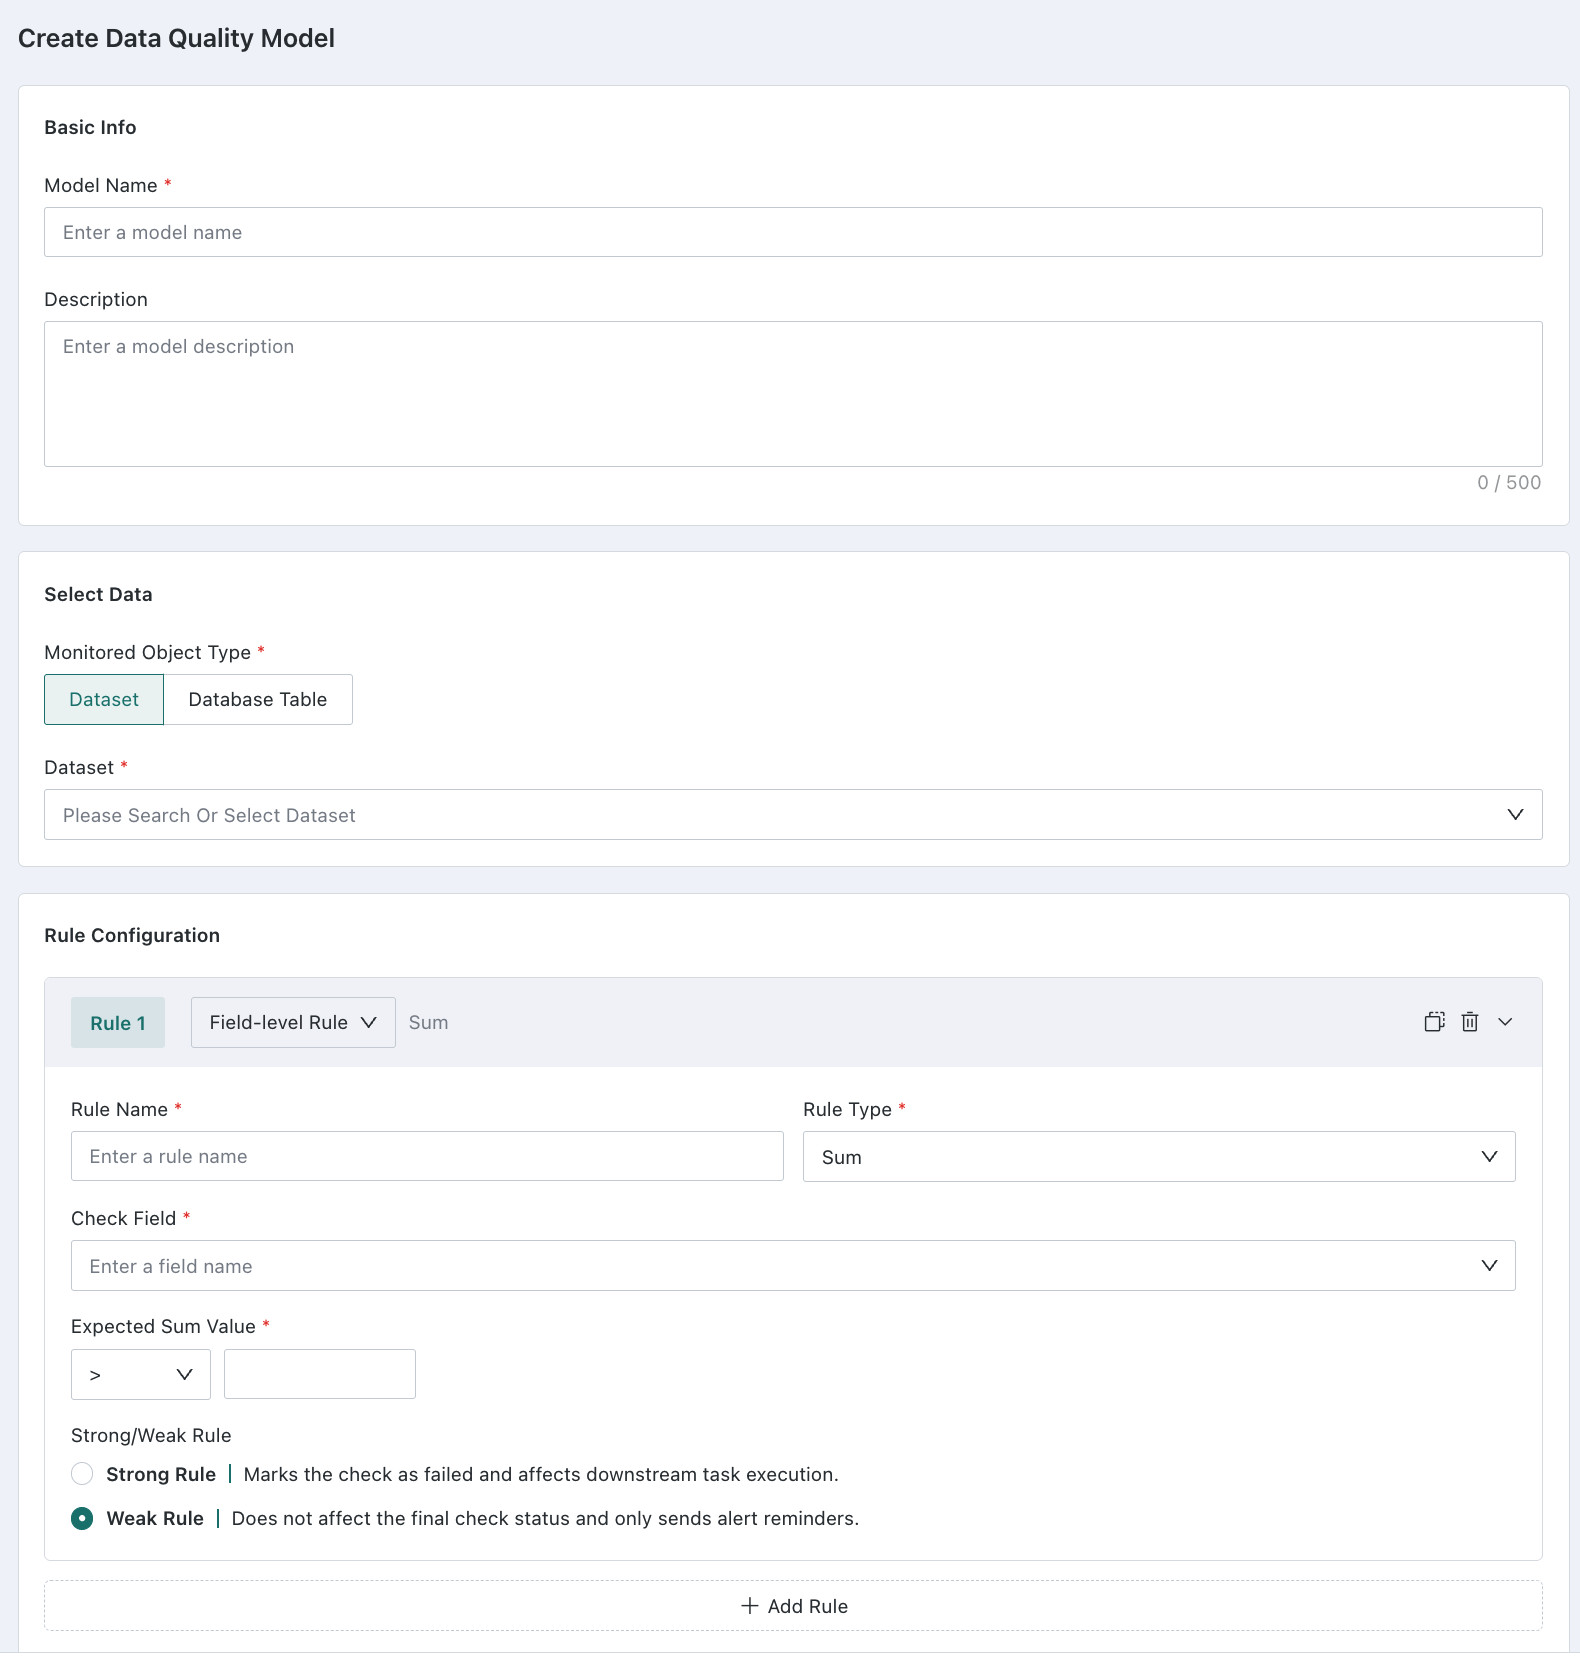
- On the Data Quality Model list, click
Create Model. - Enter a model name.
- Select the monitored object type:
Dataset: Select a dataset that you are authorized to access.Database Table: Select a data account, and then select a table under that account.
- Optional: Enter a model description.
- Optional: Configure a filter. If no filter is configured, the model validates all data in the monitored object by default.
- Add and configure at least one quality rule.
- Click
Save. After the model is created, the system returns to the model list.
Changing the monitored object type clears the selected dataset, data account, database table, and filter. Confirm the change before switching types.
Configure a Filter
A filter limits the data included in a quality validation. For example, you can validate data only for a specific business date or region.
- After selecting the monitored object, click
Edit RulesunderFilter Configuration. - Enter the condition expression in the editor. For example:
dt = {{{yesterday}}} AND region = 'East China'. - Use the toolbar to insert global parameters or time macro parameters as needed.
- Click
Preview. The system resolves the parameters and displays the first 30 filtered records. - After the preview succeeds, click
Confirm.
- Enter only the condition expression. Do not include the
WHEREkeyword. Confirmis available only after the latest preview of the current content succeeds.- If you modify the content after a successful preview, preview it again.
- Clicking
Canceldoes not overwrite the filter already confirmed on the page. - An empty filter validates all data.
Configure Quality Rules
A model must contain at least one rule. Each rule requires a unique rule name, a rule type, and the corresponding configuration.
Supported Rule Types
| Rule Type | Purpose | Main Configuration |
|---|---|---|
| Table Row Count | Checks whether the total number of table rows meets expectations. | Comparison operator and comparison value |
| Required Fields | Checks whether all specified fields exist. | One or more field names |
| Field Type | Checks whether a field has the expected type. | Field to validate and expected type |
| Invalid Values | Counts nulls, empty strings, or custom invalid values. | Field, invalid-value definition, and count or percentage threshold |
| Duplicate Count | Checks for duplicate values in specified fields. | Fields and count or percentage threshold |
| Enumeration Values | Checks whether data is within a list of allowed values. | Field, enumeration values, and out-of-range count or percentage threshold |
| Value Range | Checks whether numeric values are within a specified range. | Numeric field, minimum and maximum values, and out-of-range threshold |
| Value Format | Uses a regular expression to validate string formats. | String field, regular expression, and noncompliance threshold |
| Sum or Average | Checks the aggregate value of a specified field. | Field to validate and expected value |
| Custom SQL | Implements a custom business validation using SQL. | SQL, comparison operator, and expected value |
Custom SQL must return one row and one column. If it returns multiple rows or columns, the system uses the value in the first row and first column as the actual result.
Strong and Weak Rules
Strong Rule: If the rule does not pass, model validation fails and downstream nodes in the Offline Dev task may not continue running. Use strong rules for critical integrity checks and mandatory business requirements.Weak Rule: If the rule does not pass, the system sends a warning but does not affect the table's final validation status or downstream task execution. Use weak rules for observational metrics or non-blocking issues.
Edit a Model
On the model list or details page, click Edit. Modify the basic information, filter, or quality rules, and then save the model. Only the model owner and collaborators can edit it.
When editing a model:
- Changing the monitored object may invalidate existing field-level rules. Check the target fields and rule configuration again.
- A modified filter replaces the existing filter only after its preview succeeds and you confirm it.
View Model Details
The model details page contains the Overview, Schedule Settings, and Alert Notifications tabs.
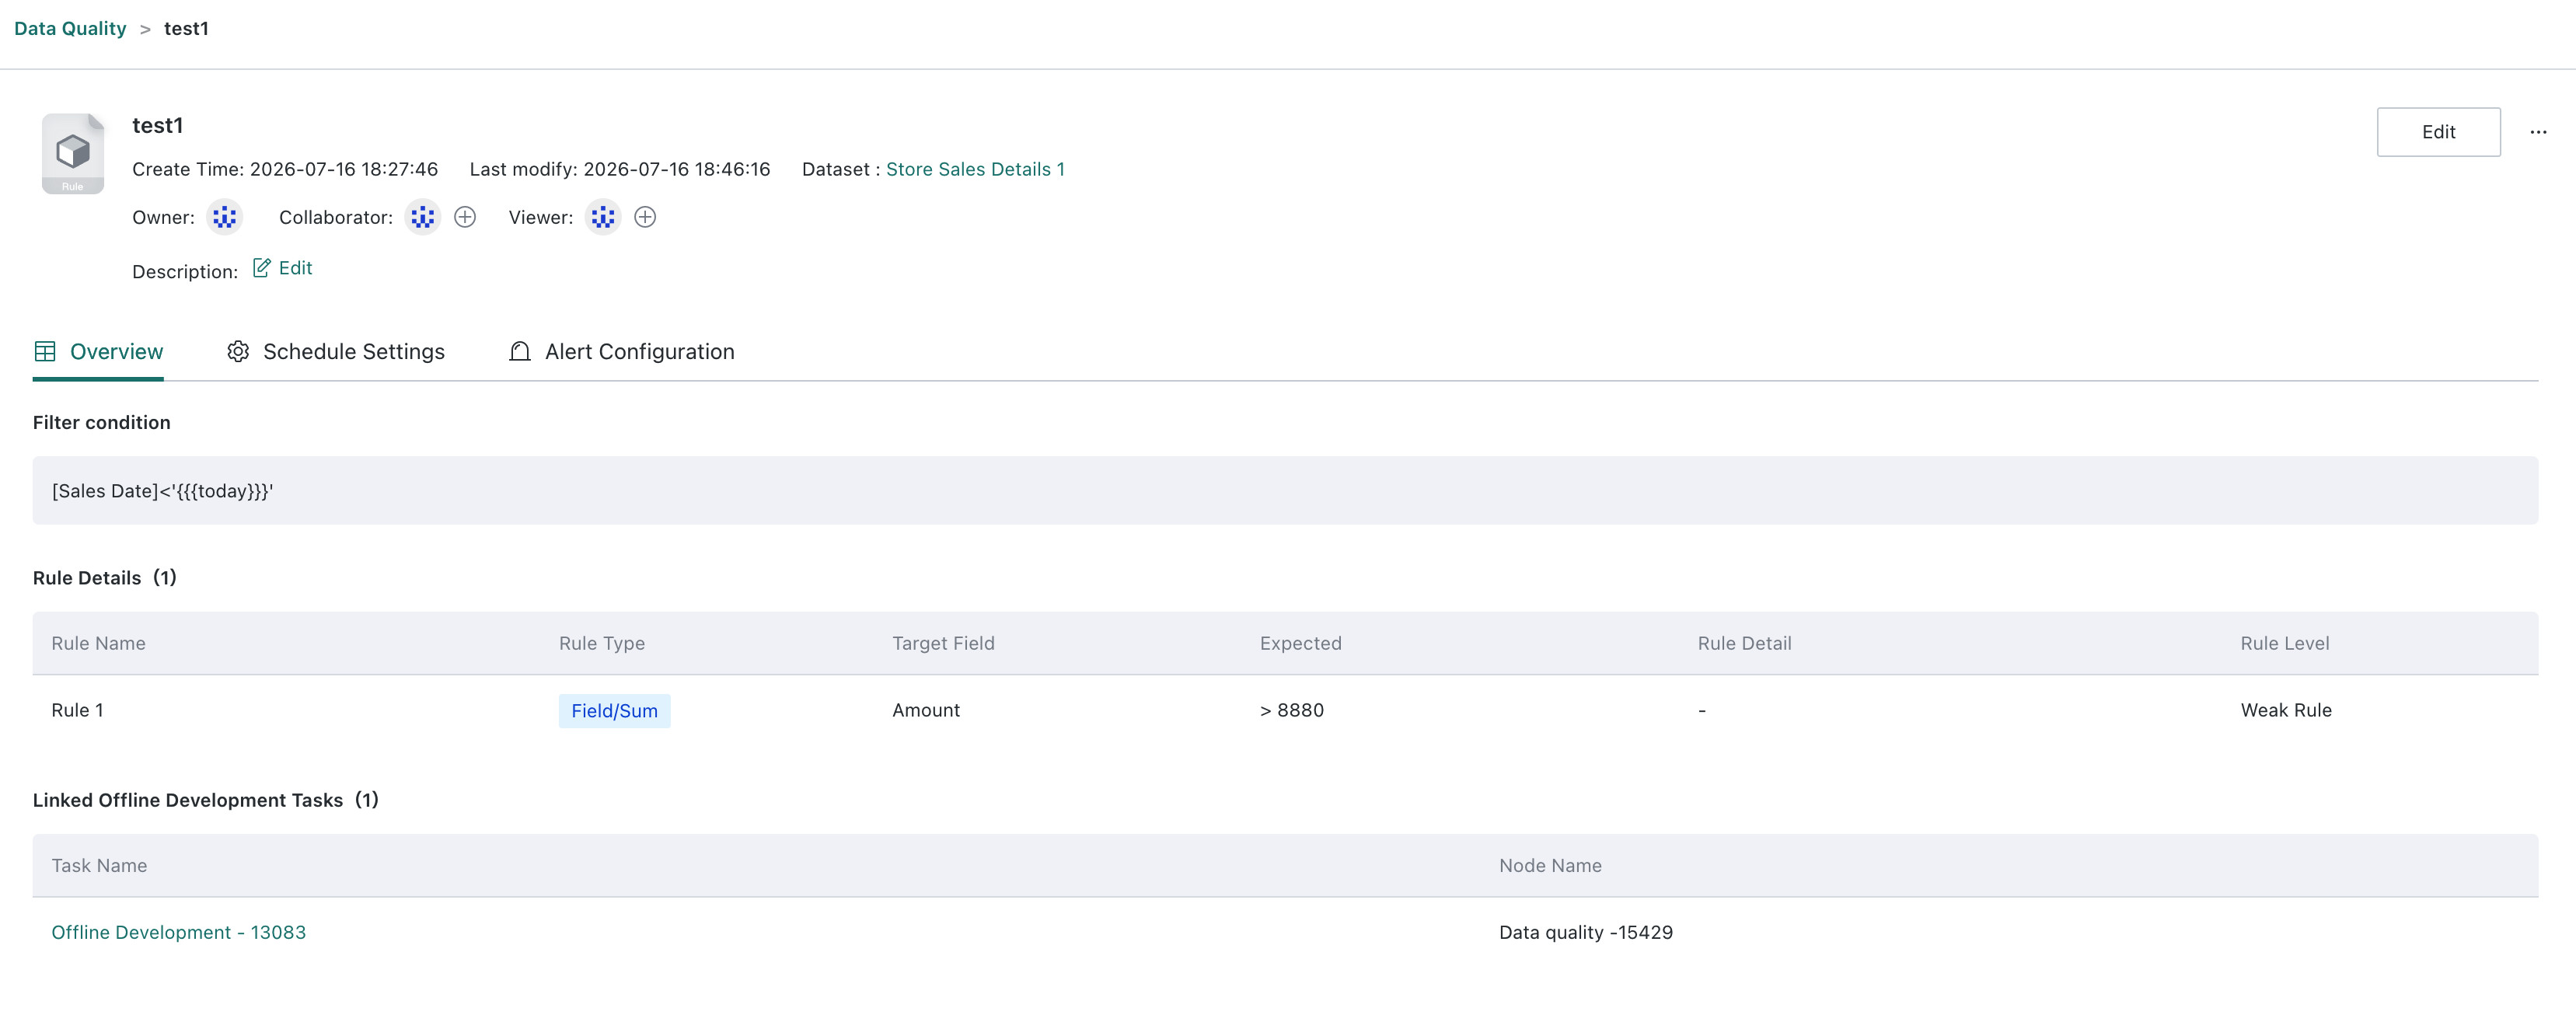
On the Overview tab, you can view:
- The model name, description, and monitored object.
- The currently confirmed filter. If no filter is configured, the page indicates that all data is validated by default.
- The type, target field or SQL, expected value, and other information for each quality rule.
- The Offline Dev tasks and node names that reference the model.
Depending on your permissions, you can edit, delete, or run the model and view its instances from the top of the page.
Run a Model
Model owners, collaborators, and users can manually run models they are authorized to access. When you click Run, the system creates a run instance. You can track its status and results under View Instances.
A model can be triggered in the following ways:
- Scheduled trigger
- Dataset update event
- Offline Dev task
- Manual trigger
Configure a Schedule
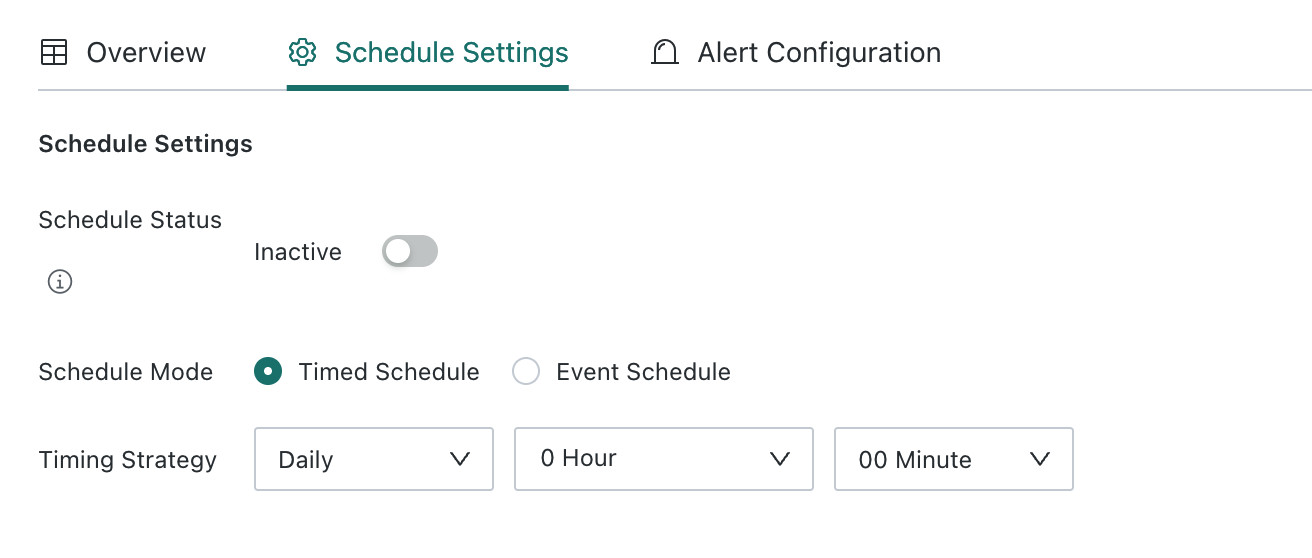
- Open the model details and select
Schedule Settings. - Click
Editand enable scheduling. - Select a schedule type and complete the corresponding configuration.
- Click
Save.
Scheduled Trigger
Scheduled triggers are supported for all monitored object types. The following schedules are available:
Daily: Set the execution time for each day.Weekly: Select the execution days and time.Monthly: Select the execution days of the month and time.
You can configure up to four unique times in each group.
Event Trigger
Event triggers are supported only when the monitored object is a dataset. When enabled, a model run is triggered whenever the corresponding dataset is updated. Models that monitor database tables support scheduled triggers only.
After scheduling is disabled, the schedule no longer takes effect, but the system retains its configuration so that you can enable it again later.
Configure Alerts
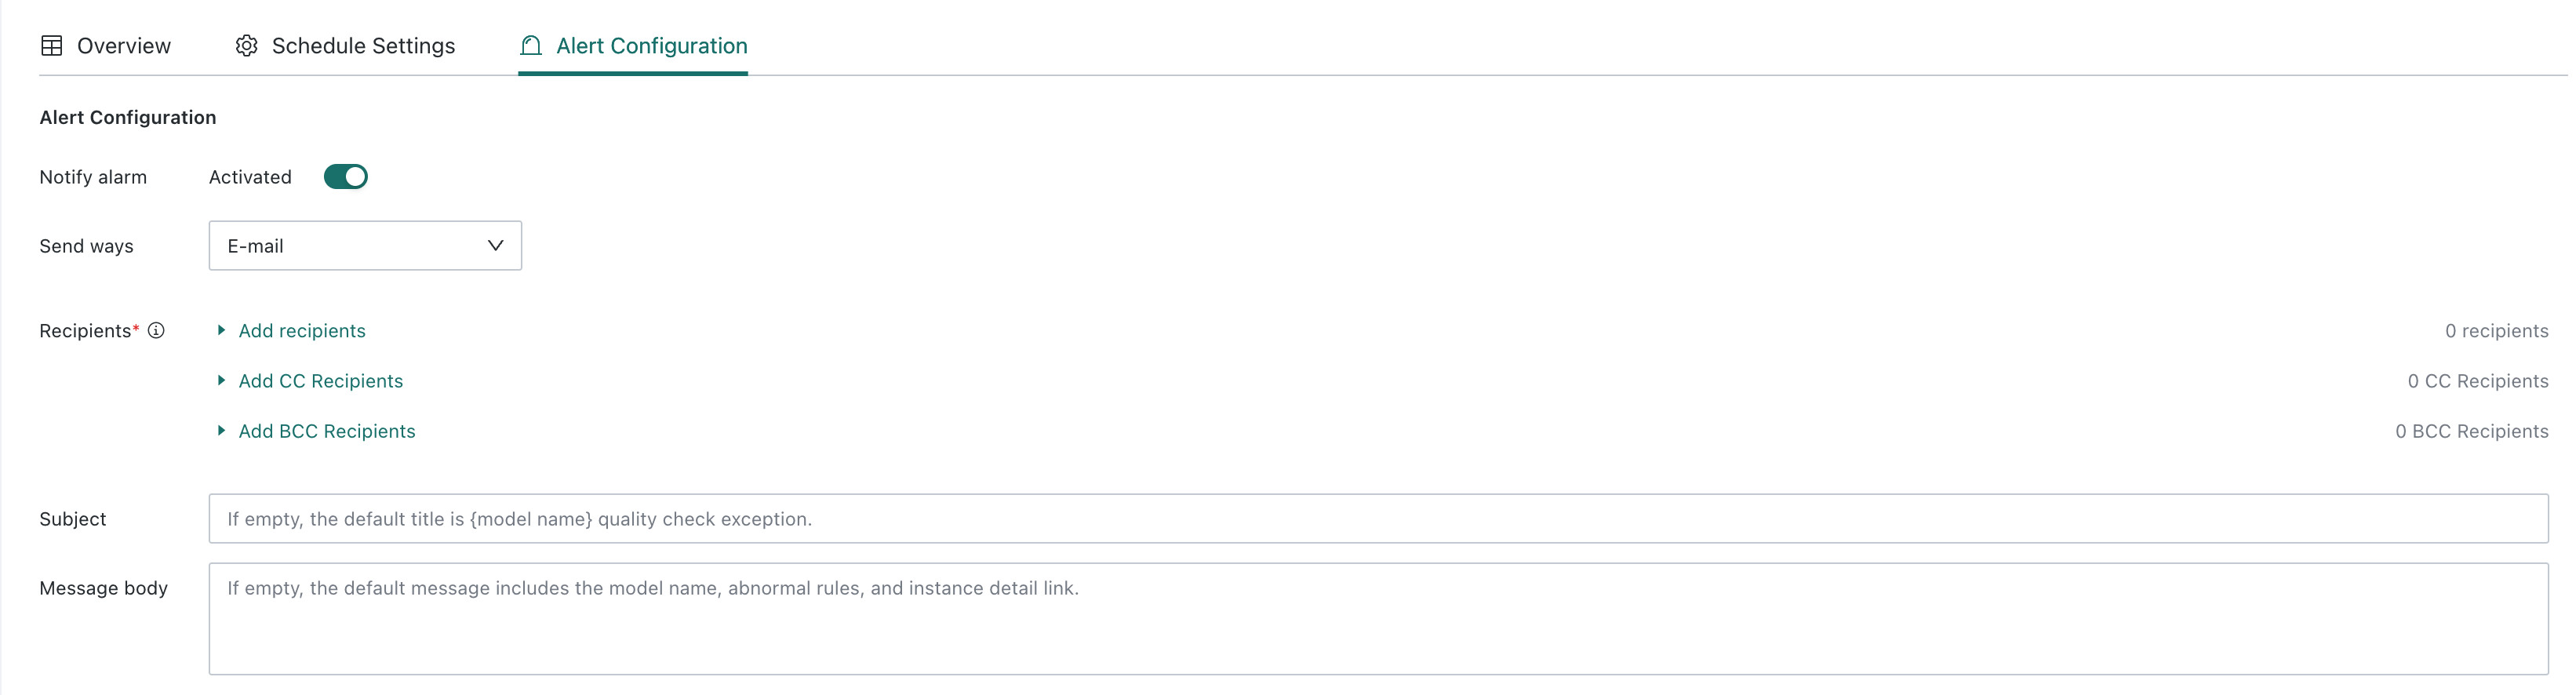
- Open the model details and select
Alert Notifications. - Click
Editand enableRun Failure/Validation Exception Alert. - Select a notification channel: E-mail, DingTalk, Feishu, WeCom, or a custom channel.
- Select at least one alert recipient.
- Confirm or modify the alert subject and message body.
- Click
Save.
The system provides the following default templates:
- Subject:
{Quality model name} has rules that did not pass or validation failed. - Message:
{Quality model name} has rules that did not pass or validation failed. Click {Quality model instance page link} for details.
View Run Instances

On the model list or details page, click View Instances to view the model's historical runs.
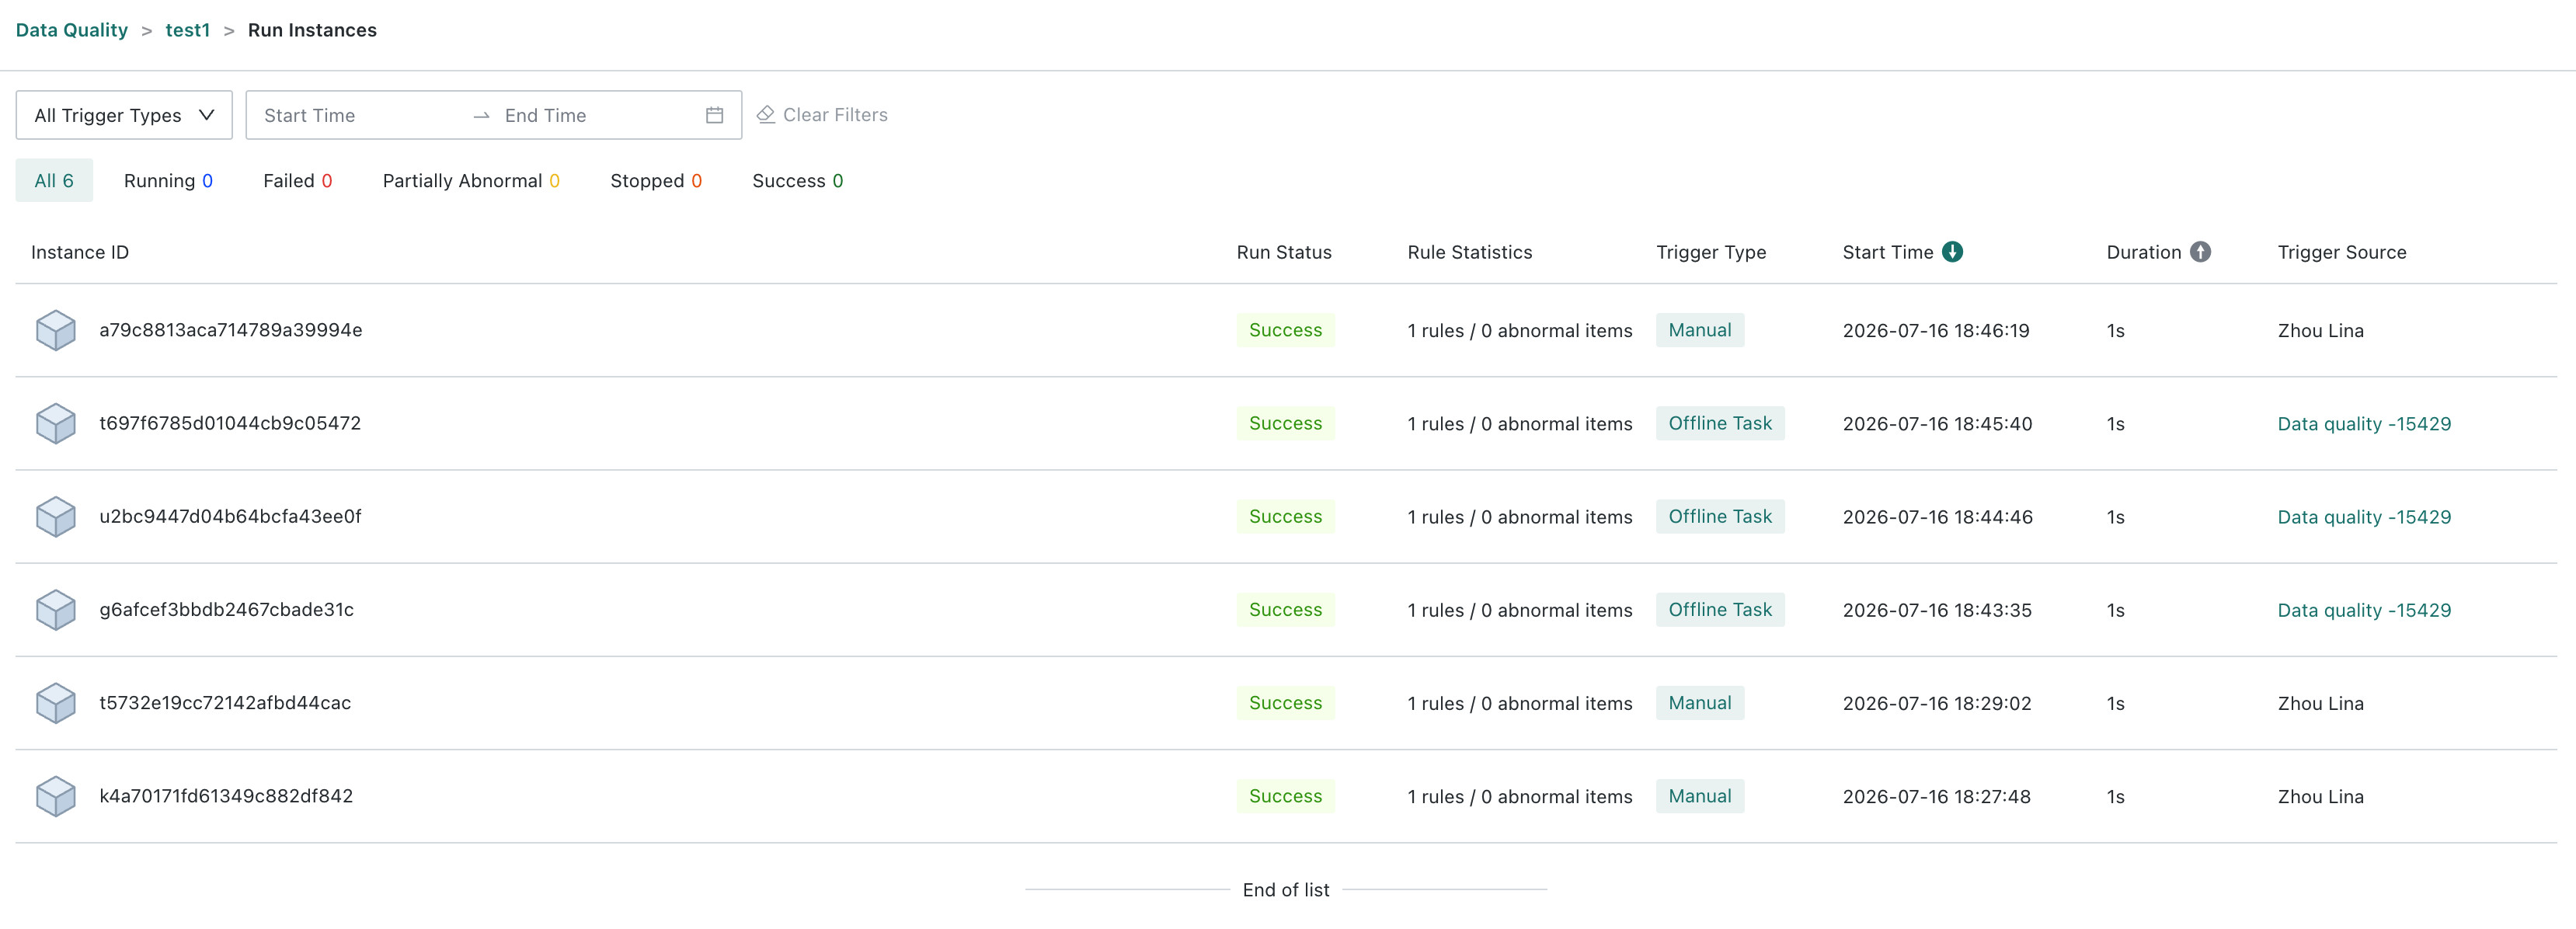
The instance list displays the instance ID, trigger method, start and end times, duration, run status, total number of rules, number of abnormal rules, and trigger source. You can filter by run status, trigger method, and start time. You can also sort or refresh the list and scroll to load more records.
Run statuses include Succeeded, Failed, Partially Abnormal, Running, and Stopped.
- Click an instance ID or
View Resultsto view rule-level results.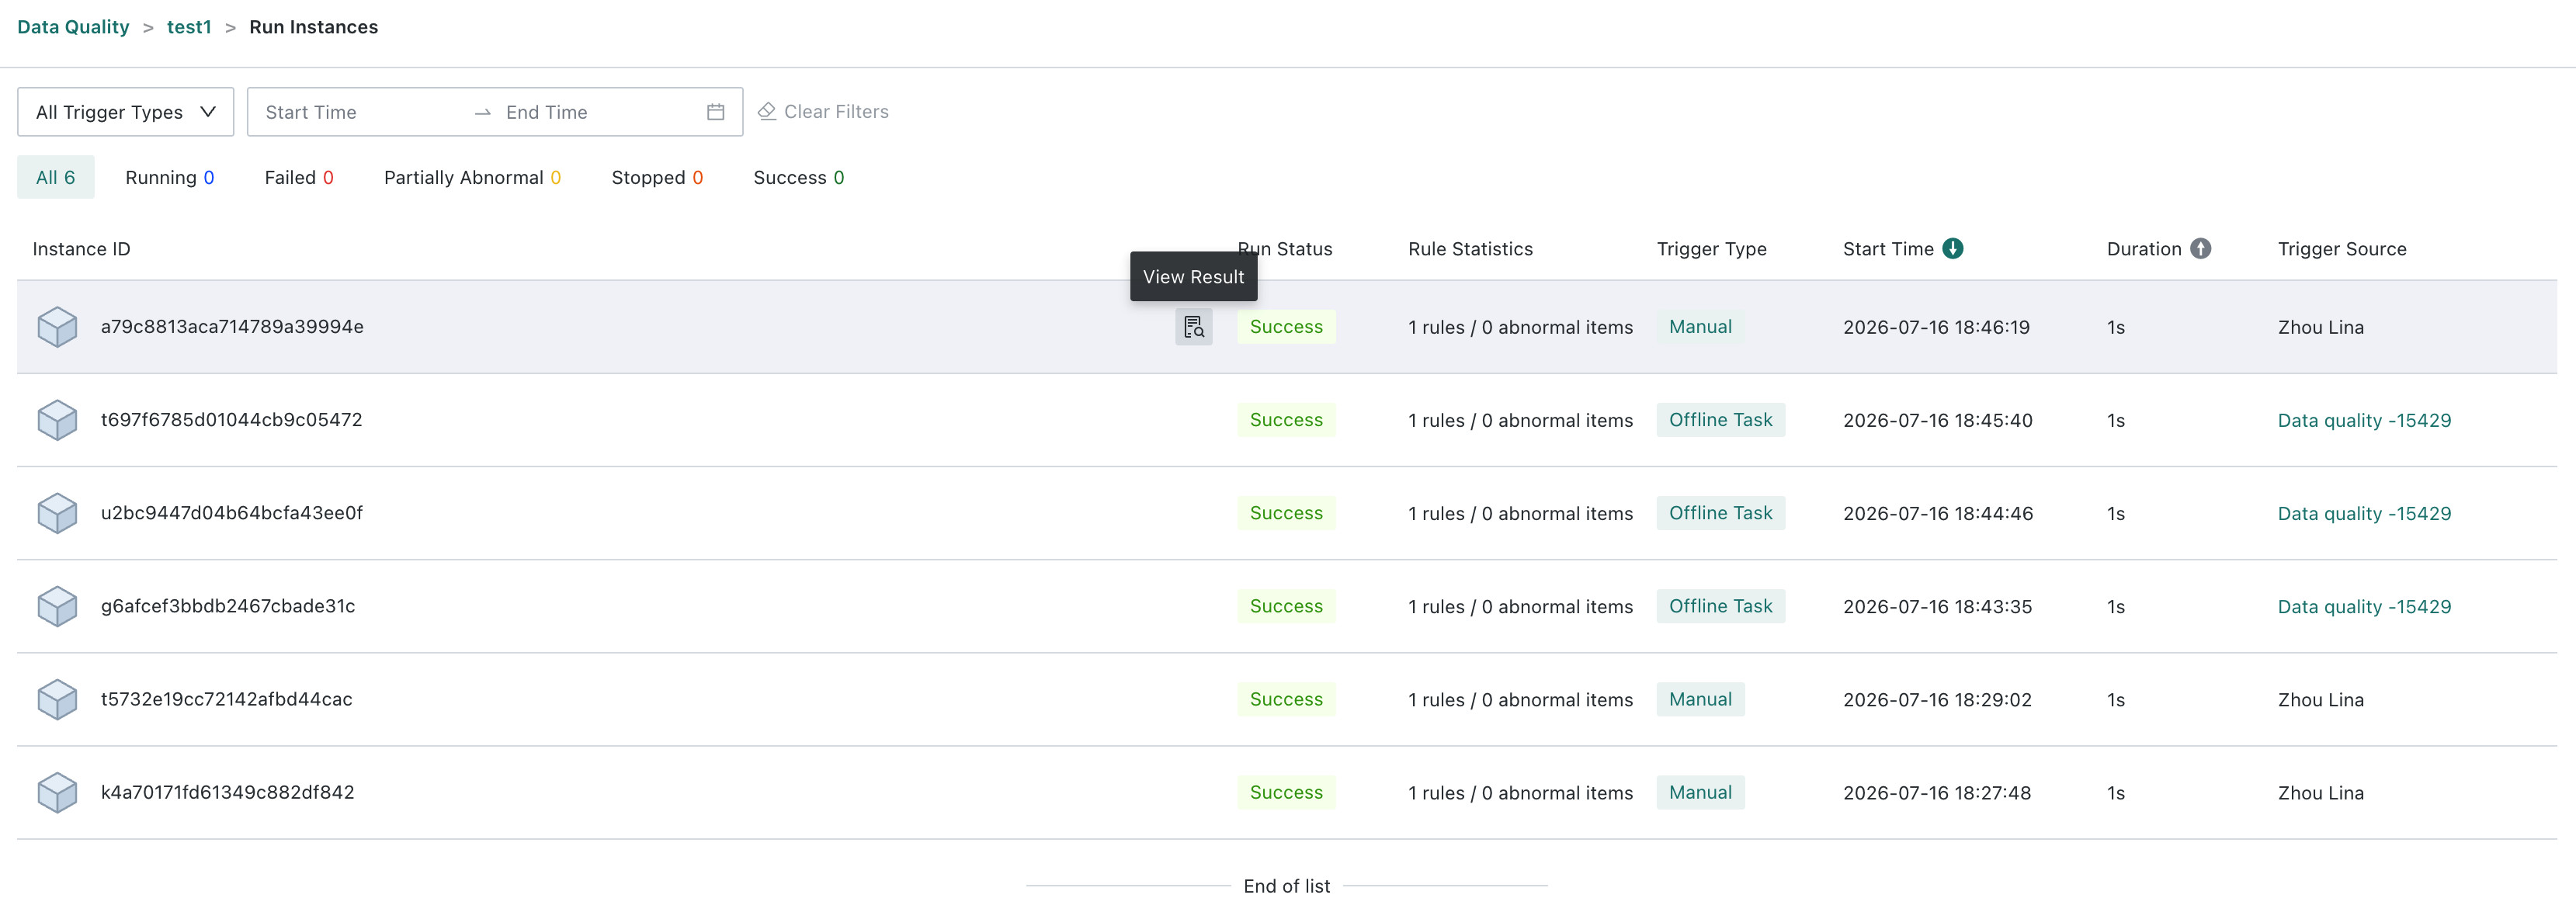
- For a running instance, an administrator or regular user can click
Stop.
View Instance Results
The instance results page contains the complete context of the run and the execution result of each rule.
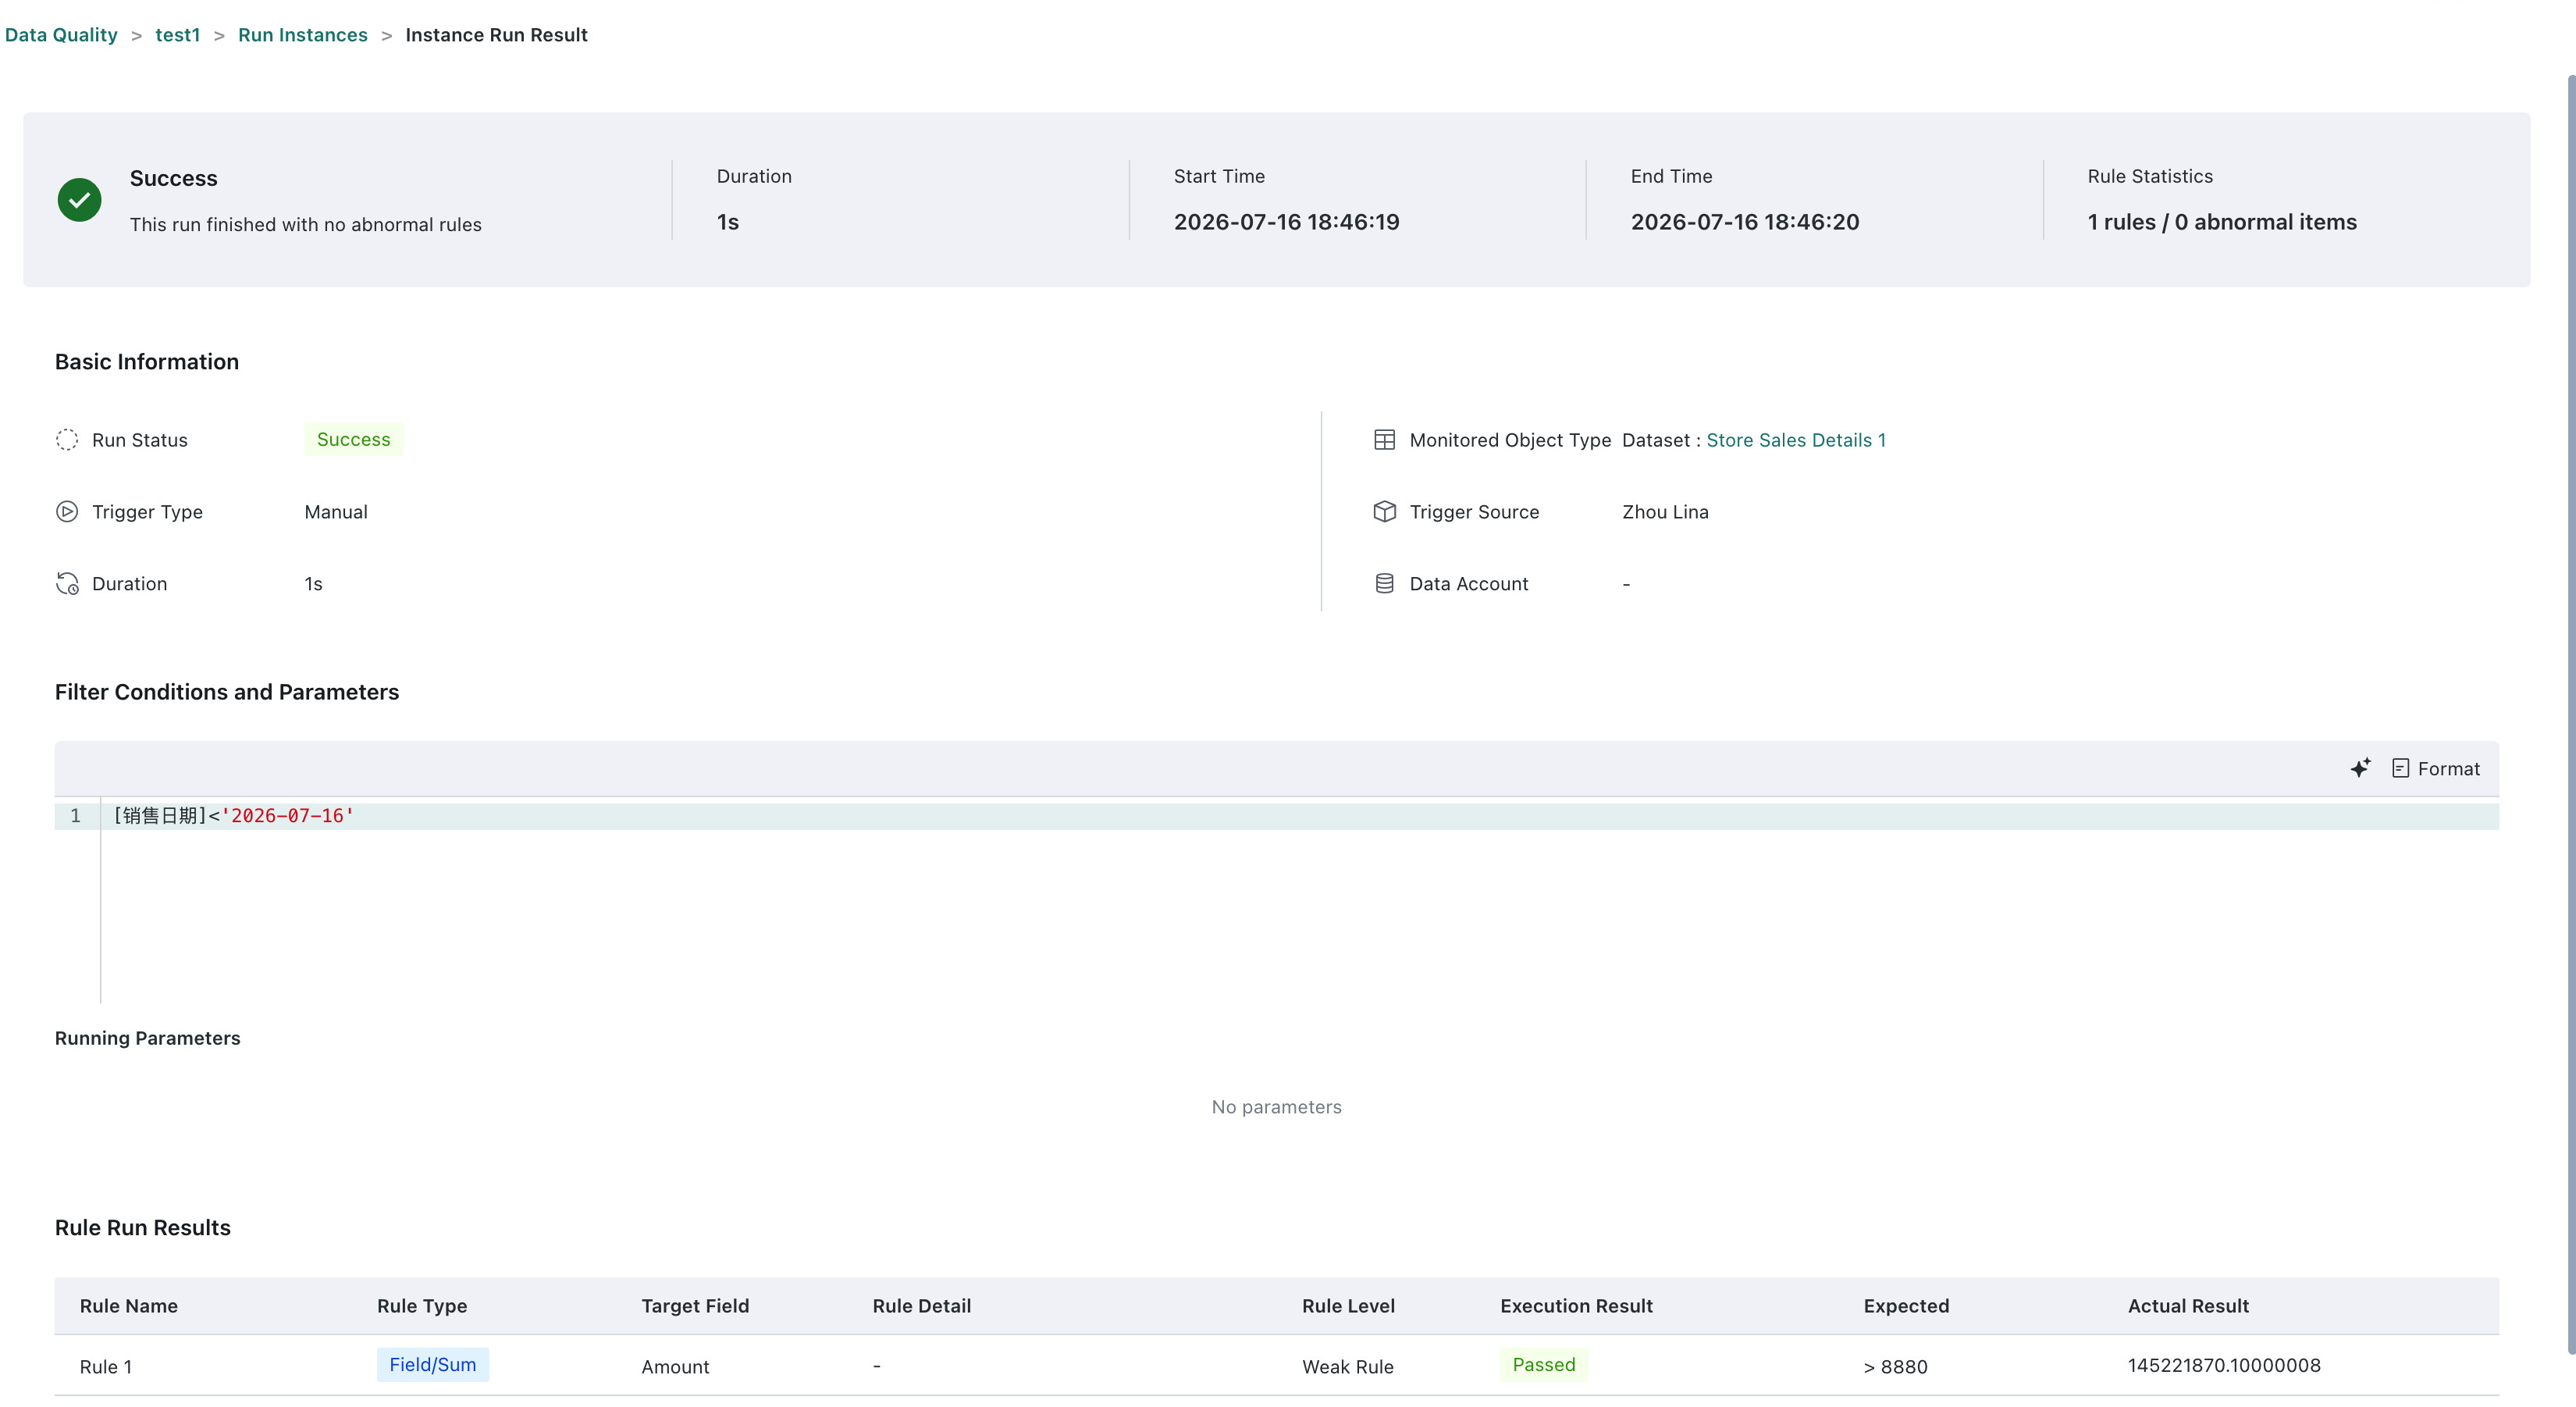
Instance Summary
You can view the run status, trigger method, start and end times, duration, rule statistics, trigger source, monitored object, and the filter used for this run.
If the filter uses global parameters or time macros, the page displays the parameter values resolved when the instance ran. For a historical instance, the page uses the values saved for that run rather than the current default values.
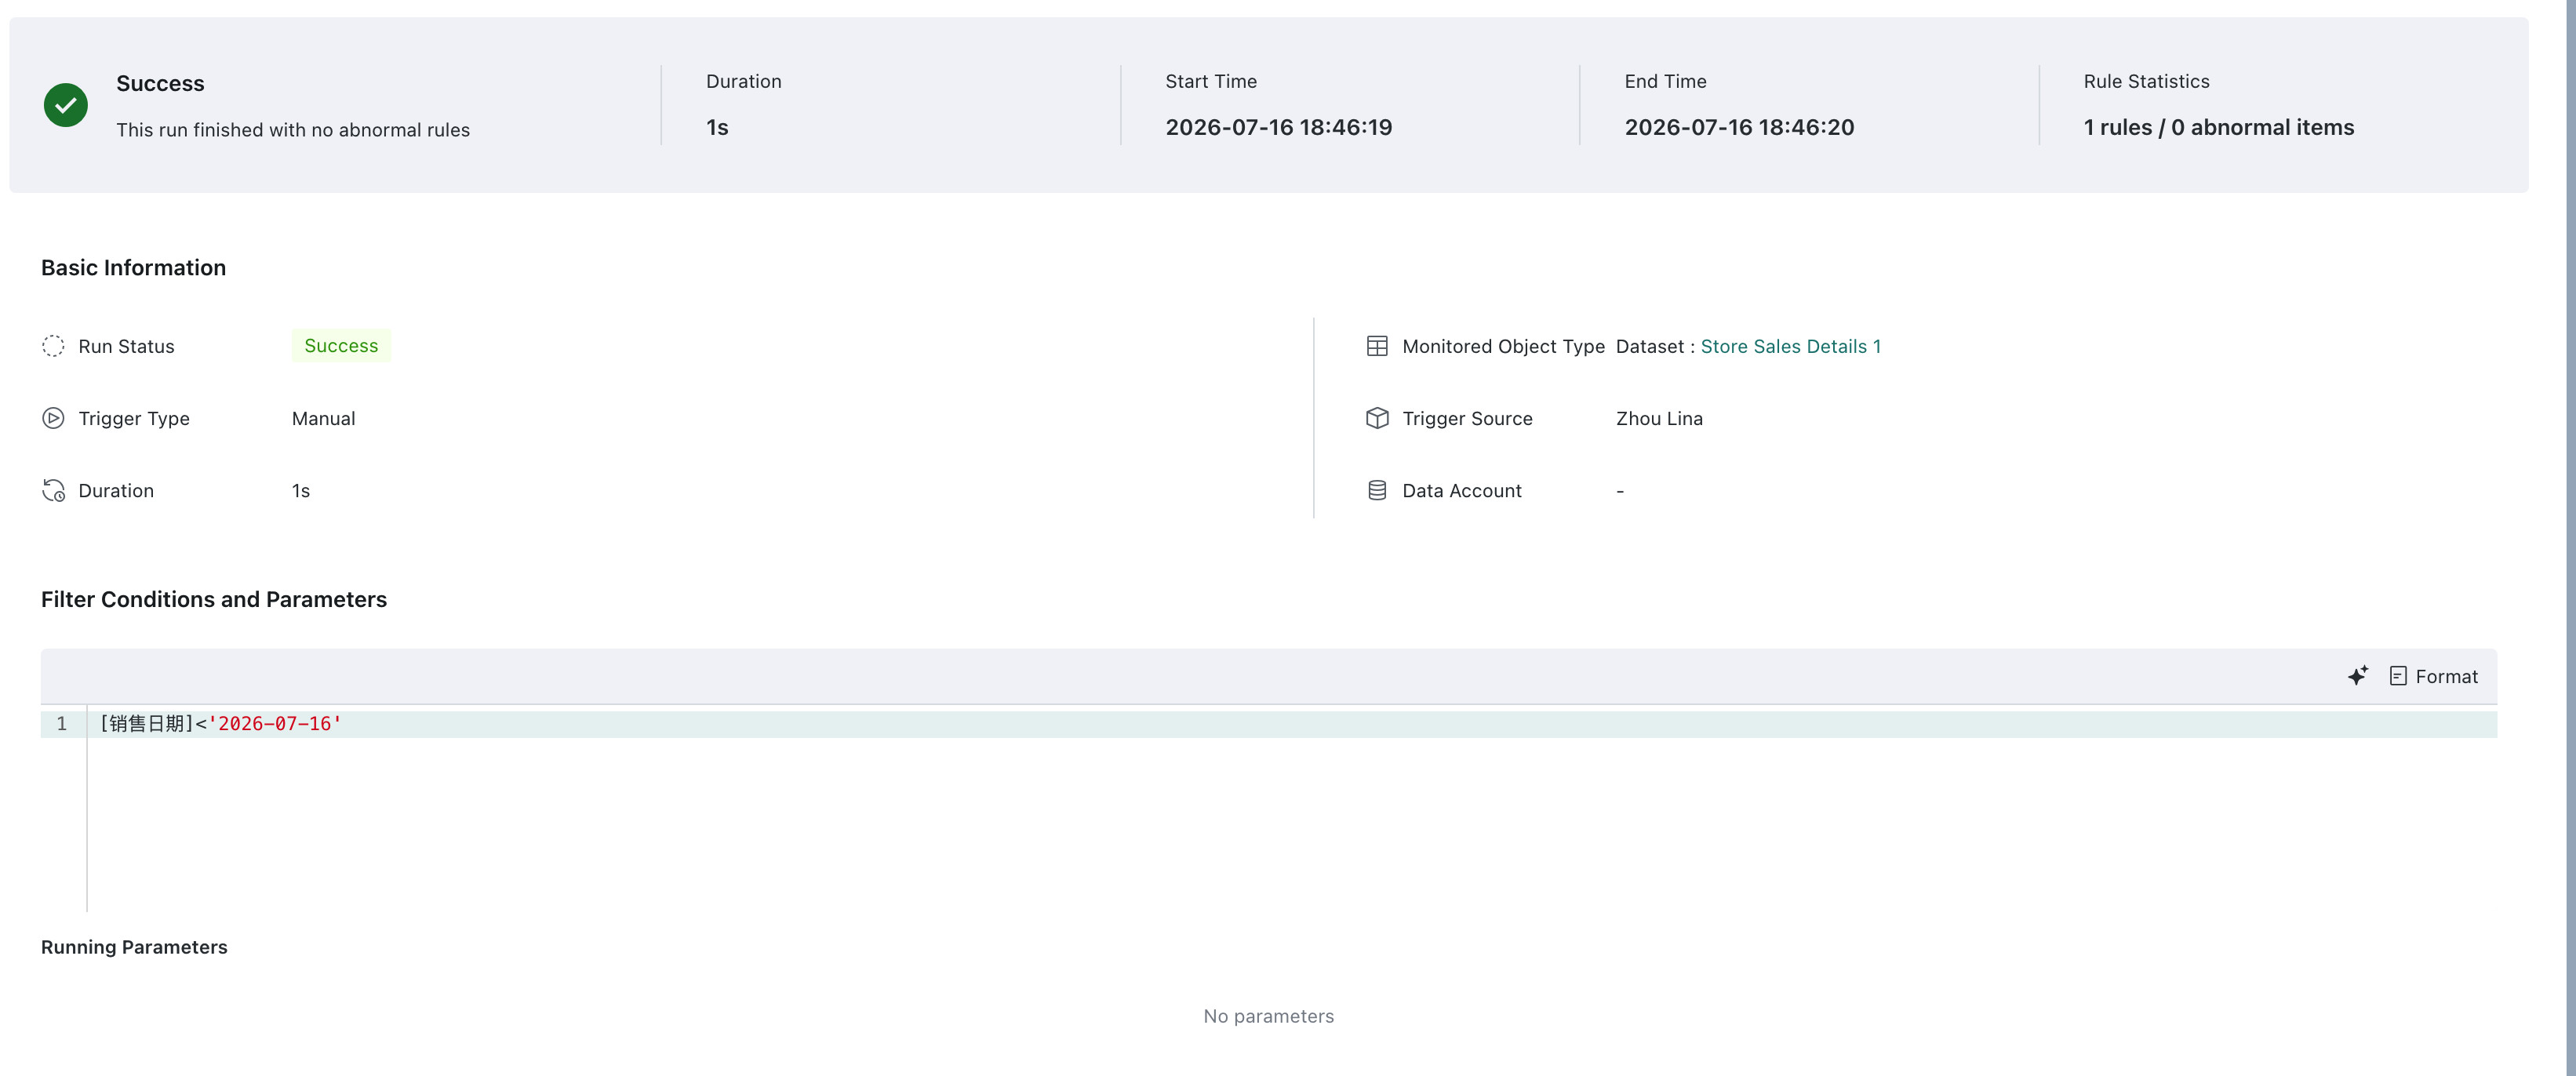
Rule Results
Rule results include the rule name, type, target field, rule details, execution result, expected result, and actual result. Execution results include Passed, Abnormal, and Failed.

Reference a Model in an Offline Dev Task
See Data Quality Node.
Manage Model Roles
Only the model owner and platform administrators can modify collaborators and users.

- Under
Collaborators, add or remove administrators and regular users. - Under
Users, add or remove administrators, regular users, and read-only users. - Click
Save.
Collaborators and users are optional. Collaborators cannot delete the model or manage roles. Users can only view, run, and reference the model.
Delete a Model
Only the model owner can delete a model.
Deletion cannot be undone. If an Offline Dev task references the model, Delete is disabled. Remove the Offline Dev reference before deleting the model.
FAQ
Why can't I create or edit a model?
Check your platform role, model role, and permissions for the monitored object. Read-only users cannot create or edit models. Model users cannot edit models.
Why can't I find a dataset or database table when selecting a monitored object?
Regular users can select only objects they are authorized to use. Ask an administrator for access to the corresponding dataset, data account, or database table.
Why is the Confirm button for the filter unavailable?
The current content must have a successful latest preview. If you modify the expression, parameters, or formatting after previewing, preview it again. The expression also cannot contain the WHERE keyword.
Does a filter preview failure affect rule configuration or task publishing?
No. It does not prevent you from adding or editing quality rules. In an Offline Dev node, a preview failure also does not block publishing. Unconfirmed content is not submitted. The system continues to use the last confirmed filter or validates all data if no filter has been confirmed.
Why is event scheduling unavailable for a model that monitors a database table?
Event scheduling depends on dataset update events and therefore applies only to dataset models. A database table model can use scheduled triggers or be triggered through another supported entry point.
Why can't I delete a model?
Make sure that you are the model owner and check whether an Offline Dev task references the model. If a reference exists, remove it before deleting the model.
How should I choose between strong and weak rules?
Use strong rules for critical validations that affect the correctness or compliance of downstream data. Use weak rules for issues that require a notification but should not temporarily block the task.
Why do parameter values in a historical instance differ from their current values?
Instance results save and display the values actually resolved when that instance ran. Subsequent parameter changes do not alter historical instance records.
Why can't I select alert recipients?
Select a notification channel first. When alerts are enabled, the notification channel, recipients, subject, and message body are all required.
Best Practices
- Start with weak rules to observe data fluctuations. After confirming that the thresholds are appropriate, change critical rules to strong rules.
- Use recognizable business names for models and rules, and identify the monitoring purpose and responsible person in the description.
- Use parameters or time macros in filters whenever possible to avoid changing dates manually each day.
- Configure both scheduling and alerts for critical models, and review their run instances regularly.
- Before deleting a model, check for associated Offline Dev tasks to avoid affecting existing development workflows.