Tele Files
Overview
Feature Description
Guandata BI supports integrating data from FTP/SFTP files and ADLS Gen2 files.
- FTP/SFTP: Integrating data from an FTP/SFTP dataset means that Guandata BI can actively retrieve data through FTP/SFTP file storage services. For example, users can store data downloaded from third-party platforms or e-commerce channel operations on an FTP server, then connect it centrally through BI for ETL processing and further analysis.
- ADLS Gen2: Azure Data Lake Storage Gen2 is Microsoft's next-generation big data storage product for enterprise data lake applications. It inherits the ease of use and low cost of Azure Blob Storage while adding enterprise-grade capabilities such as hierarchical directories and fine-grained access control. To better support the Azure ecosystem, Guandata BI provides a dedicated connector for ADLS Gen2 in Data Connections.
Prerequisites
You need to select a Data Account when integrating Tele Files.
Users who have already created a Data Account can skip this step. If you have not created one yet, see Data Account for more information.
User Guide
The workflows for FTP/SFTP and ADLS Gen2 file integration are basically the same except for Select Data Table. You can complete the setup by following the configuration instructions below.
Steps
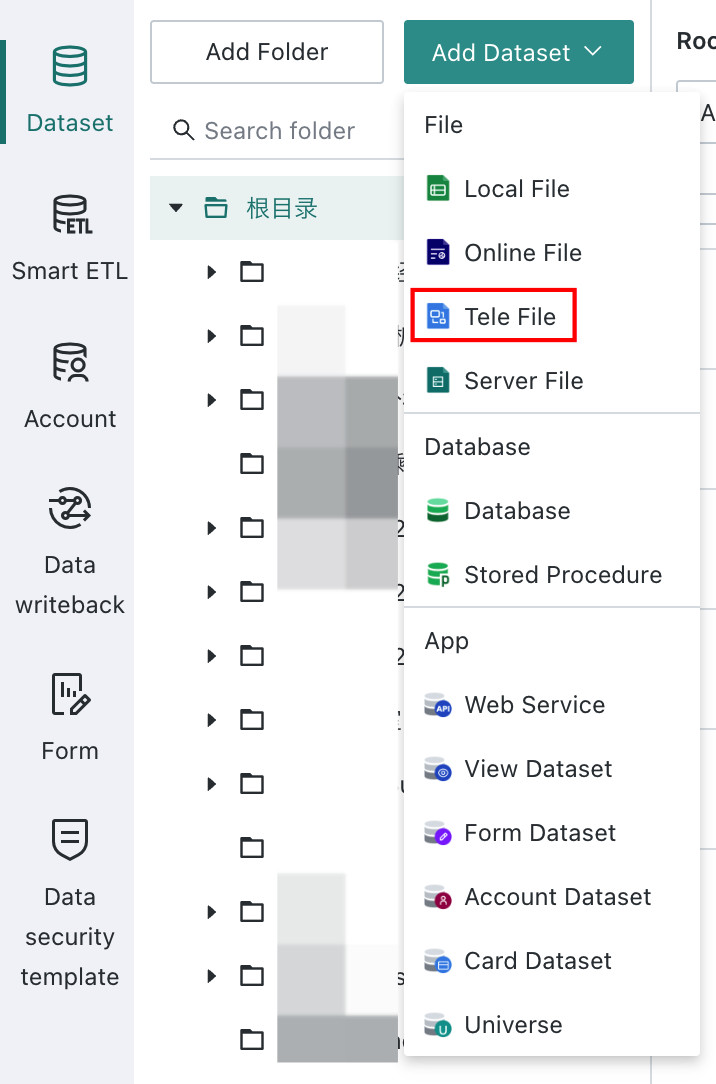
- Go to the
Data Preparationpage and click theDatasetssection in the left navigation. - Click
New Dataset, then choose File > Tele File. - Select the
FTP/SFTPorADLS Gen2connector and configure the required settings. - After confirming the data table information, click
Confirm Creationto finish the integration.
Select the Connector
Entry point: Data Preparation > Datasets > Add Dataset > Tele File > FTP/SFTP or ADLS Gen2 Connector.
Select the Data Table
FTP/SFTP
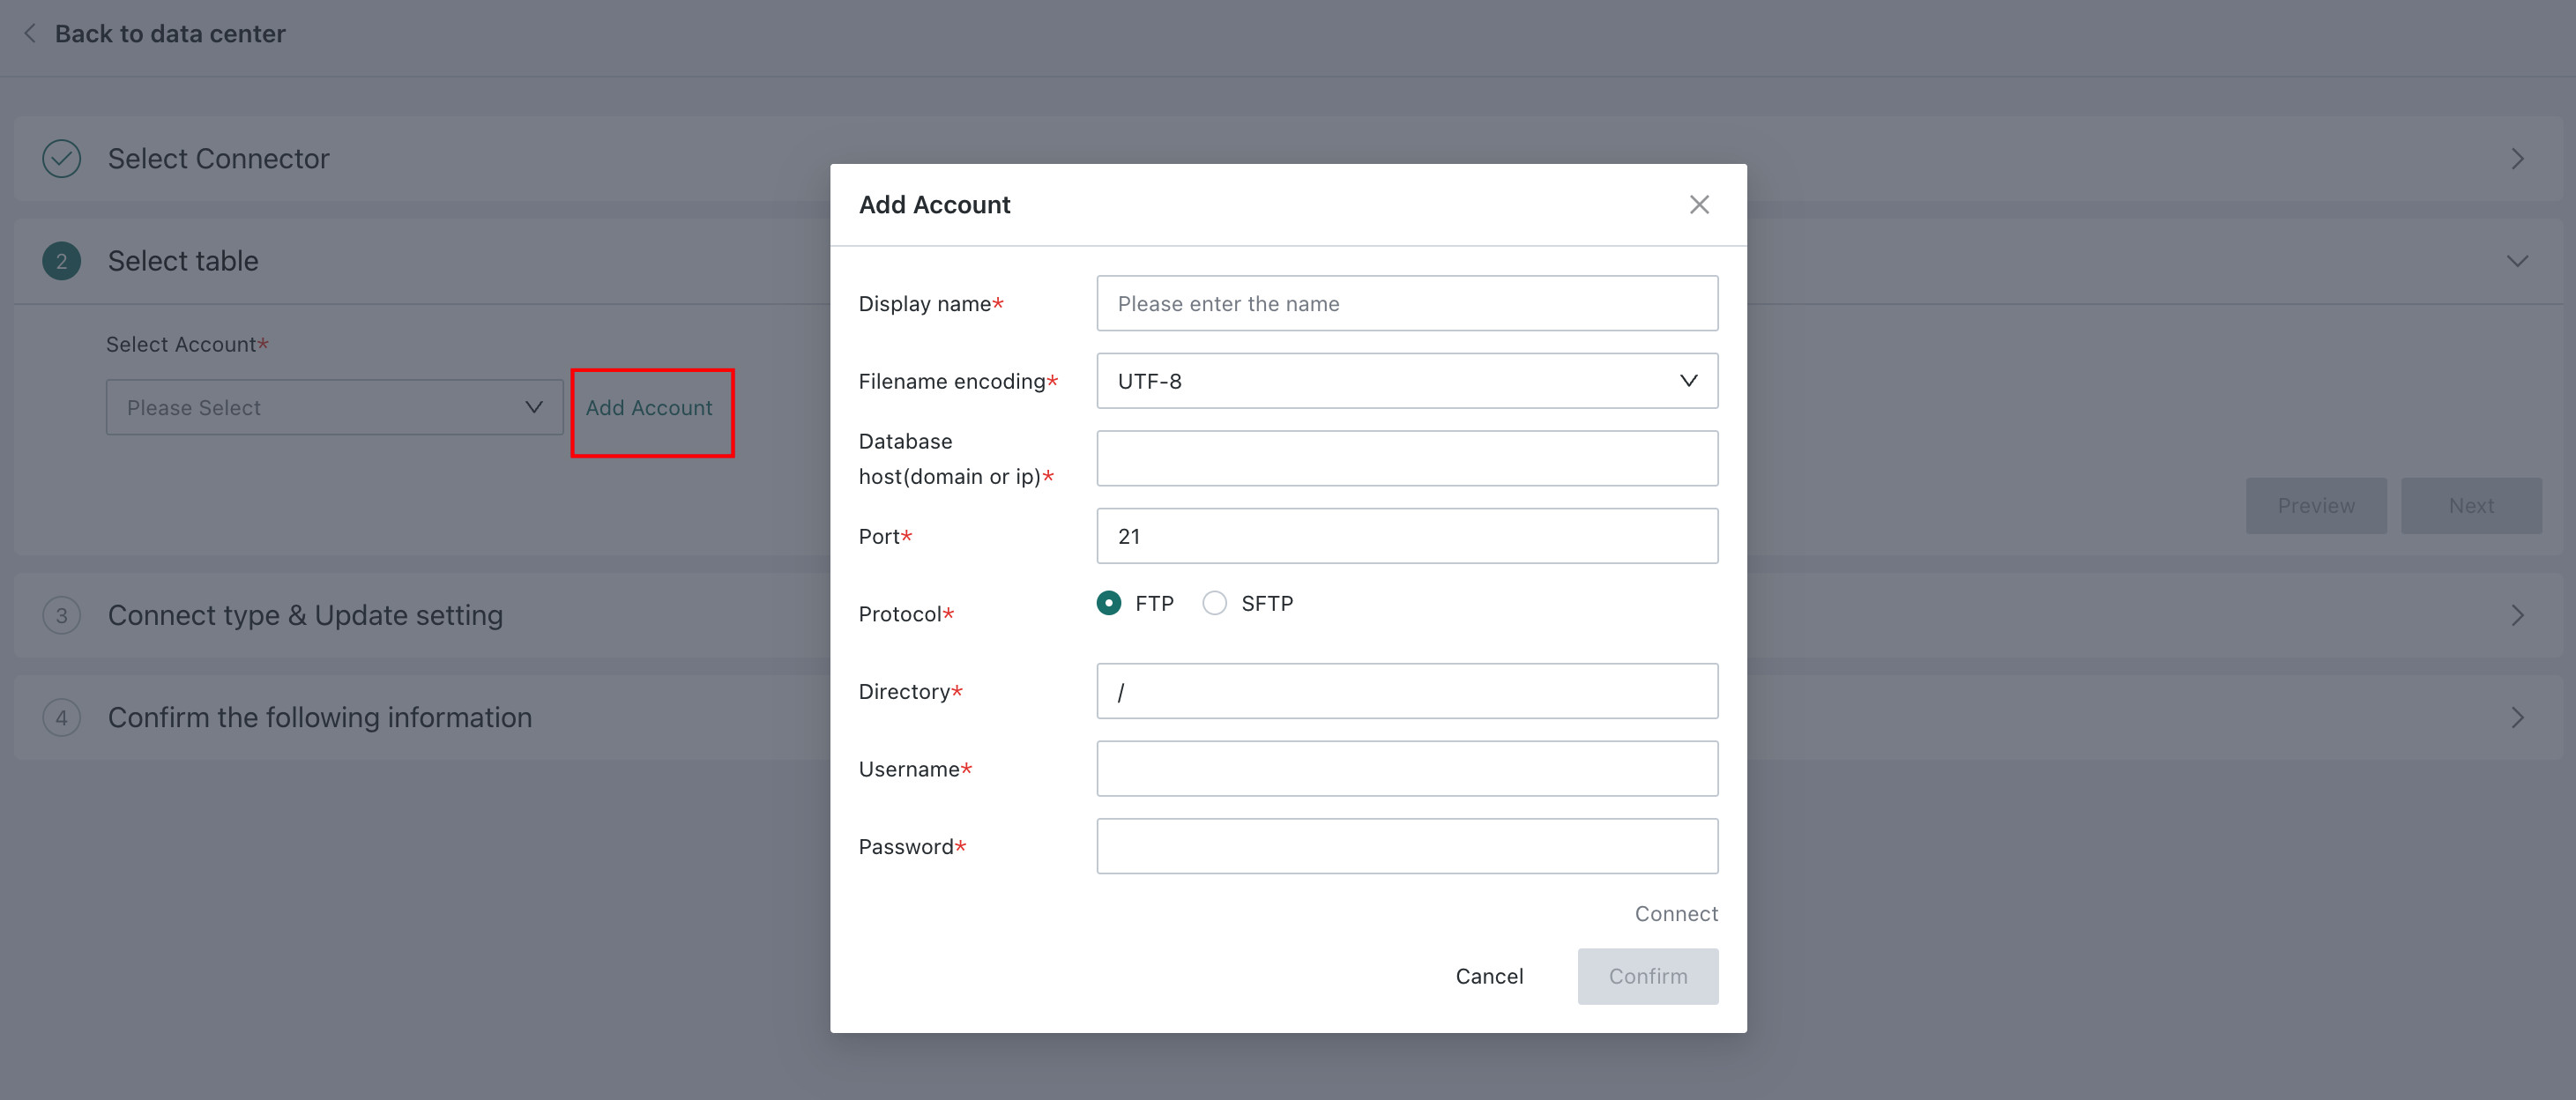
1. Select the Account
-
Select the corresponding data access account.
-
Create a new account if needed.
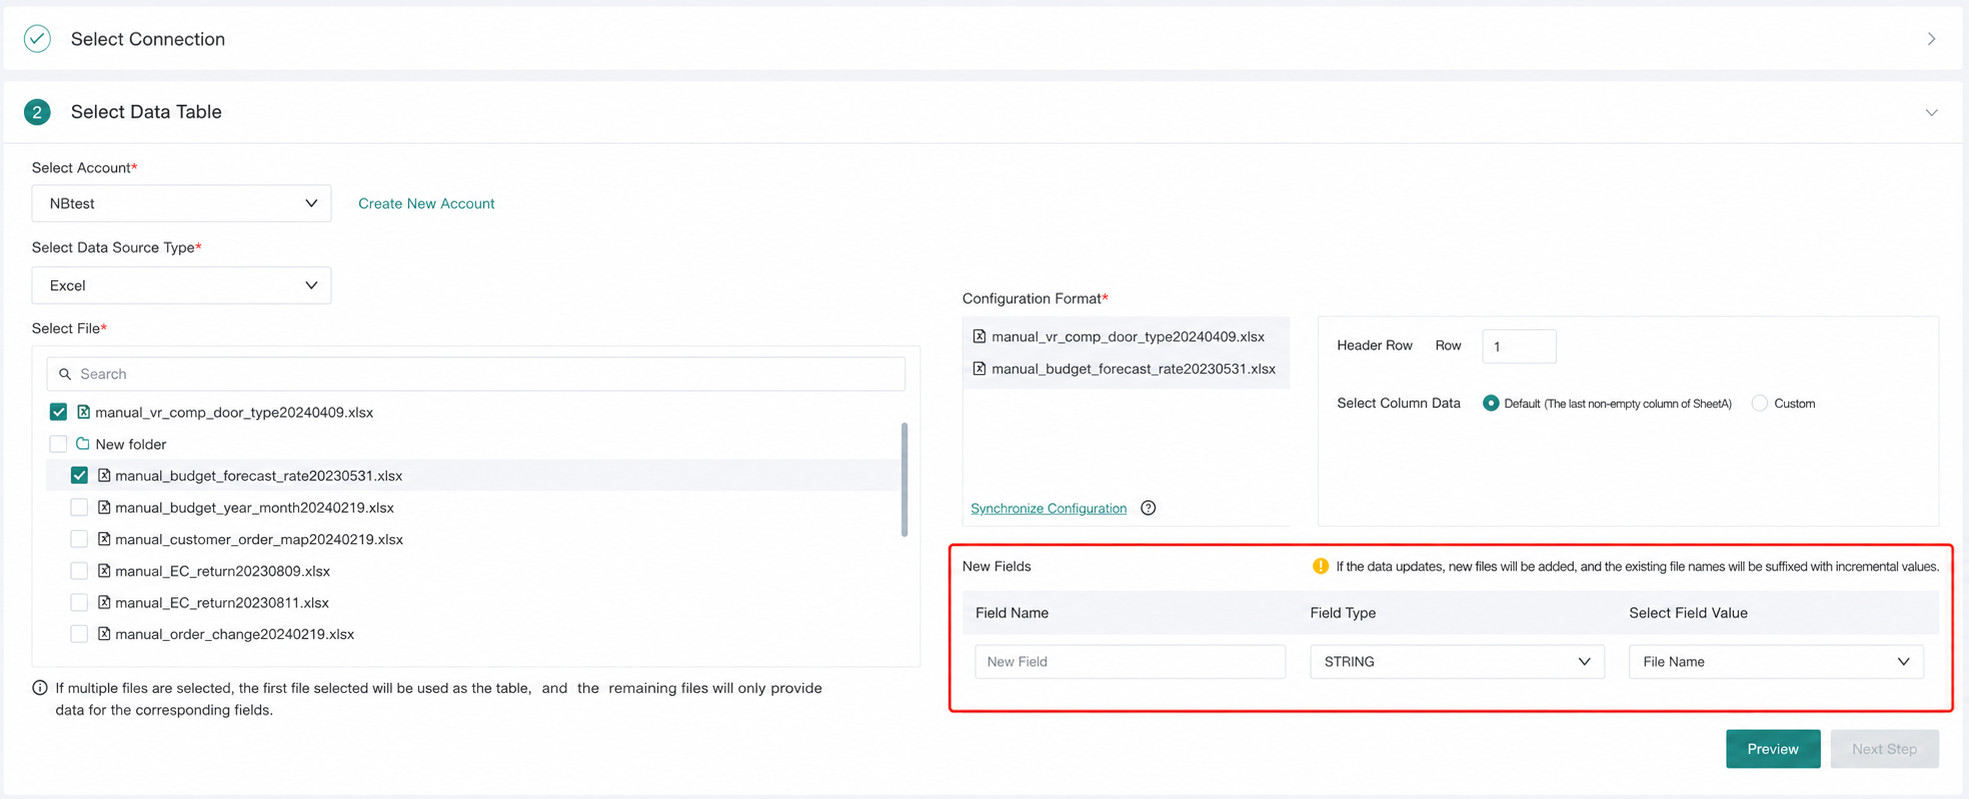
2. Select the Data Table Type
- Supports Excel and CSV files. (Single selection)
- Supports
.zipfiles. After selection, only the matching file types extracted from the archive are used during upload.
3. Select Files
-
Only files in the configured directory of the Data Account can be browsed.
-
Selected files are automatically added to the selection panel on the right.
-
After a file is deselected, it is removed from the selection panel on the right.
-
Click
Clearin the upper-right corner of the selection panel to remove all selected files.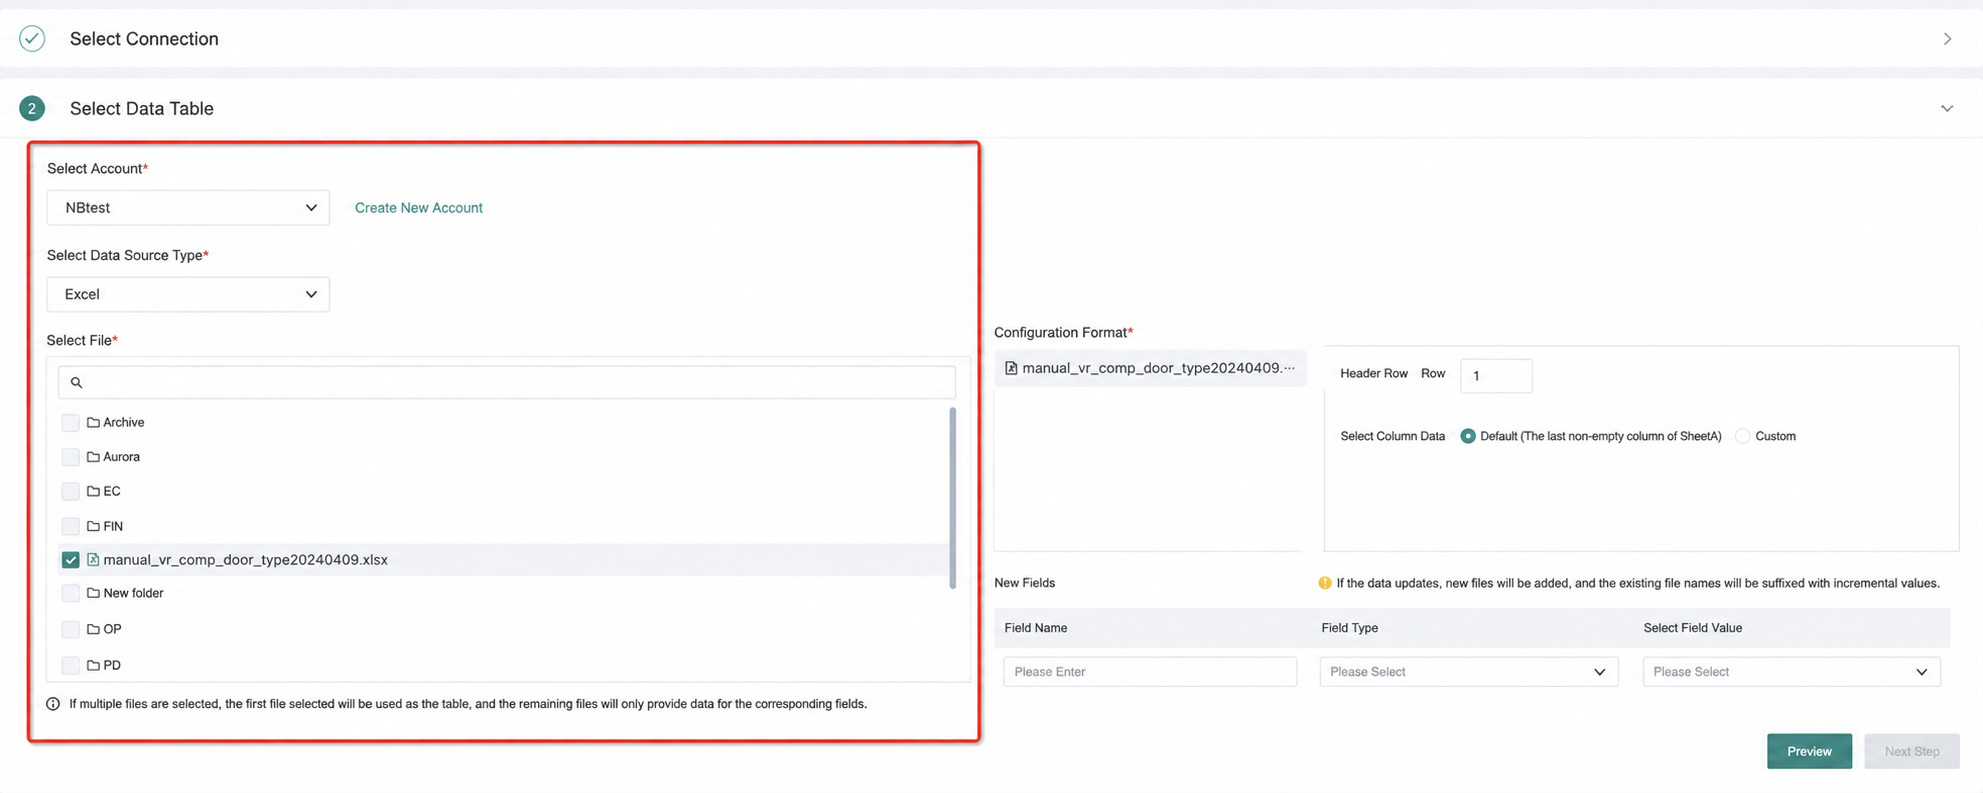
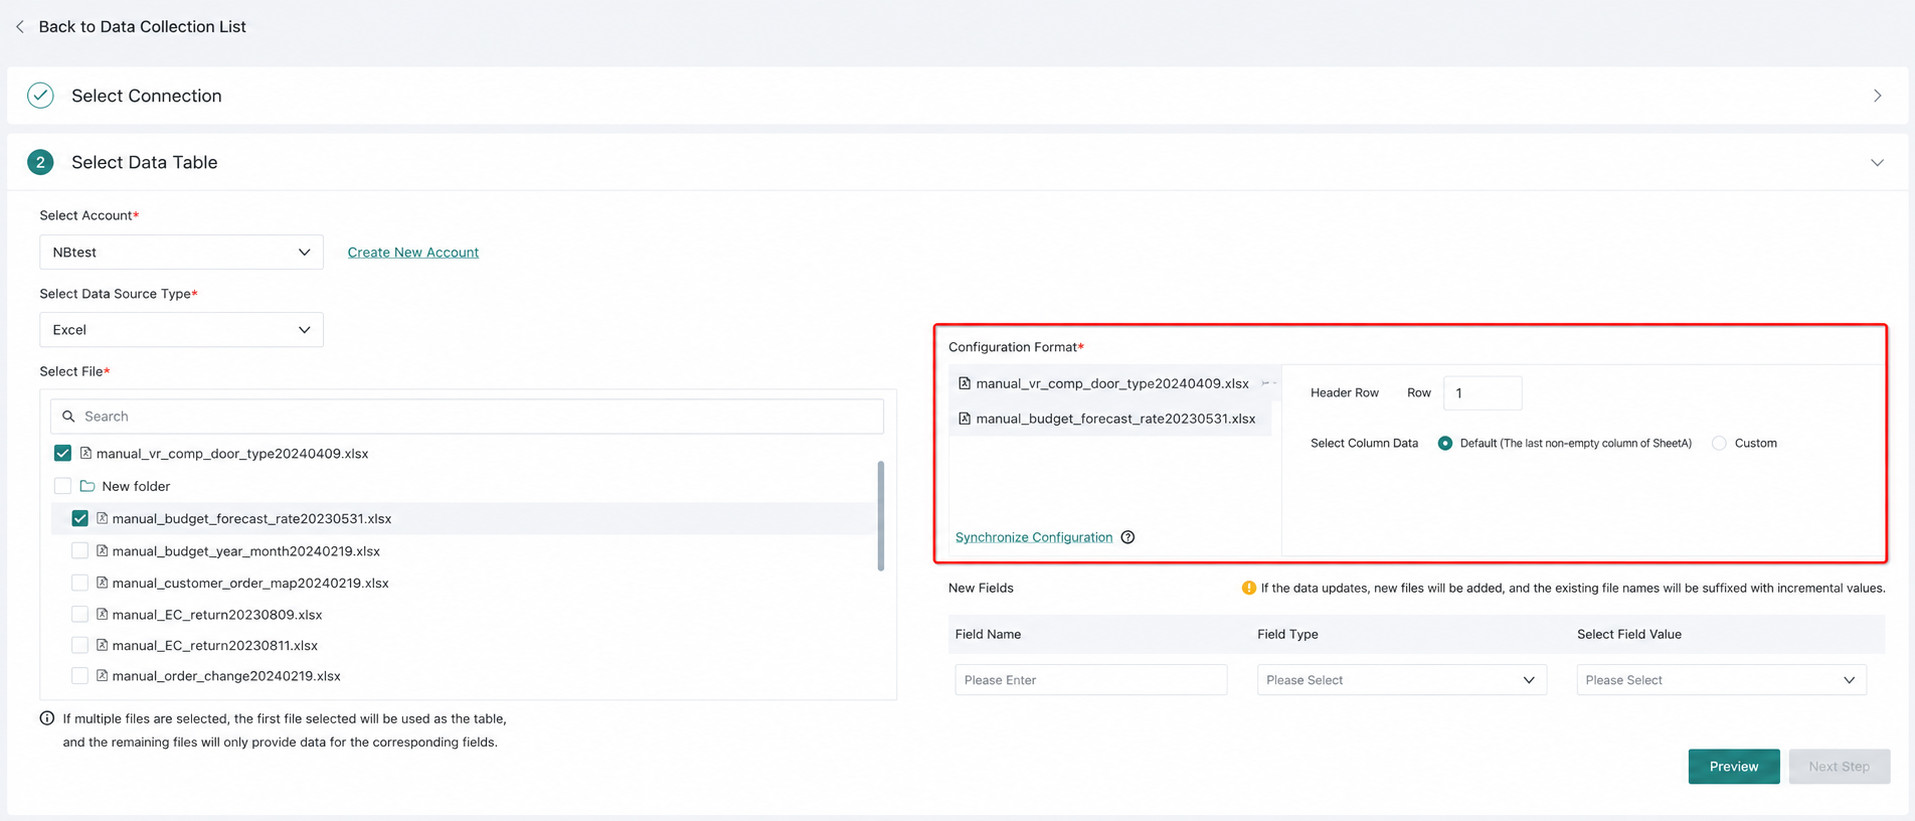
- If multiple files are selected, the system uses the processing rules for Excel or CSV file datasets.
- When multiple files are selected, the first file is used as the header reference, and the remaining files keep only data for fields that also exist in the first file.
- During data preview, only the first file is previewed.
- Both Excel and CSV files must be smaller than 500 MB.
4. Data Range Configuration (Optional)
- Set Header Row: You can define the header row position. The system imports data from the header row through the last non-empty row. The default header row is row 1.
- Select Columns: Click
Customto define a column range. The system imports only the specified columns. By default, it uses columns from A through the last non-empty column in the header. - When multiple worksheets share the same header row and column range, you can use
Sync Configurationto apply the current settings to the remaining datasets.
The system automatically creates datasets at the worksheet level.
5. Create a New Field (Optional)
When users download files from business systems, filenames often include the current date or timestamp. During FTP/SFTP dataset integration, you can use Create a New Field to write that timestamp into the dataset as well, making it possible to identify which specific date each detail record belongs to.
- You can define a new field name. At present, only the
Stringtype is supported, and the value is filled with the filename. - During incremental dataset updates, the incremental filename is written as the incremental field value.
ADLS Gen2
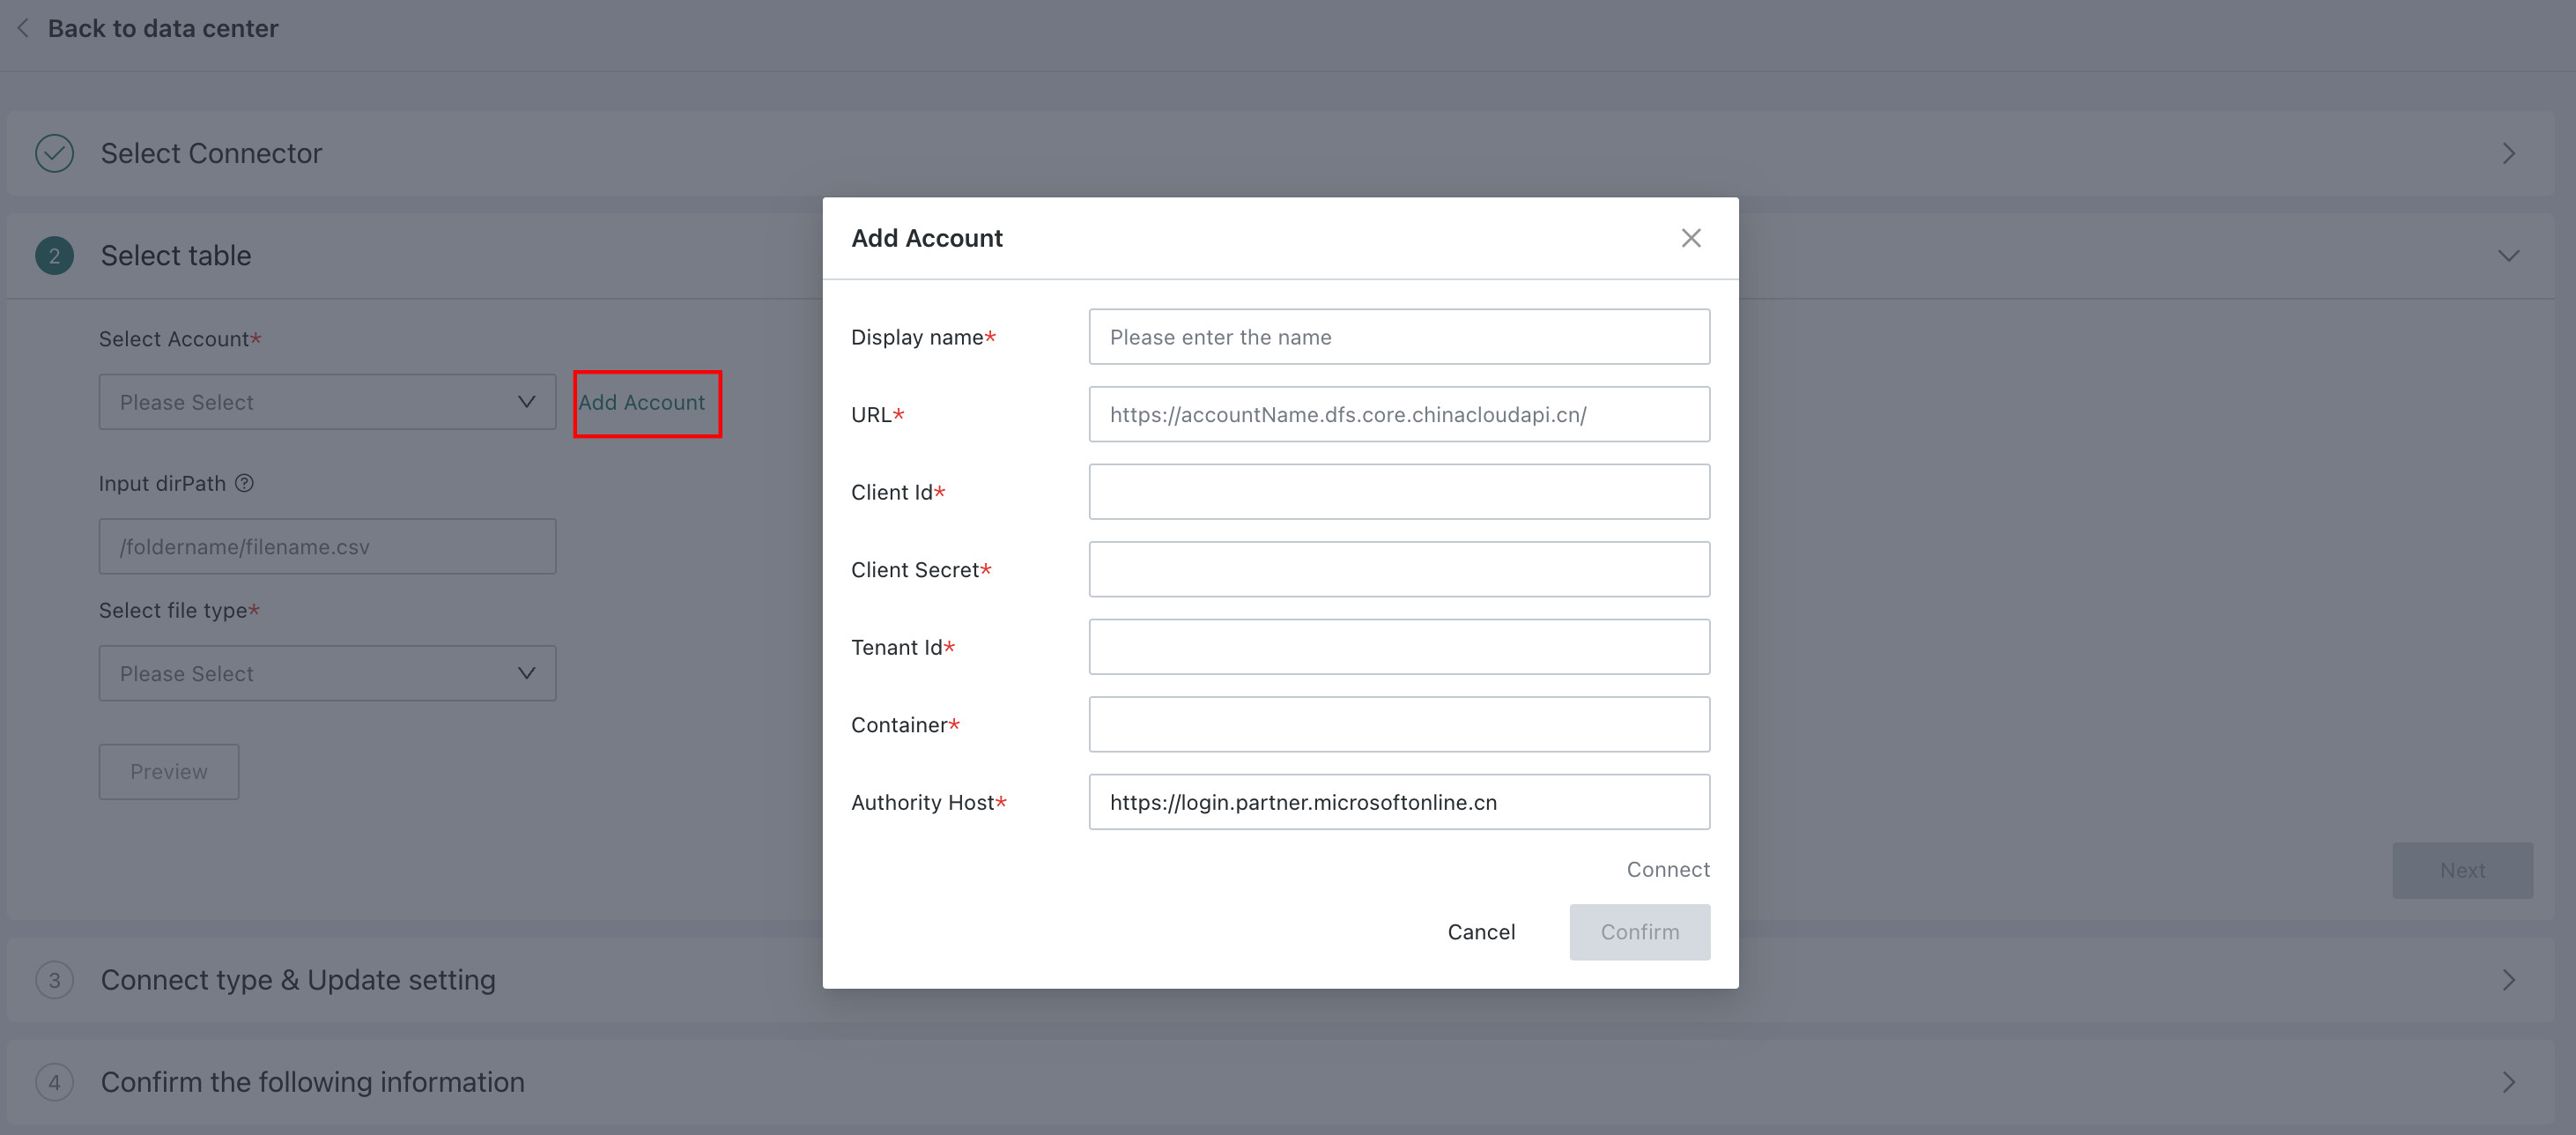
1. Select the Account
Choose an existing Data Account from the dropdown list. If no Data Account exists, click Add Account, enter the required target parameters such as URL, Client Id, Client Secret, and Tenant Id, then click Test Connection.
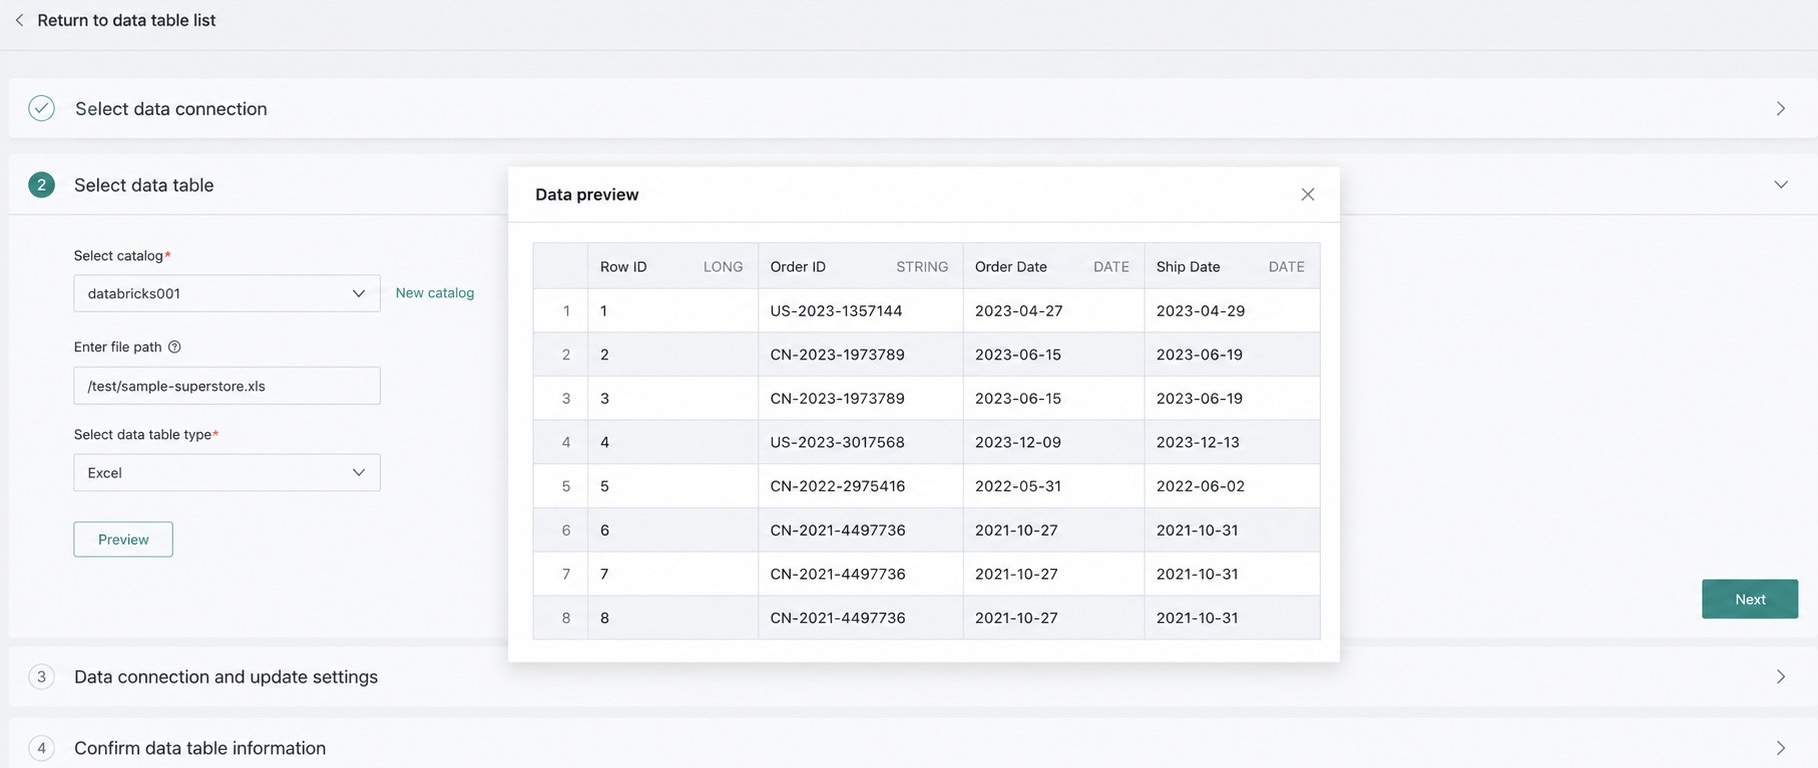
2. Enter the File Path
Copy the URL from the property directory in the overview section of the ADLS Gen2 file and paste it here. Only Excel and CSV files are supported.
3. Select the Data Table Type:
Only Excel and CSV files are supported.
4. Preview
After completing the steps above, click Preview. Once the previewed data is confirmed to be correct, click Next.
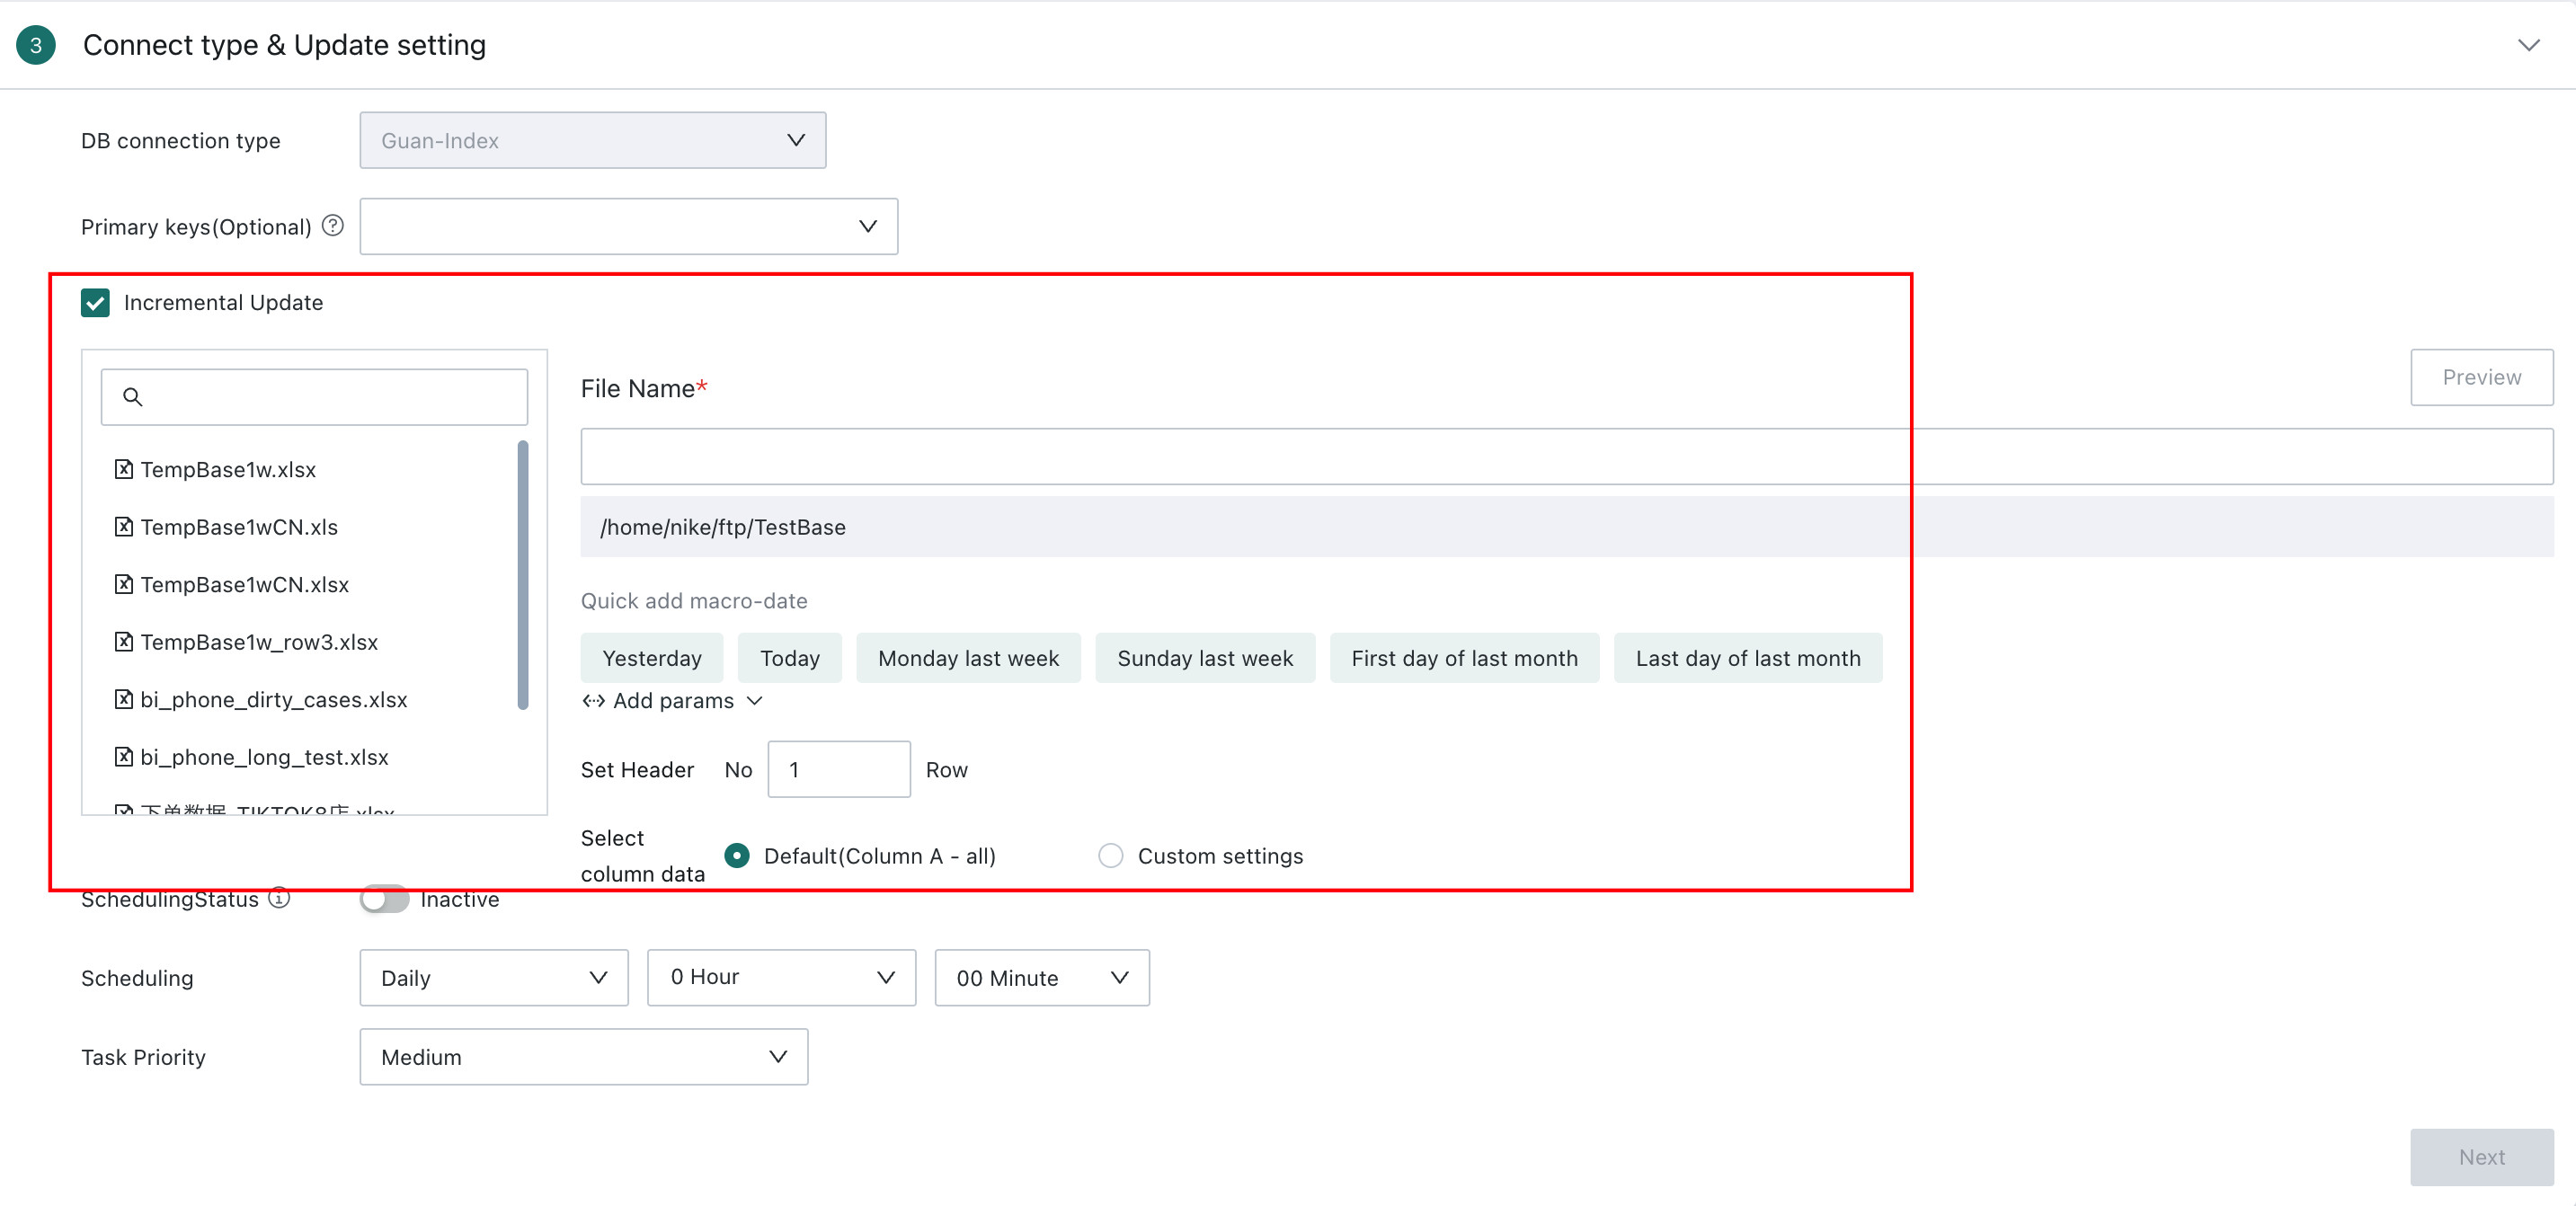
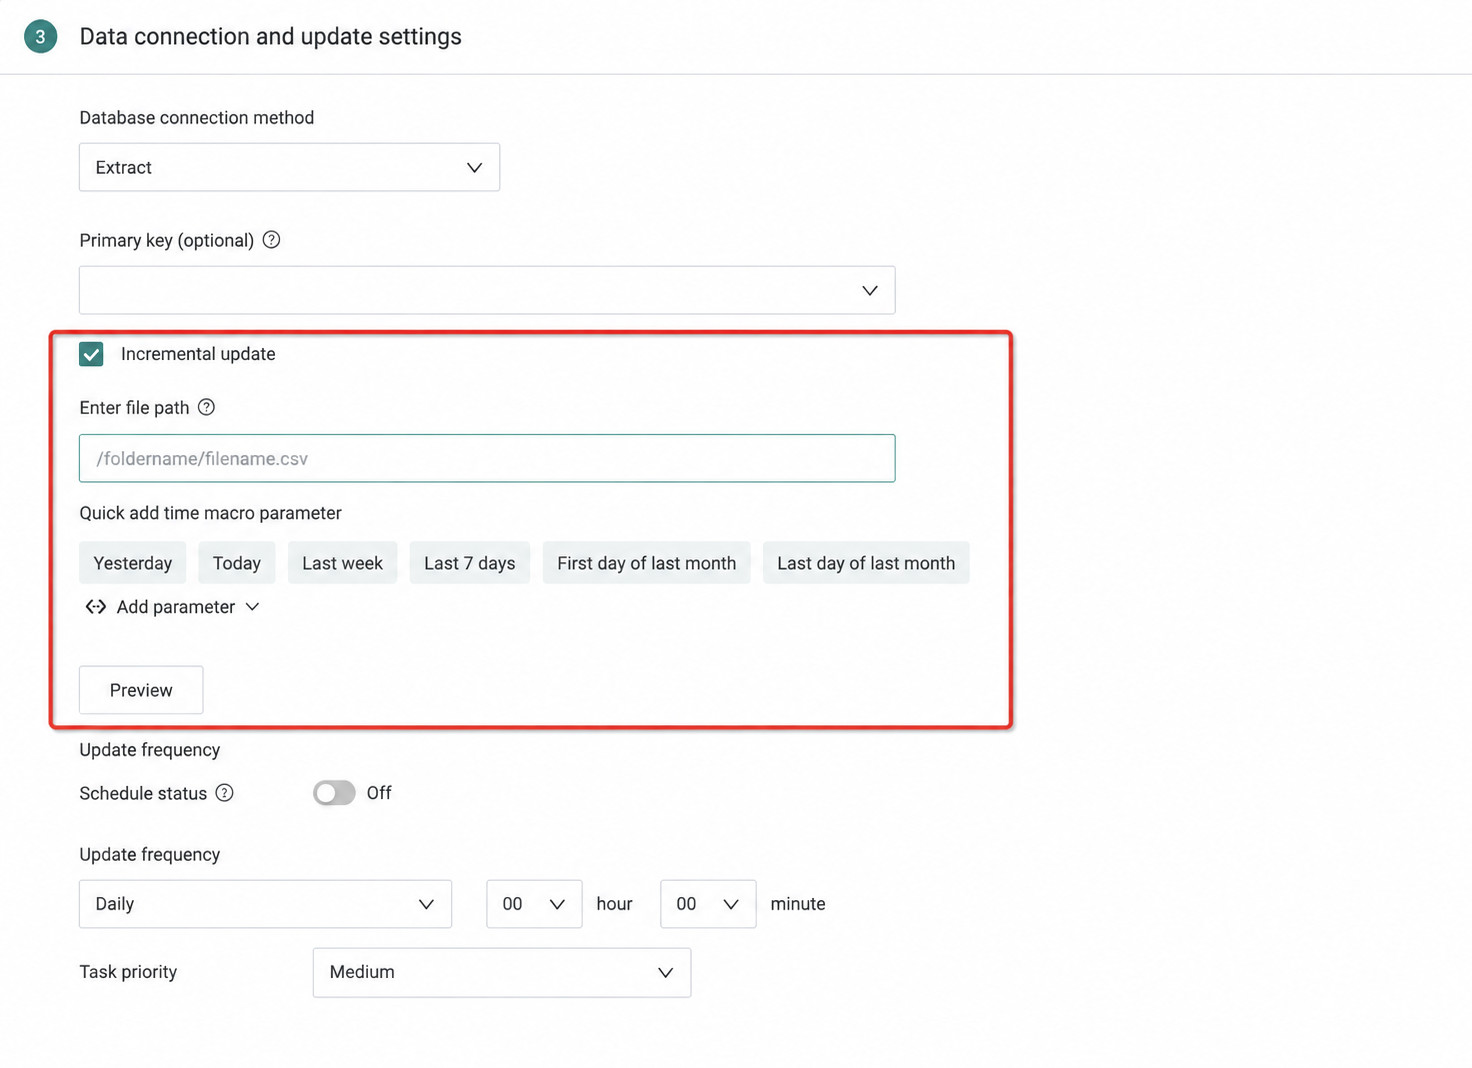
Configure the Update Method
FTP/SFTP
1. Data Connection Method: Only Extract is supported.
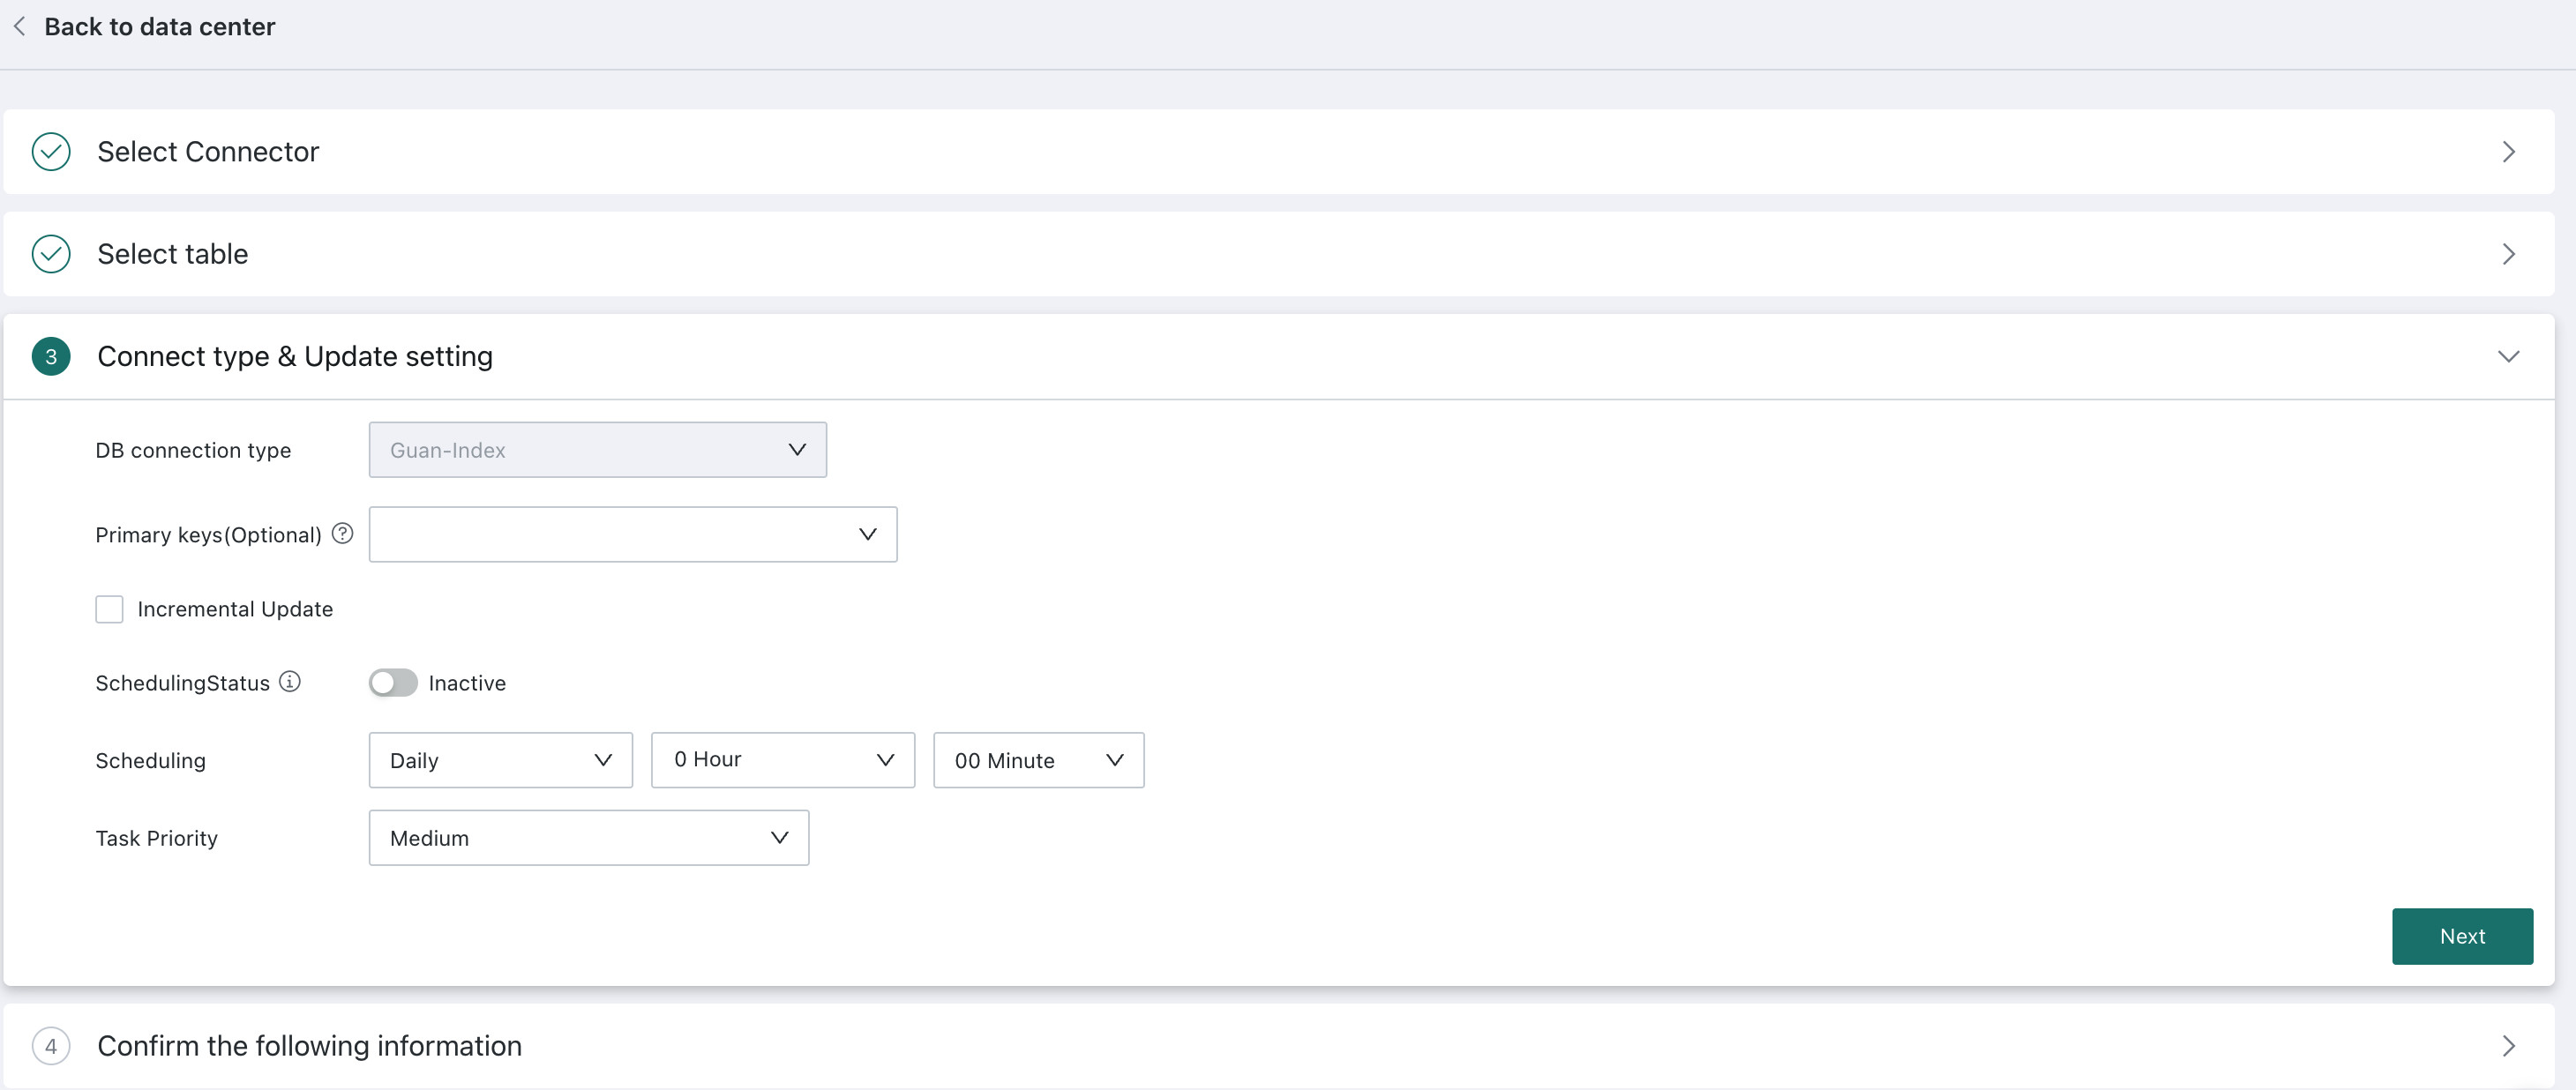
2. Deduplication Primary Key (Optional): Available options are taken from the field list of the first file.
3. Incremental Update: Supports either incremental updates or full refresh. If not selected, full refresh is used. For incremental updates, the update file can be specified through filename + time macro, for example: test-file-{{{yesterday}}}.csv
-
Quick-entry time macros are supported.
-
The system updates the data according to the configured update cycle.
-
Default update rule: all data matching the specified filename plus time macro is updated into the dataset. Other comparison operations are not supported.
| Update Type | Description |
| Full Refresh | When incremental update is not selected, every update replaces all data in the created dataset. The source of the full refresh is all files uploaded during the initial setup. If a corresponding file is missing from the FTP service, an error indicating that the file does not exist appears on the dataset details page. |
| Incremental Update | You can proceed only after entering the filename. In the left file panel, only single selection is allowed: either a folder or a specific file. After selecting a folder or file, the folder path is populated automatically. Folder path indicates which directory the update data is fetched from, and the default path is the directory configured in the Data Account. Filename indicates which data file is used for the update. Parameters are supported through global parameters. For details, see Global Parameters. When incrementally updating a CSV file, you also need to choose the file encoding and delimiter, just as in the initial creation step. The defaults are UTF-8 and comma ,. |
4. Data Update Cycle: Same as database datasets: Manual, Daily, Weekly, or Monthly.
5. Scheduling Status: When scheduling is enabled, dataset updates are triggered automatically according to the configured update cycle. When scheduling is disabled, automatic updates stop.

Manual and URL-triggered updates are not affected by the scheduling status.
6. Task Priority: Set different execution priorities for the current scheduled task based on business importance and urgency. Available priorities are Highest, High, Medium, Low, and Lowest. Highest means the task is executed before all other queued tasks.
ADLS Gen2
Except for the Incremental Update configuration, the update settings for ADLS Gen2 are basically the same as for FTP/SFTP. See the section above for details.
When configuring the ADLS Gen2 update method, after clicking Incremental Update, you must enter the file path. Copy the file path portion from the URL in the overview section of the ADLS Gen2 file and paste it into the corresponding input box. Only CSV and Excel files are supported.
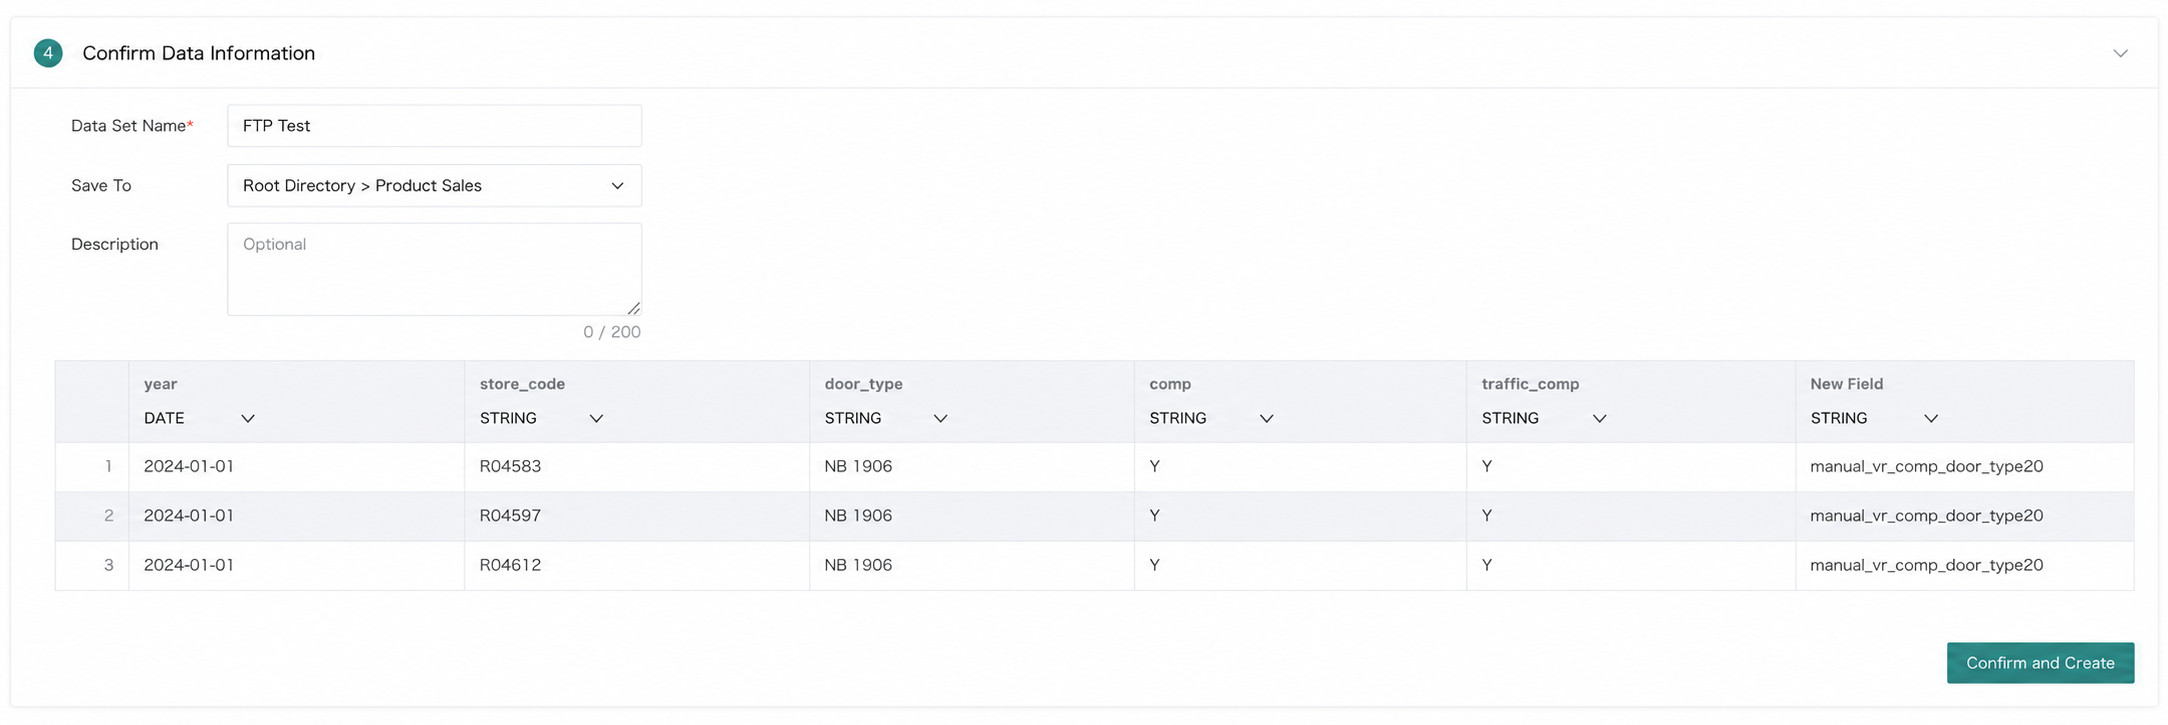
Confirm the Data Table Information
Enter the dataset name and save path, adjust field types if necessary, then click Confirm Creation to create the dataset.
Notes
For FTP/SFTP files:
- During the initial upload, a maximum of 10 files can be uploaded at one time, and the first upload supports up to 200 fields. If you need to upload many historical files, use
Update Data > Append New Data. - During incremental updates:
- Matching fields are written directly.
- Newly added fields are discarded.
- Missing fields are written as empty values.