Table Entry-Best Cases
Best Cases
Free Entry - Quickly Create Forms Based on Existing Excel Tables
Taking building an "Employee Archive Information Table" as an example.
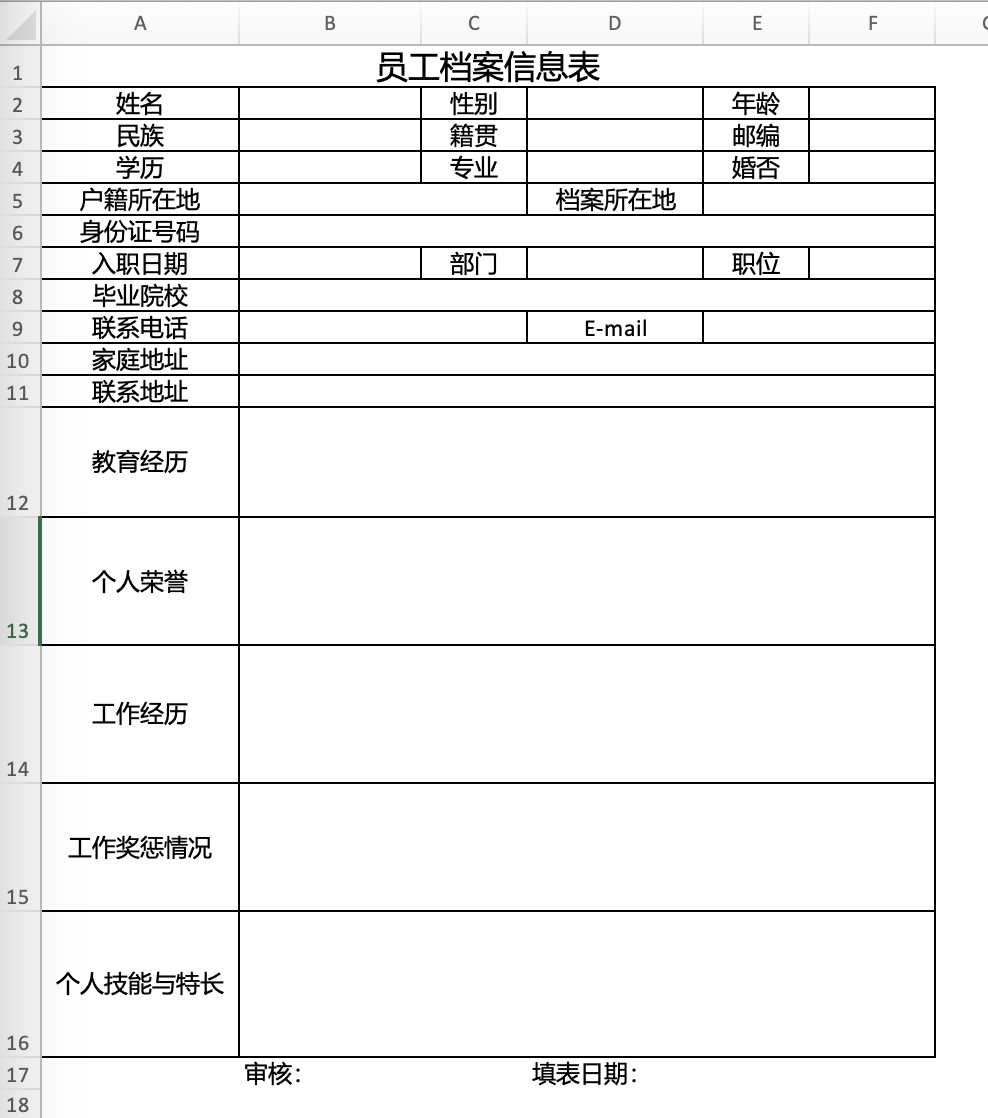
First step, we create a table entry card and skip the dataset selection step, directly importing the Excel template.

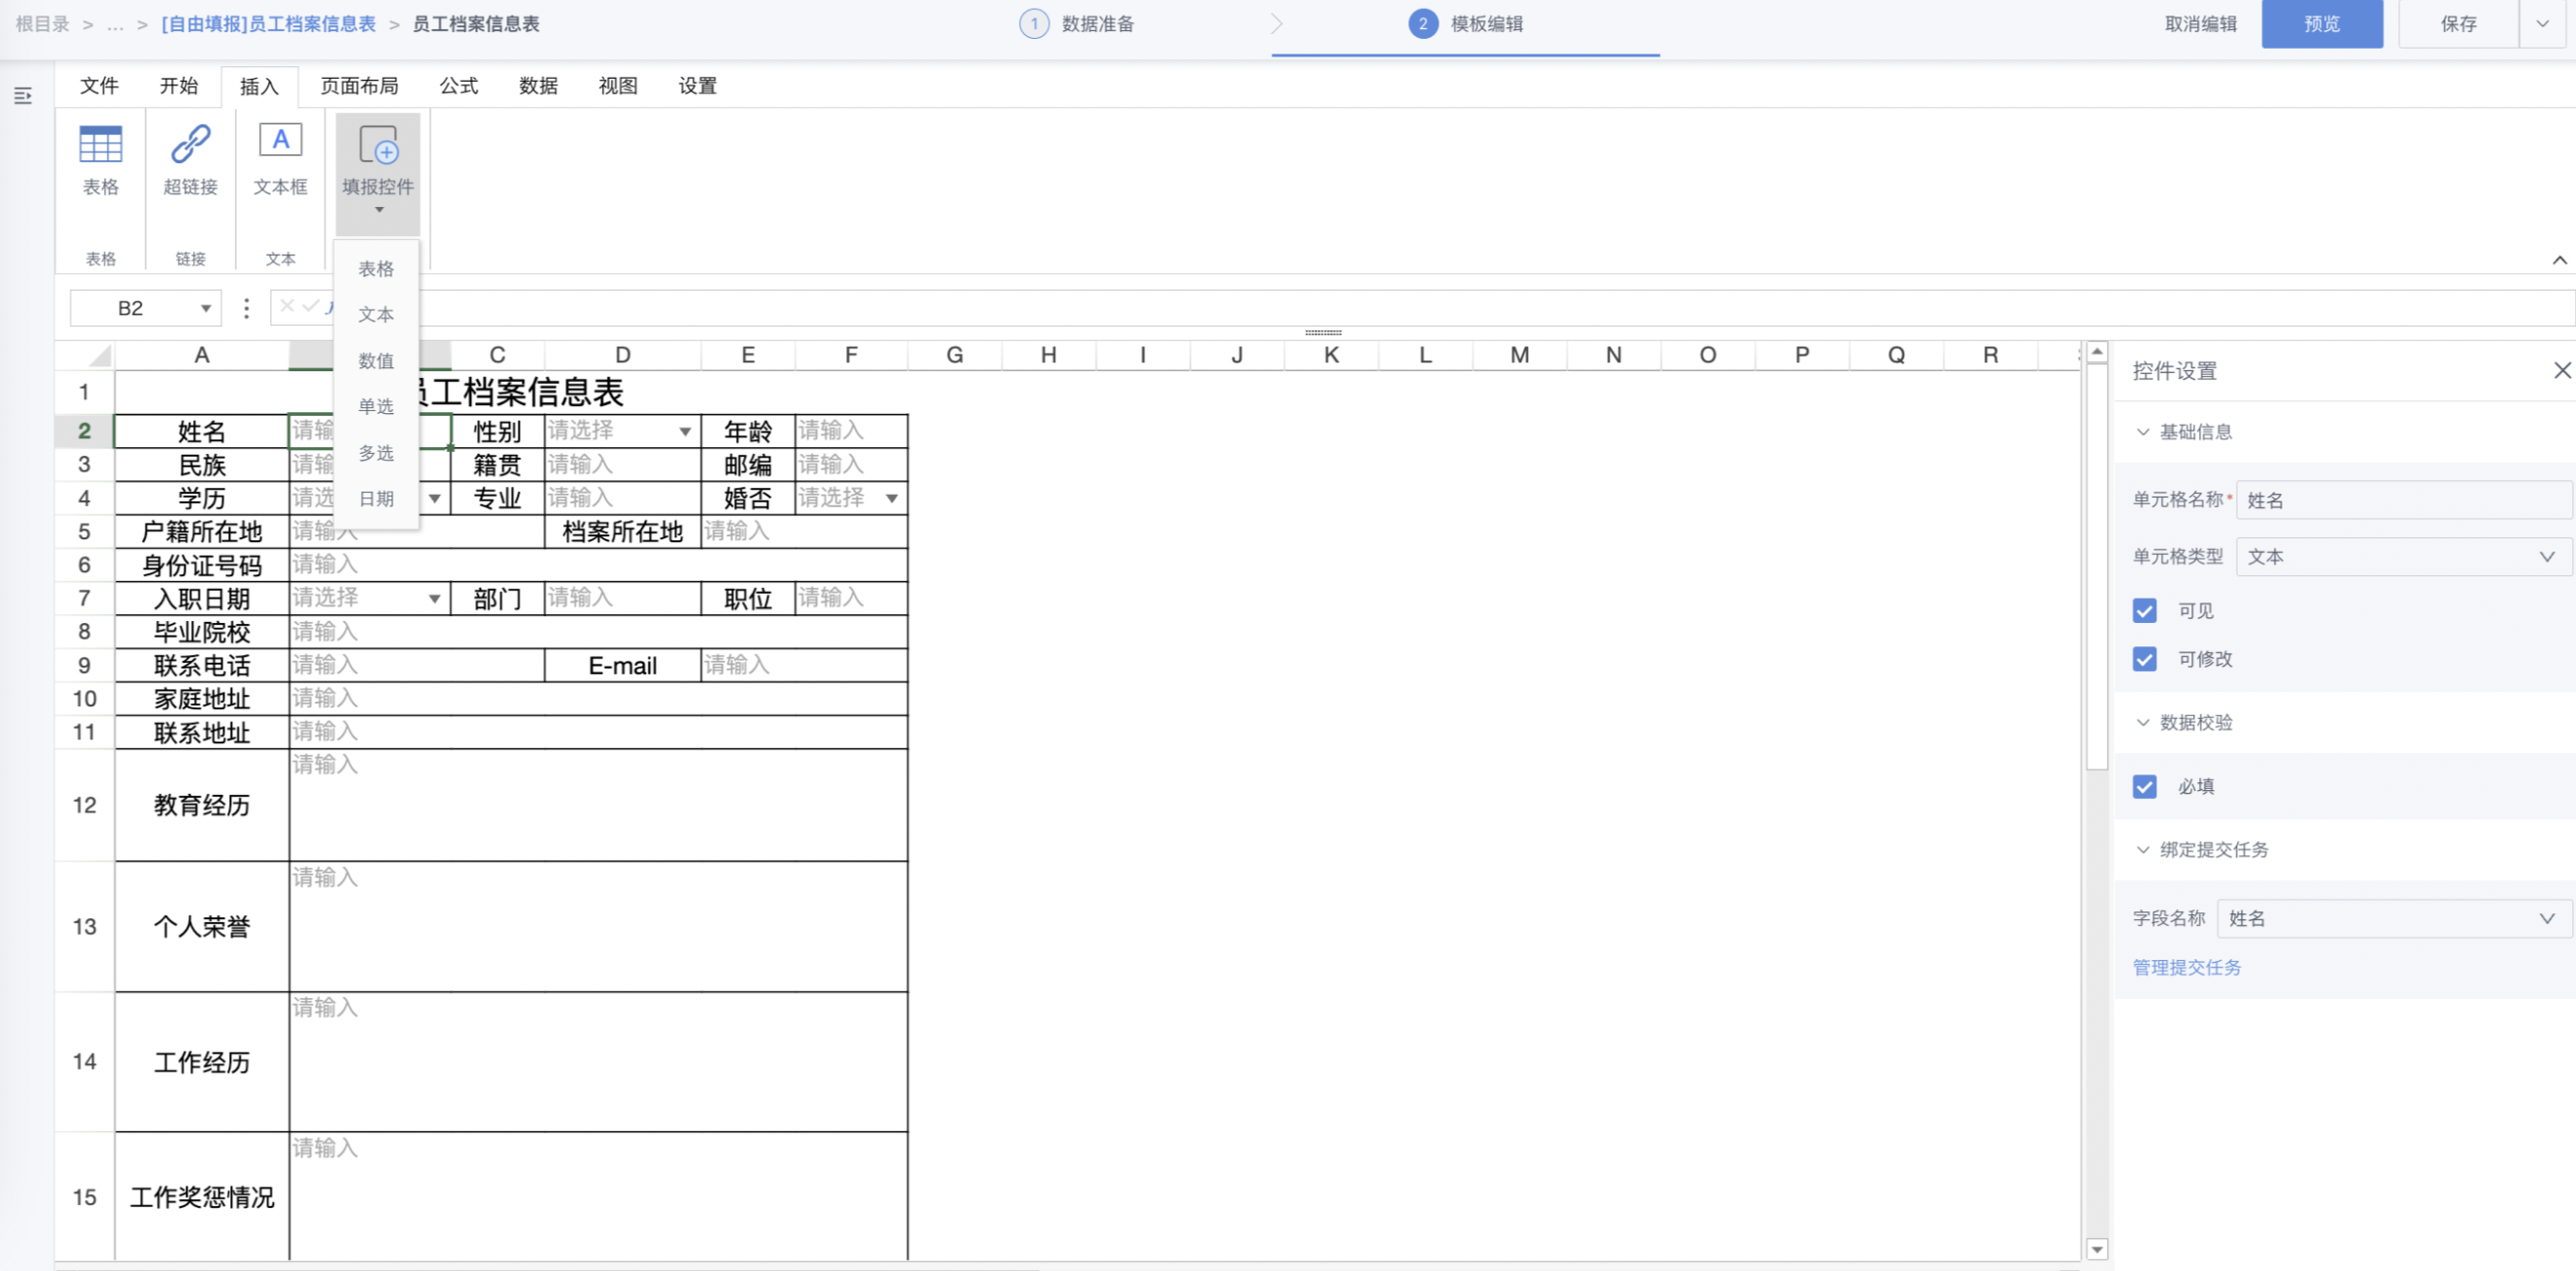
Second step, for cells that need to be filled and written back, set entry controls: "Insert tab-Entry Controls-Specific Control Type". The demo example configuration is as follows:
B2 - Text D2 - Single Choice F2 - Numeric
B3 - Text D3 - Text F3 - Text
B4 - Single Choice D4 - Text F4 - Single Choice
B5 - Text E5 - Text
B6 - Text
B7 - Date D7 - Department F7 - Position
B8 - Text
B9 - Text E9 - Text
B10 - Text
B11 - Text
B12 - Text
B13 - Text
B14 - Text
B15 - Text
B16 - Text
C17 - Text E17 - Date
Third step, after the entry cell configuration is complete, perform data submission settings: "Data tab - Data Submission Settings", select submission method as "Direct Write". Finally, beautify the table settings and modify the card name, and after completion, save the card.
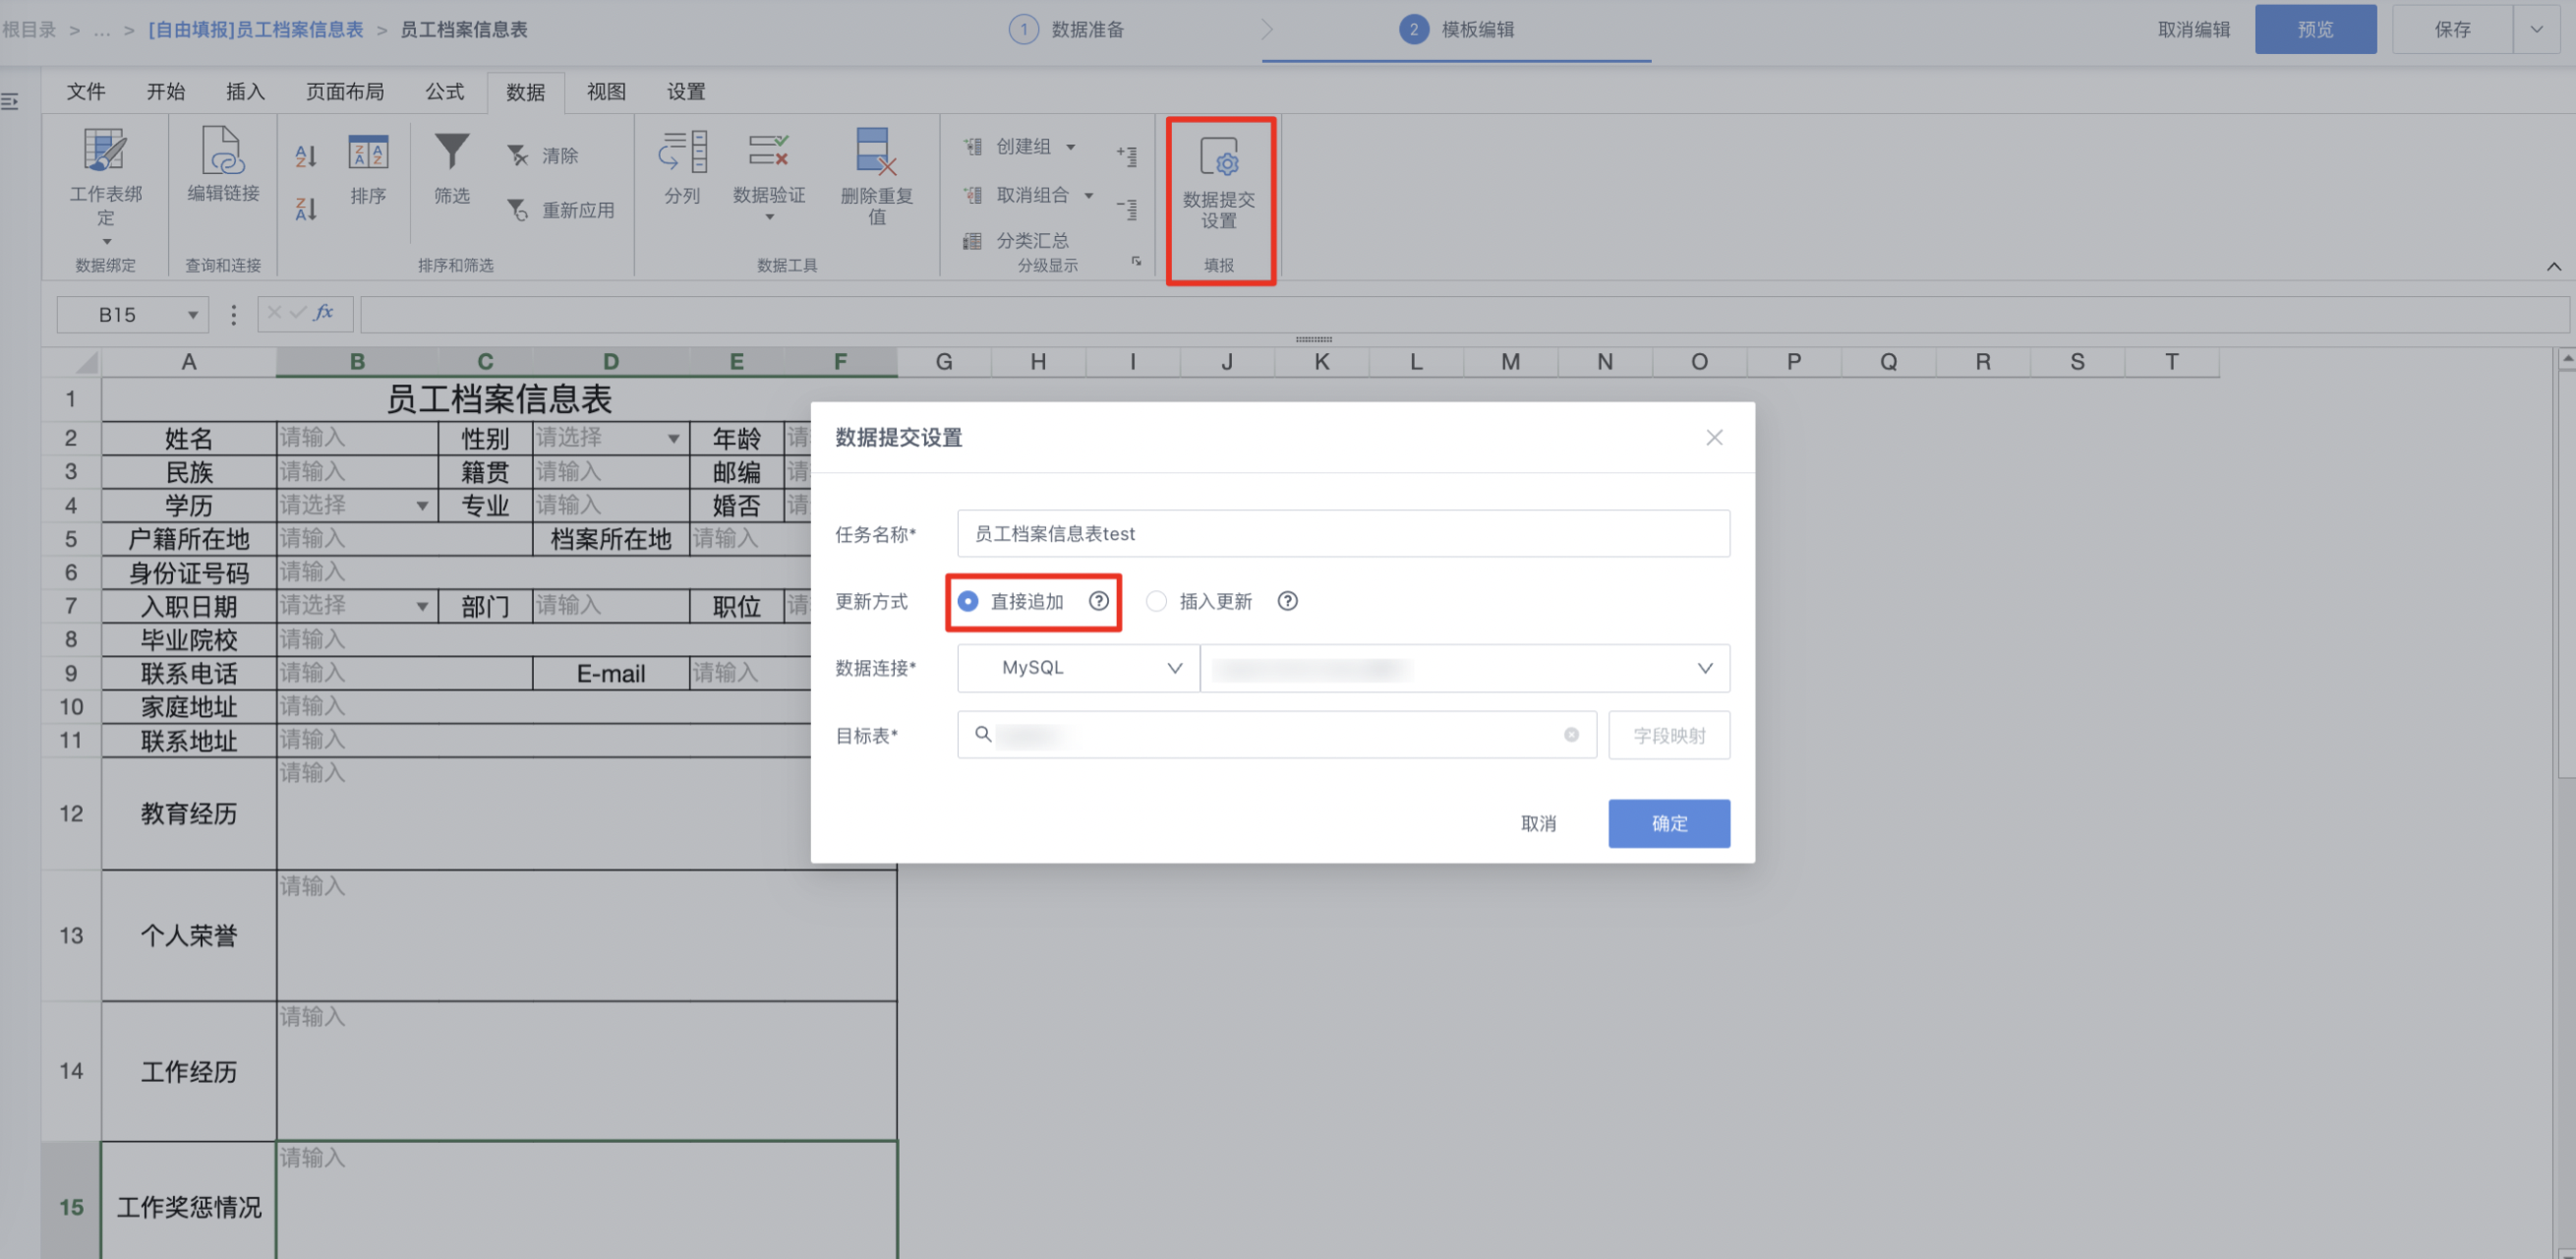
Note: Before configuring writeback, please first configure data connection accounts in BI and ensure that the account has database write permissions.
Table Entry - Building Entry Tables from Scratch
In the invoice management scenario, we can build an entry scenario like this.
First step, create a new page for new invoice entry. In this page, select New Card-Create Entry Card, skip the dataset association step (similar to free entry, not repeated).
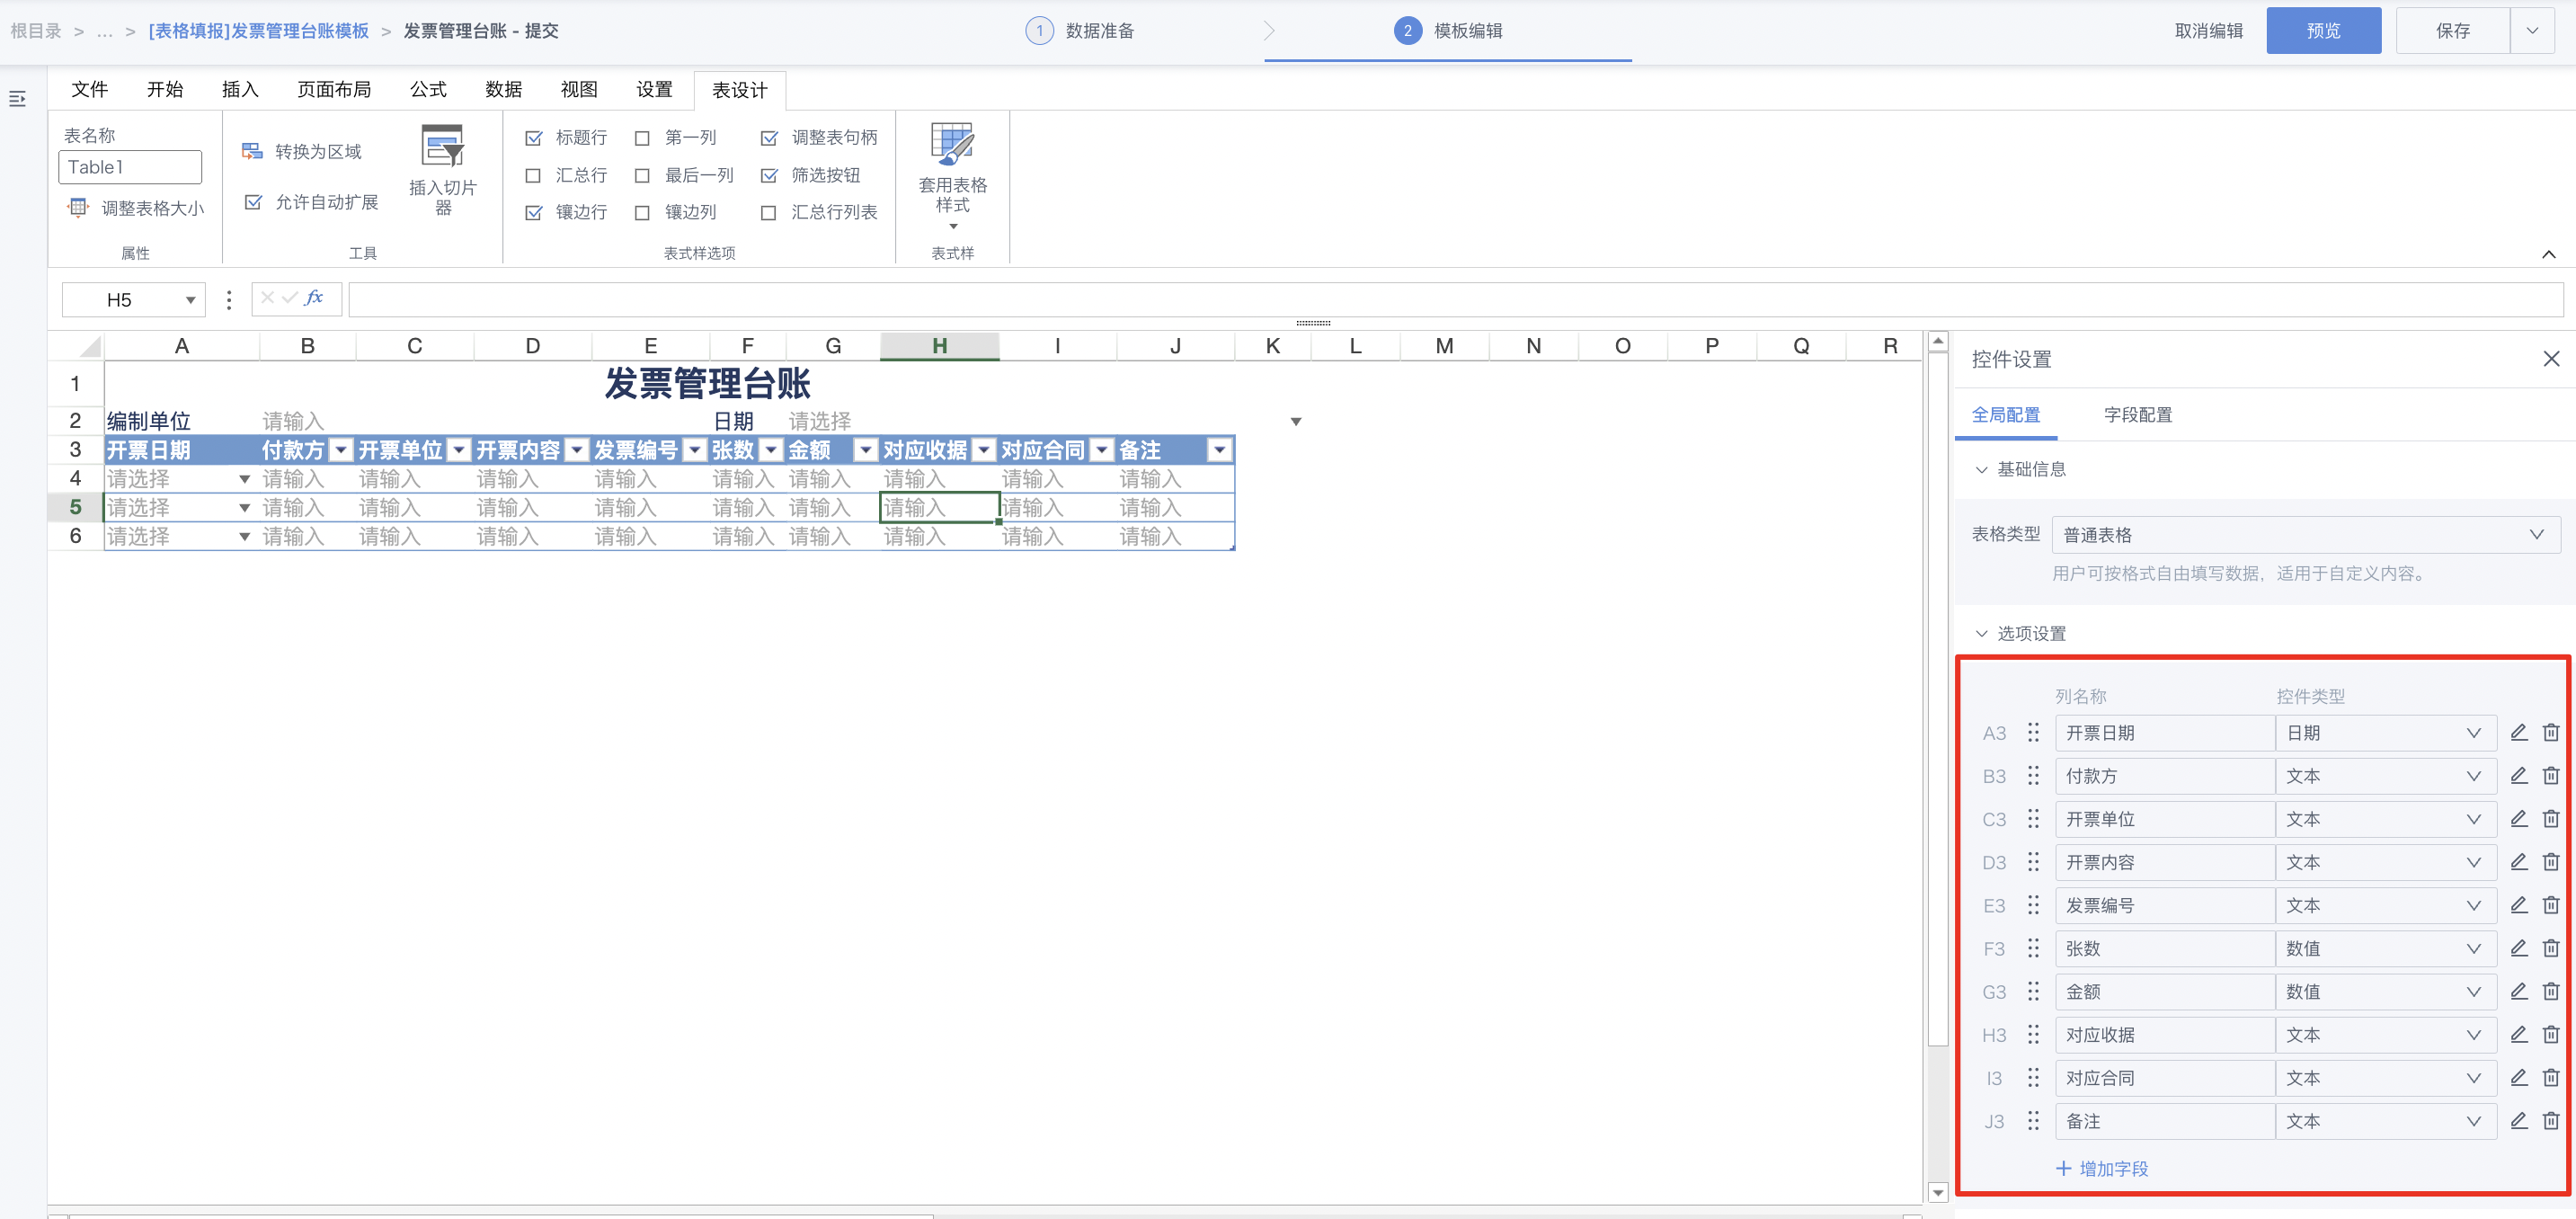
Second step, draw table header information and set entry cell controls: "Insert tab-Entry Controls-Specific Control Type". The table header cell configuration here is as follows:
B2 - Text G2 - Date
Third step, set table controls: "Insert tab-Entry Controls-Table Controls", and select "Regular Table". Reserve a certain number of rows according to the required number of rows to fill, and the table control configuration is as follows:
A3 - Date B3 - Text C3 - Text D3 - Text E3 - Text F3 - Numeric G3 - Numeric H3 - Text I3 - Text J3 - Single Choice K3 - Text
Fourth step, after table configuration is complete, perform data submission settings: "Data tab - Data Submission Settings", select submission method as "Direct Write".
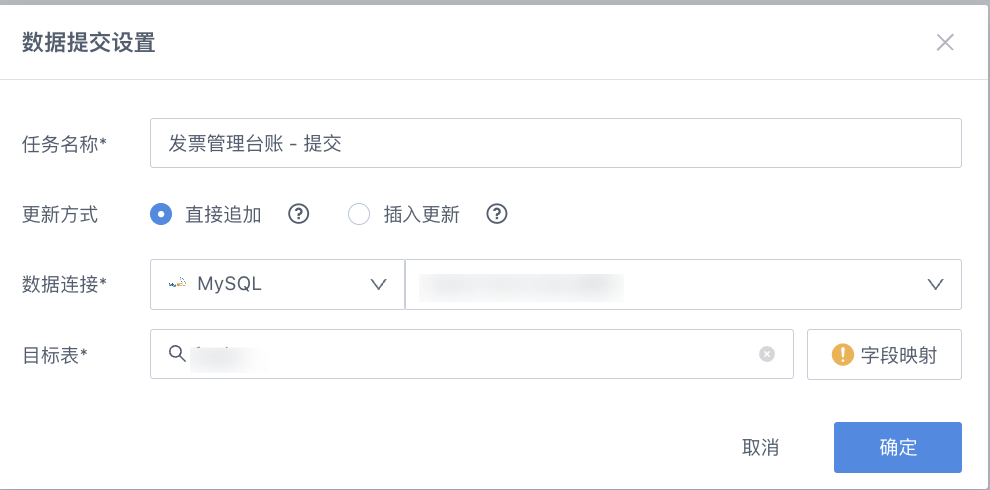
Note: Before configuring writeback, please first configure data connection accounts in BI and ensure that the account has database write permissions.
Fifth step, beautify the table settings and modify the card name, and after completion, save the card.
At this time, for invoice entry personnel, the data after submission will directly enter the database.
Sixth step, create a new page for invoice information modification. Save the previously created card as and store it in this page, then enter card editing.
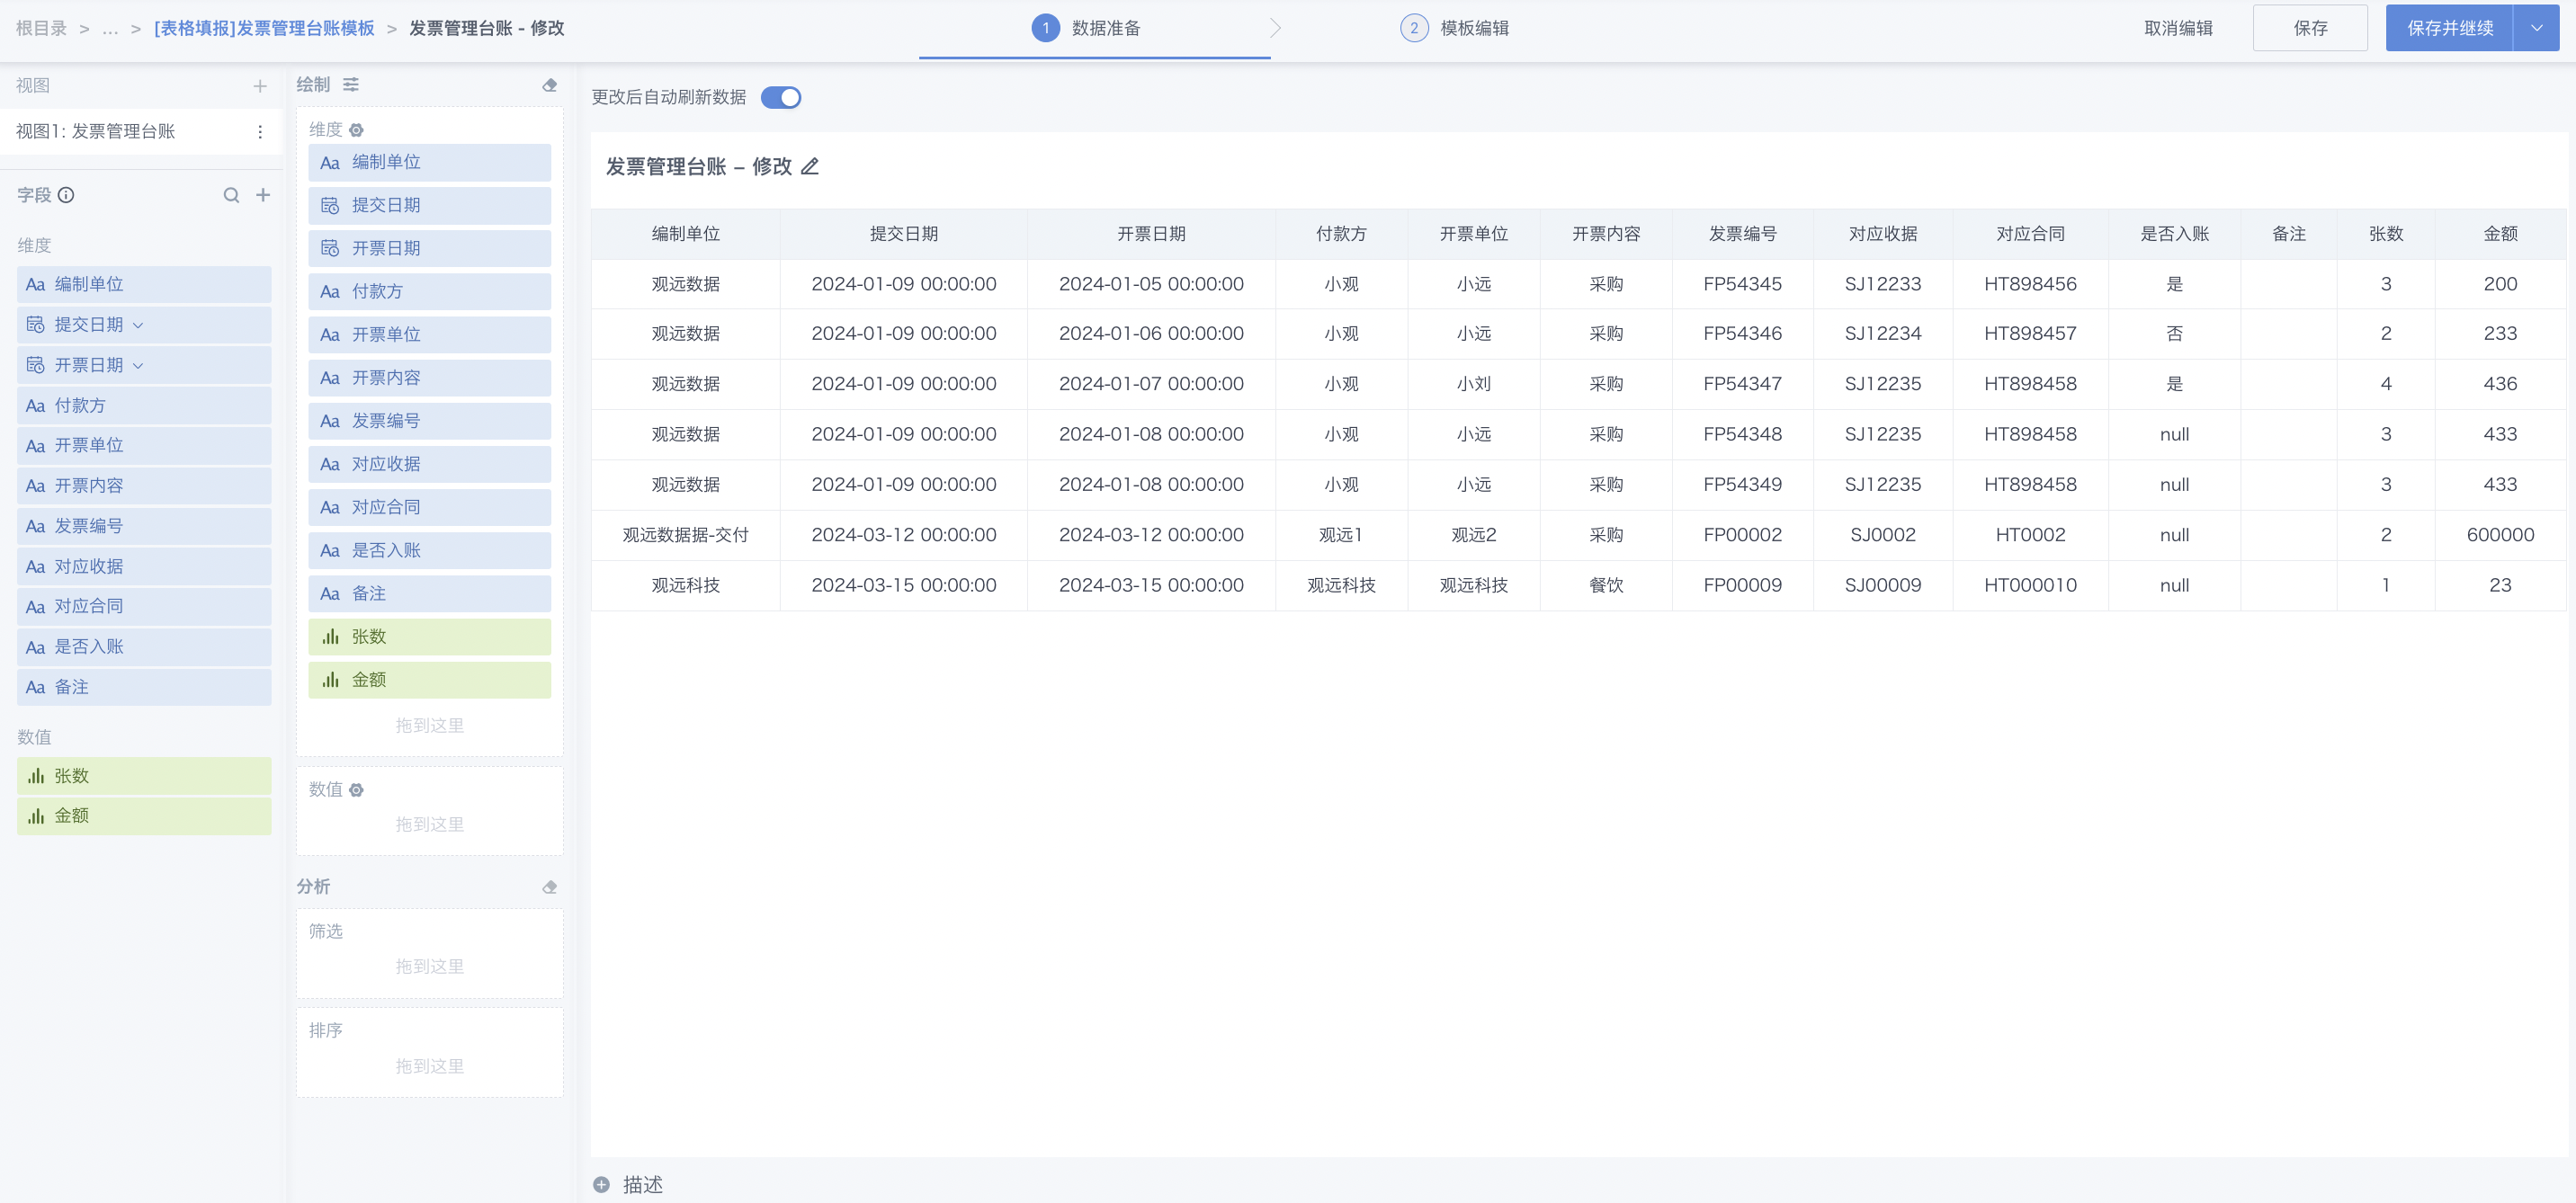
Seventh step, in the data preparation interface, build a view dataset, and the built table structure is the fill table structure.
Note: Please confirm that when executing this step, the table used for previous writeback has been connected to BI.
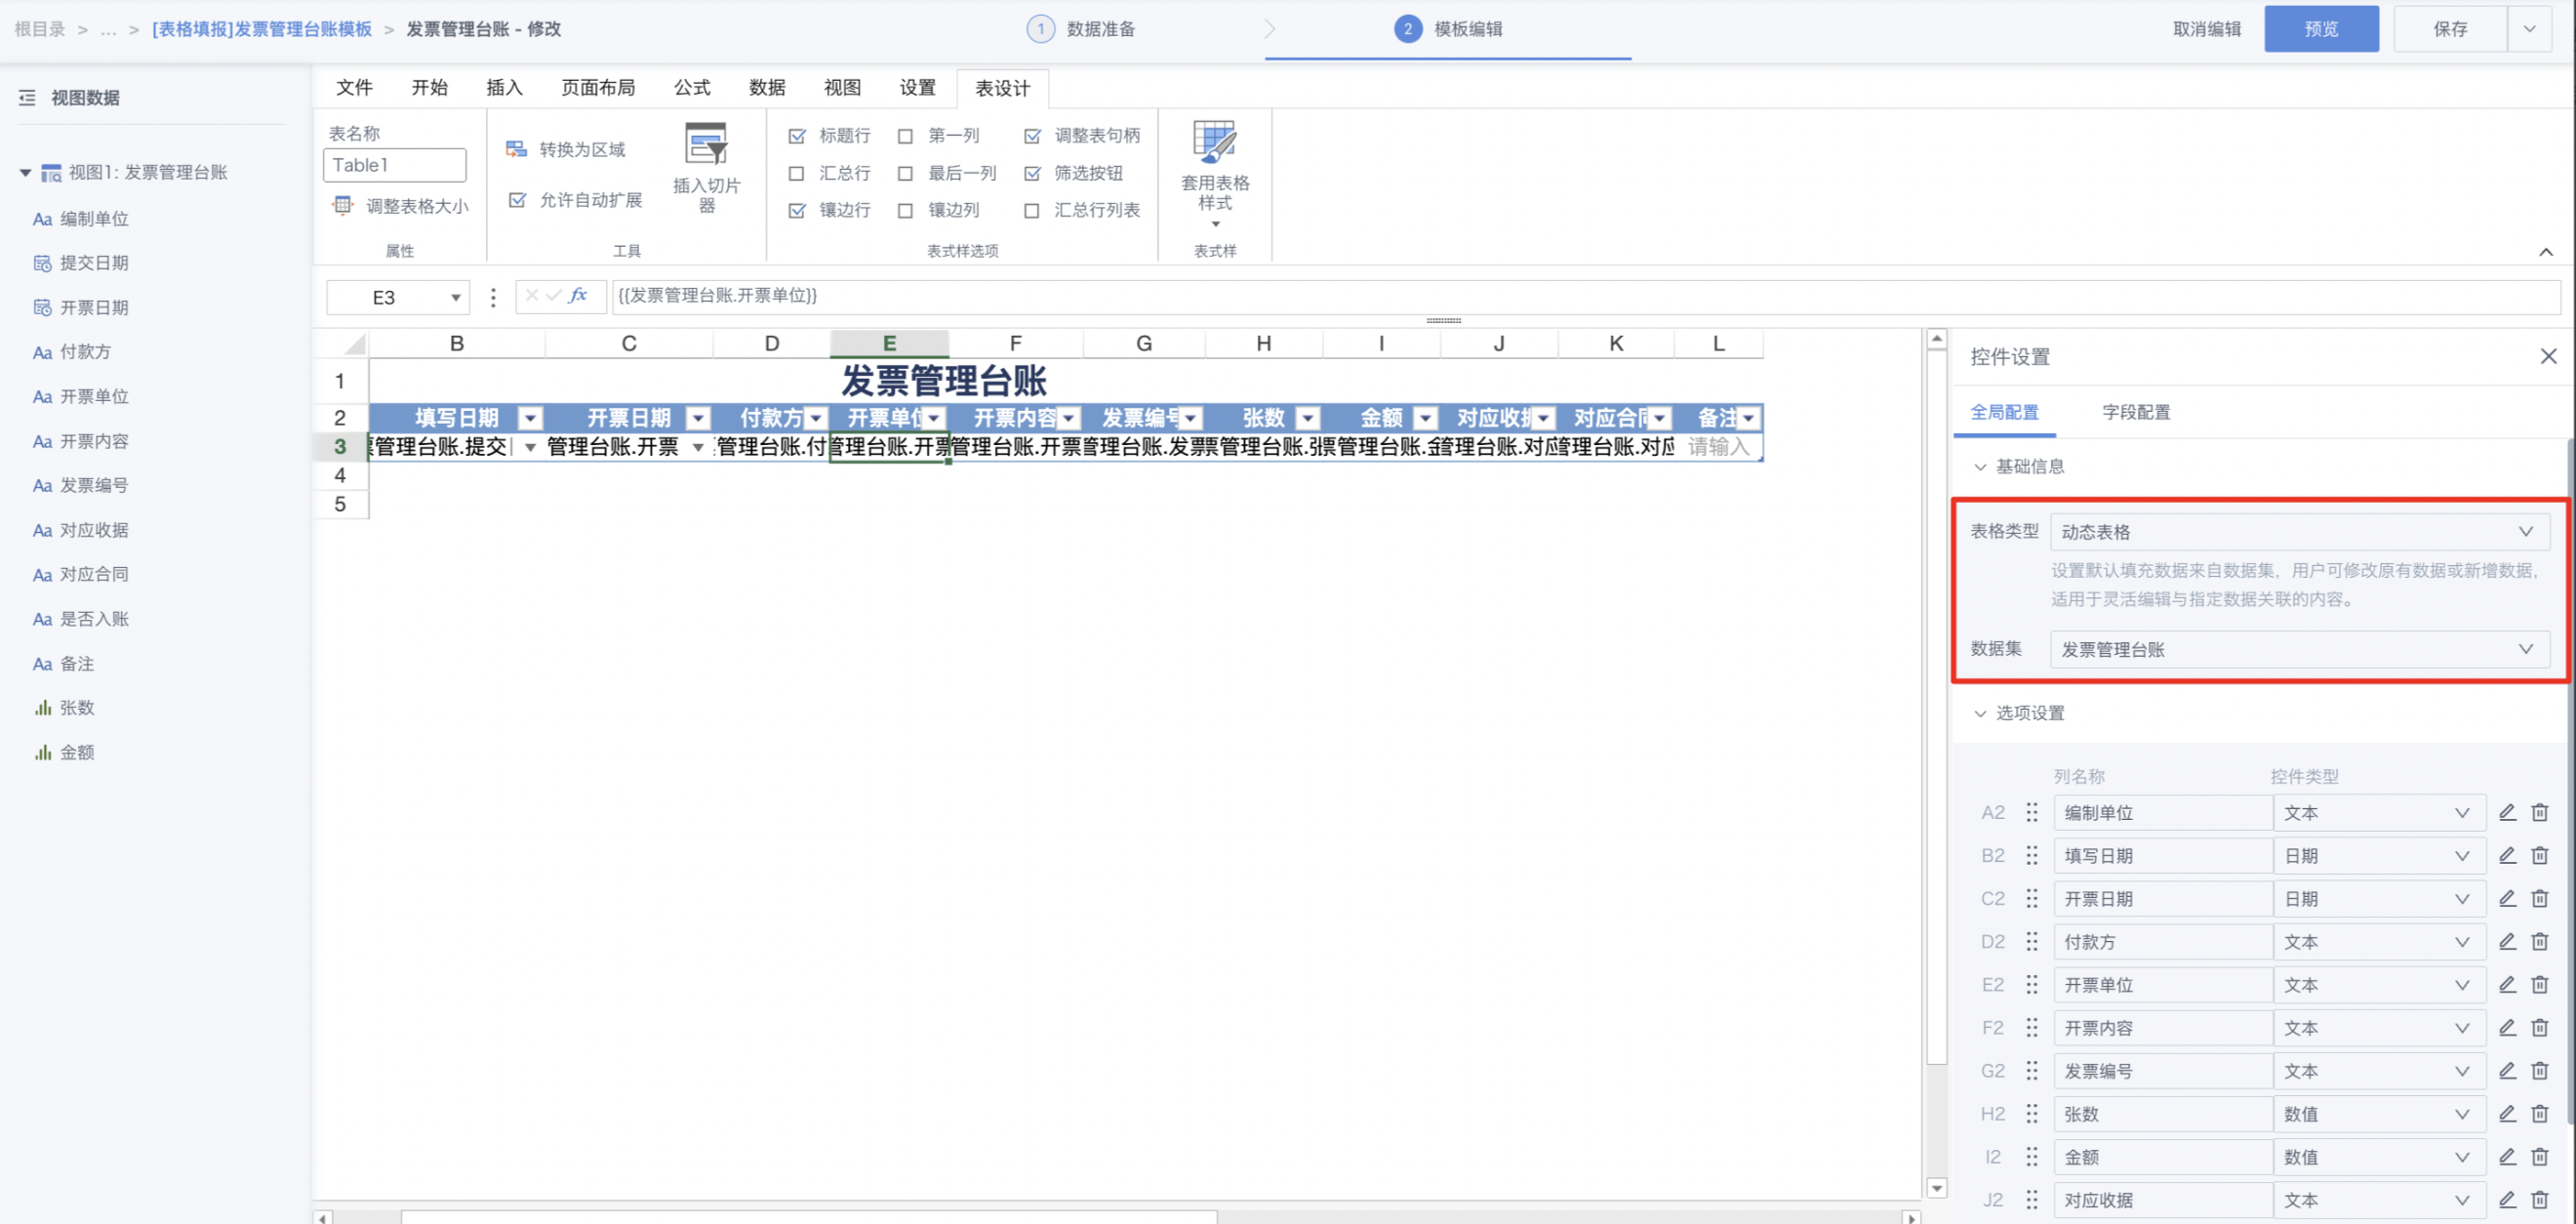
Eighth step, save and enter the template editing interface, convert the "Regular Table" control to "Dynamic Table" control, and add "Preparing Unit" and "Entry Date" as table columns, drag the view dataset fields to the corresponding positions in the table, and uncheck "Editable" for non-editable fields.
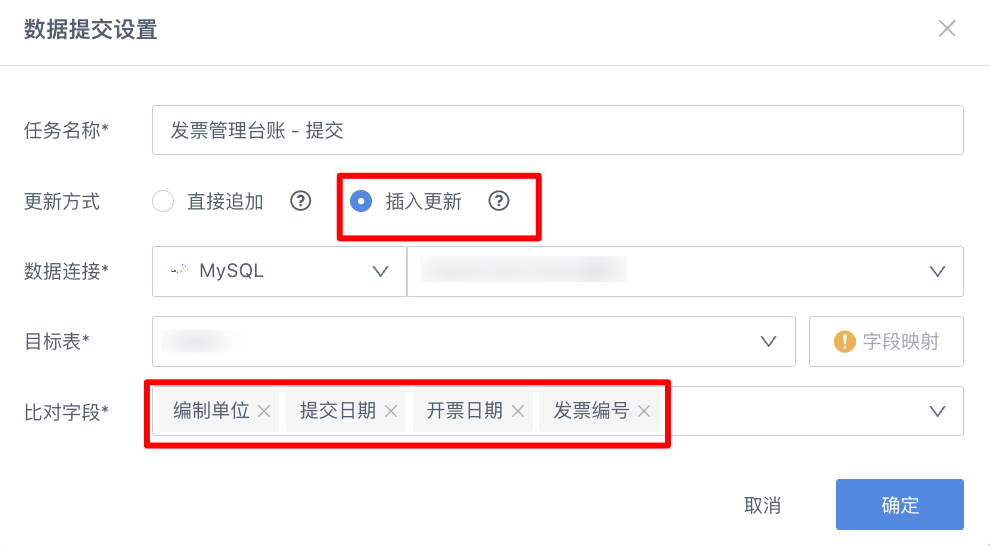
Ninth step, after table configuration is complete, perform data submission settings: "Data tab - Data Submission Settings", select submission method as "Insert-Update", and set comparison fields as "Submission Date", "Preparing Unit", "Invoice Date", "Invoice Number".
Tenth step, beautify the table settings and modify the card name, and after completion, save the card.
At this time, for personnel with permission to modify entry content, the modified data will overwrite the originally filled content (note not to change the comparison fields).
Dynamic Table Practice - Modifying Existing Data Table Content
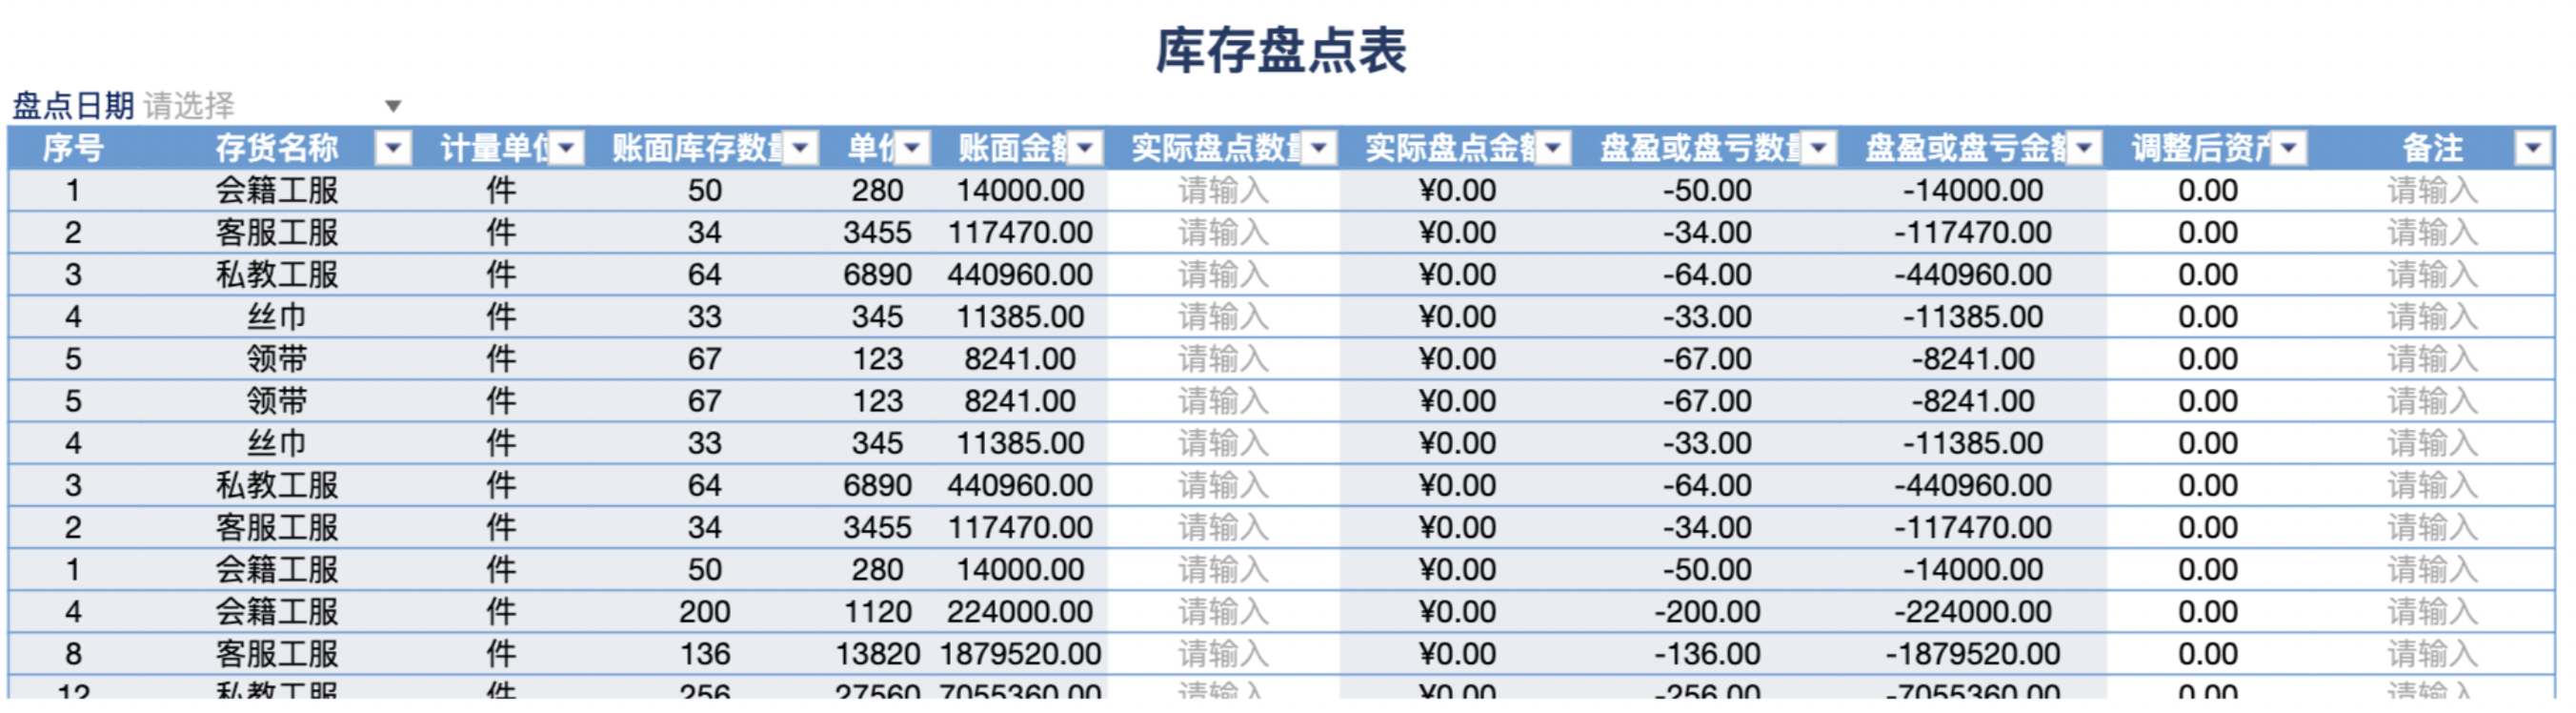
In the inventory scenario, we can build an entry scenario like this.

First step, create a new page, select New Card-Create Entry Card, and select the dataset as book data from the business system.
Note: Here you need to first summarize and integrate the book data from the business system, then use it for entry reference.
Second step, in the data preparation interface, build a view dataset, and the built table structure is the reference data needed when filling the table.
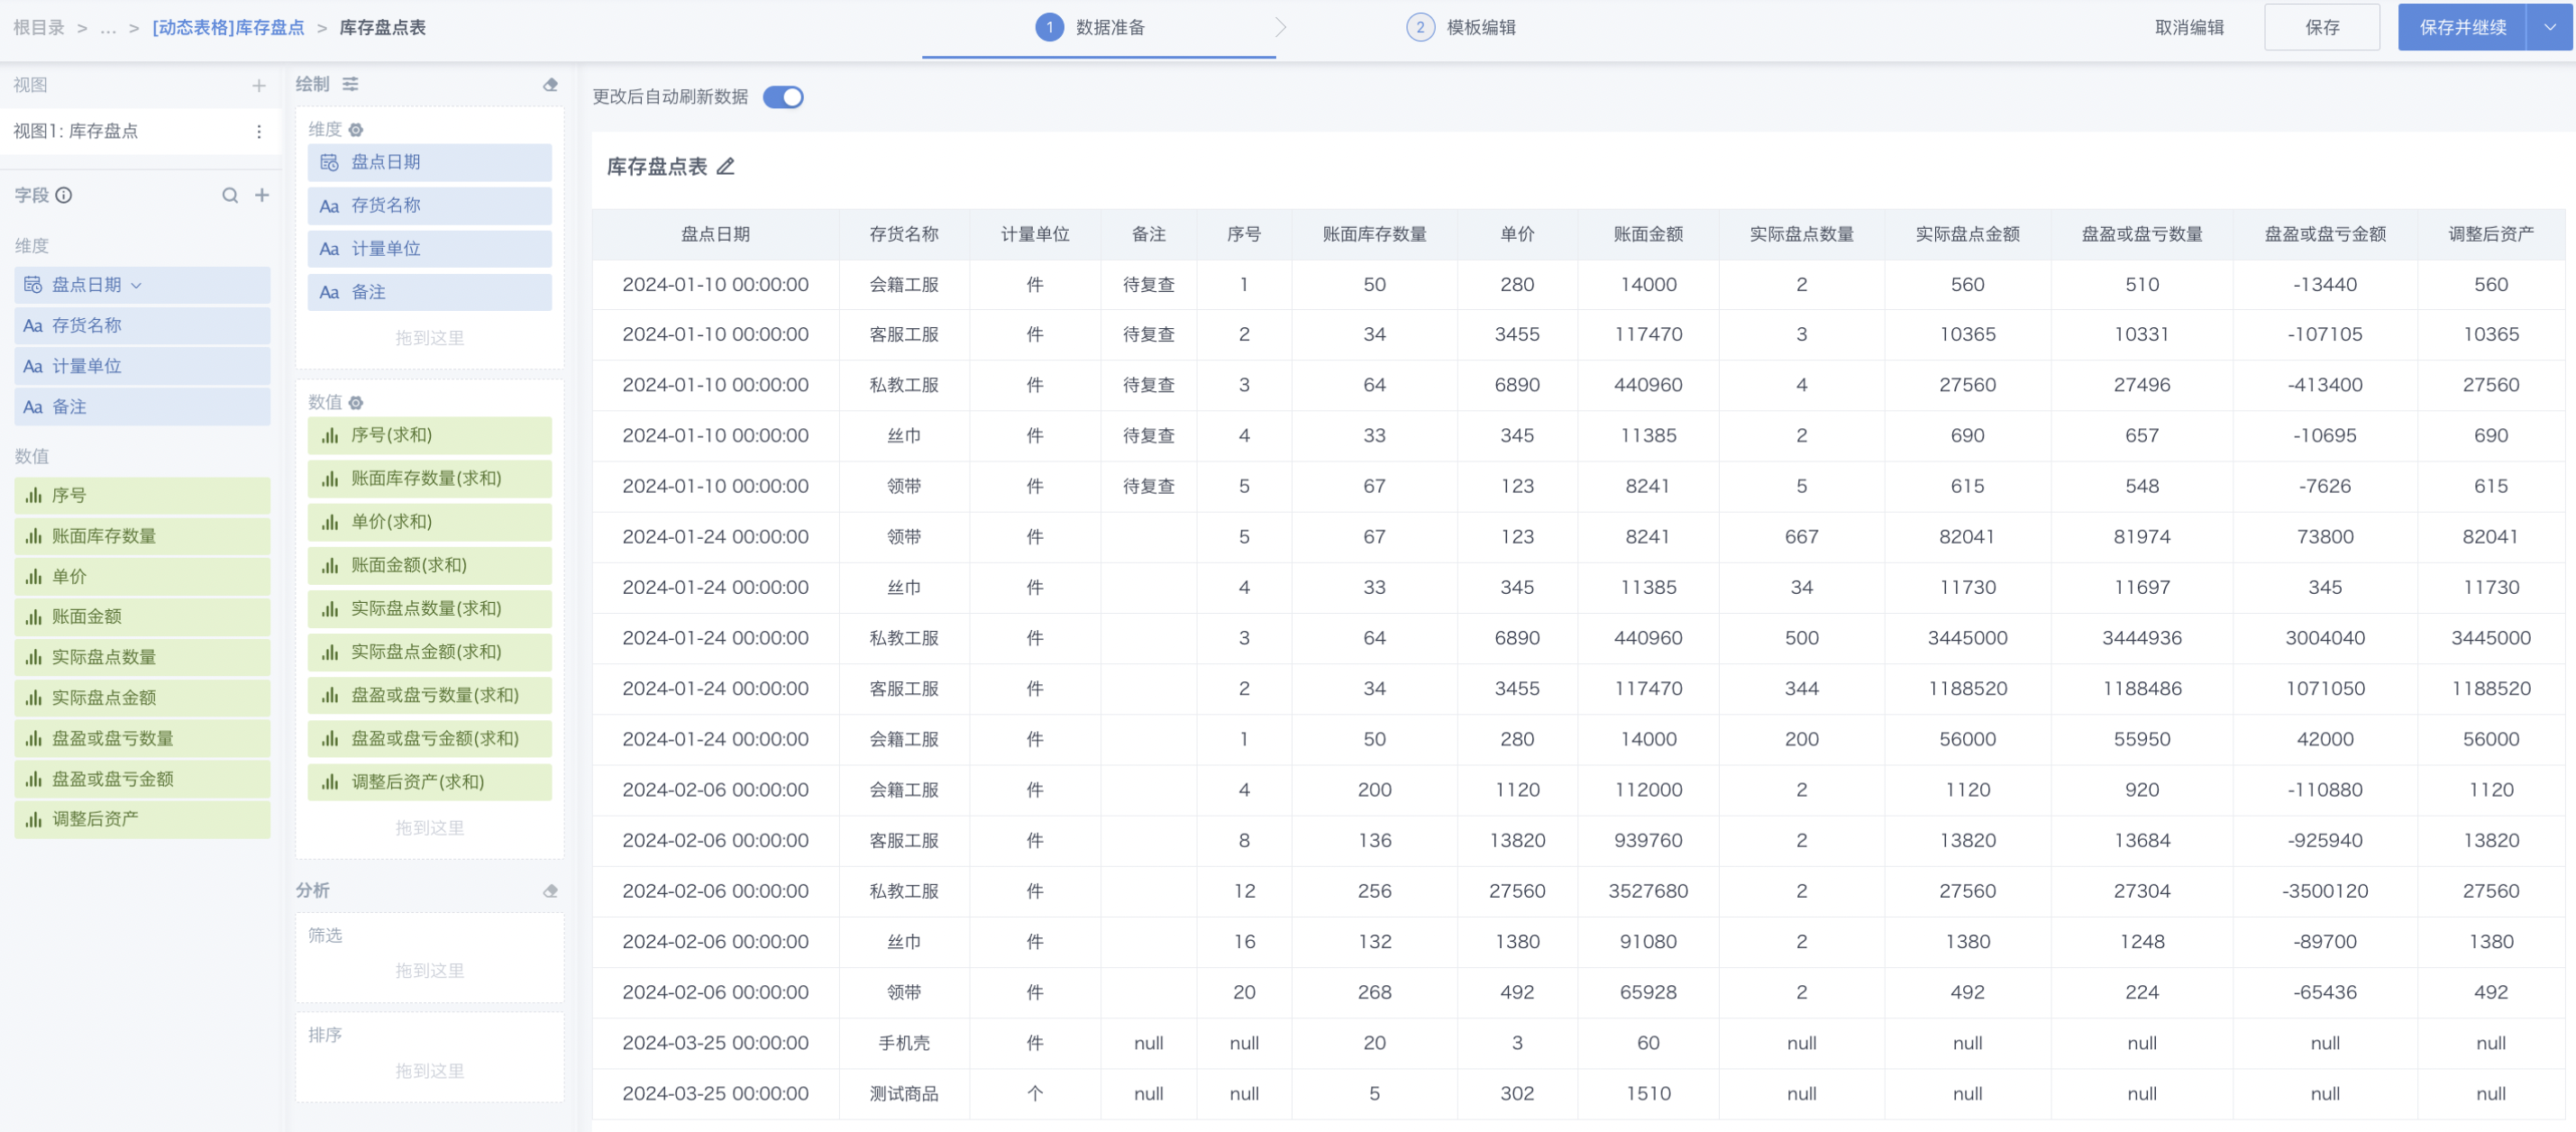
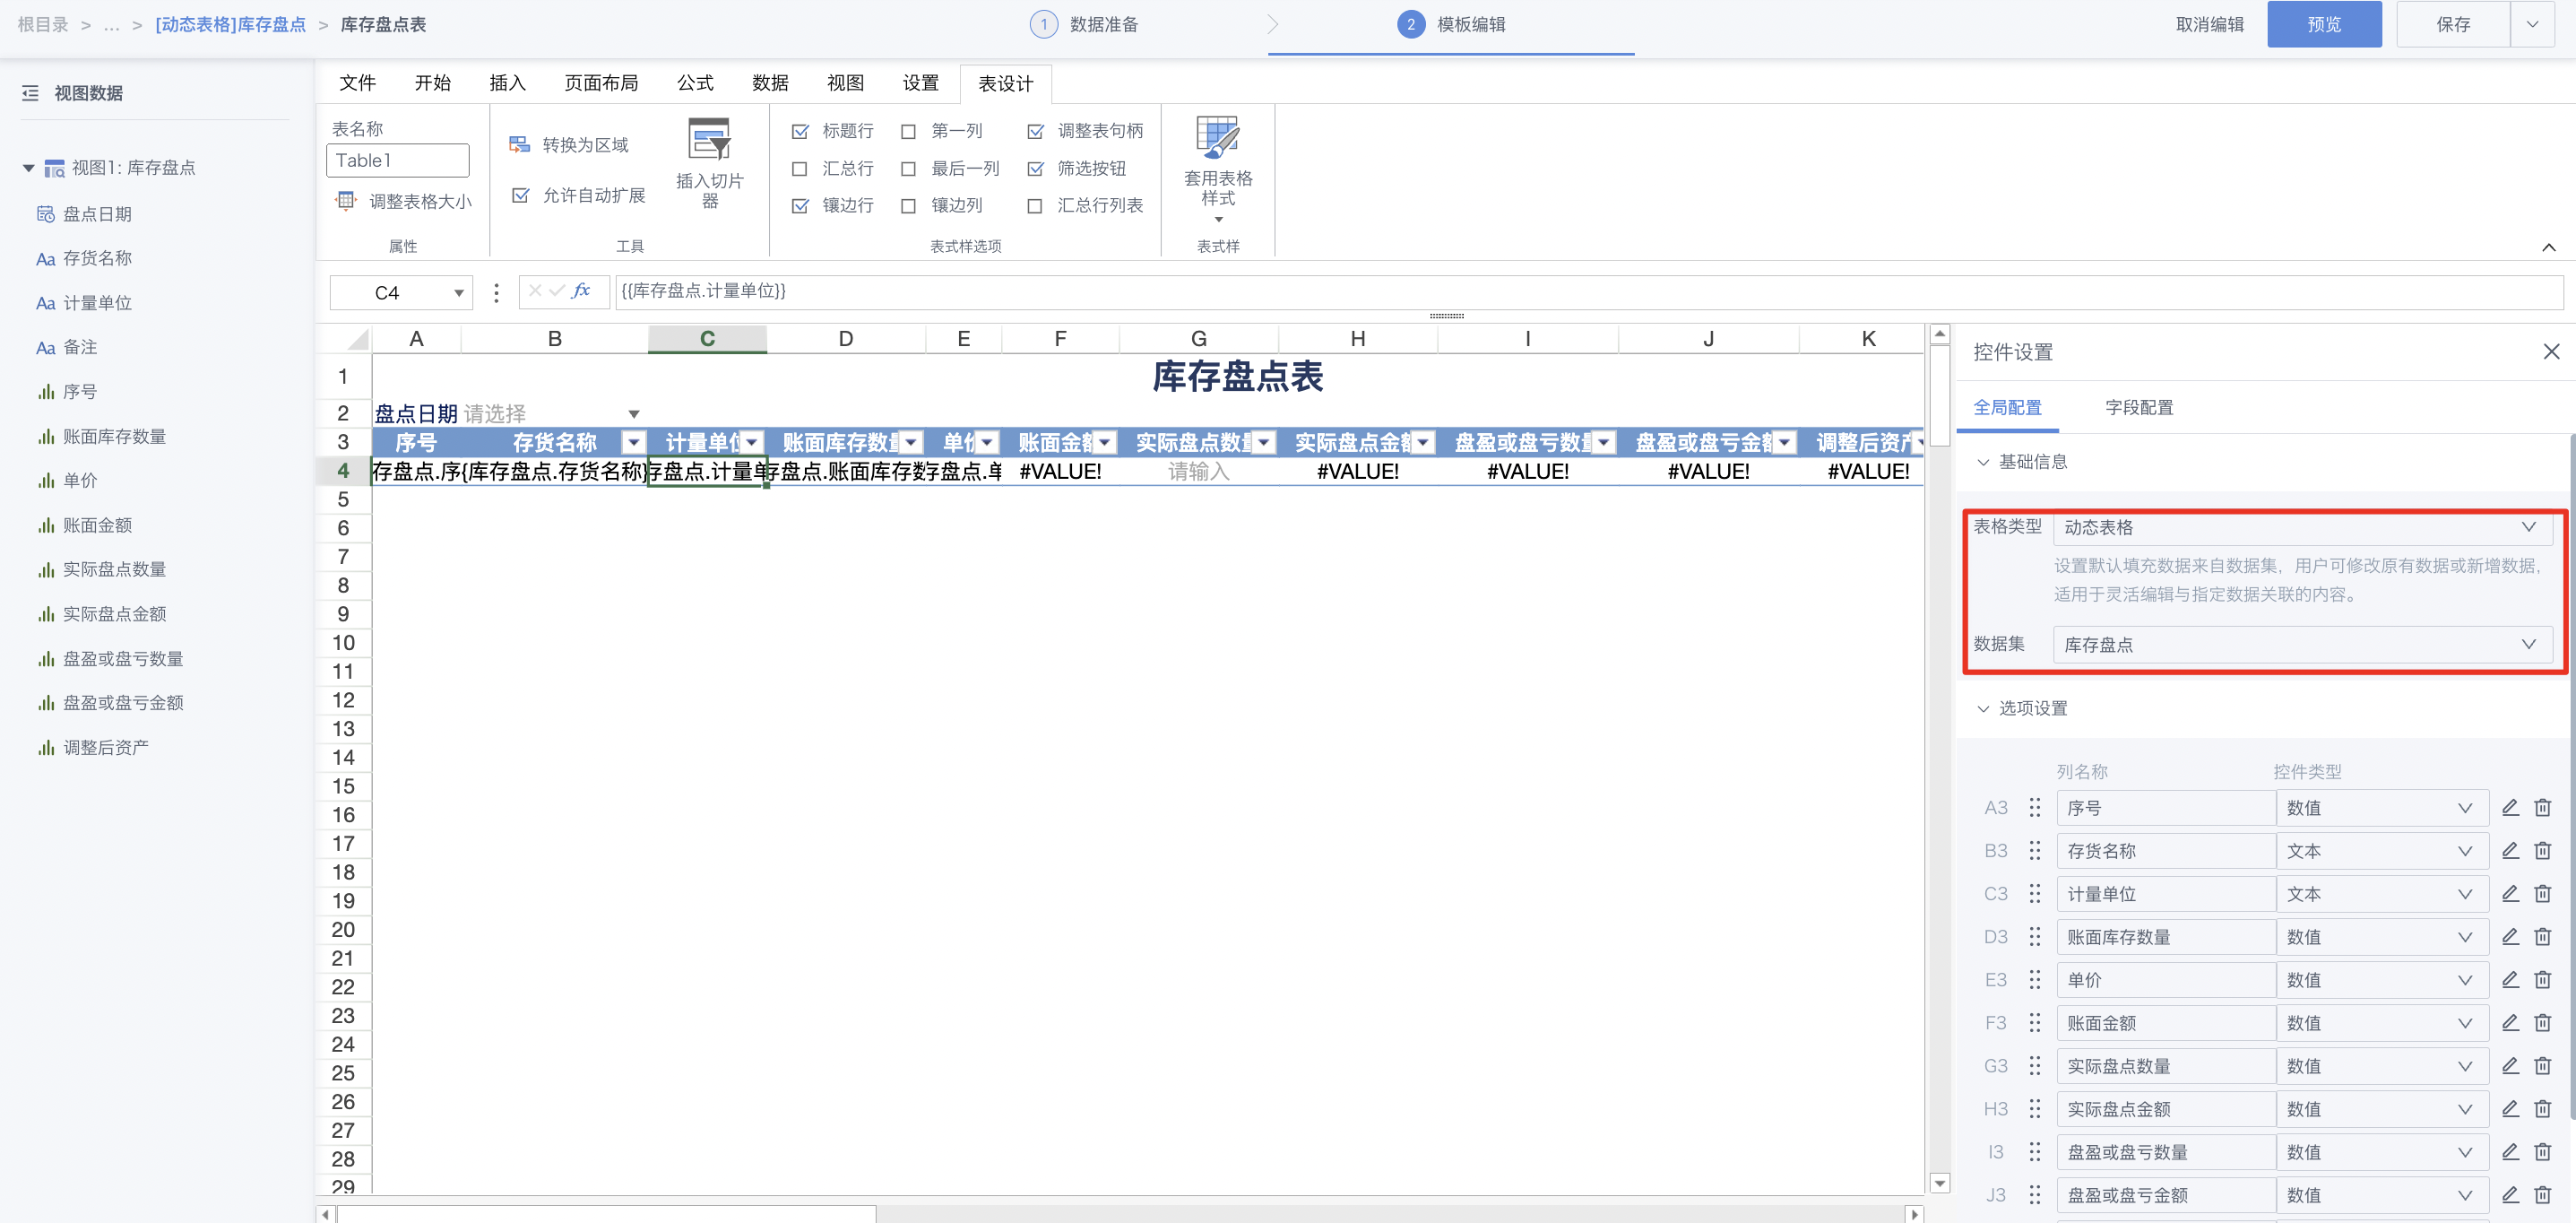
Third step, save and enter the template editing interface, edit the table header and entry cells, and perform table control settings: "Insert tab-Insert Entry Controls-Table Controls", select dynamic table. The dynamic table cell configuration is as follows:
A3 - Text, data source as "Serial Number", not editable
B3 - Text, data source as "Inventory Name", not editable
C3 - Text, data source as "Unit of Measurement", not editable
D3 - Numeric, data source as "Book Inventory Quantity", not editable, decimal places 0
E3 - Numeric, data source as "Unit Price", not editable, decimal places 2
F3 - Numeric, cell formula =[Book Inventory Quantity]*[Unit Price], not editable, decimal places 2
G3 - Numeric, decimal places 0
H3 - Numeric, cell formula =[Actual Count Quantity]*[Unit Price], not editable, decimal places 2
I3 - Numeric, cell formula =[Actual Count Quantity]-[Book Inventory Quantity], not editable, decimal places 0
J3 - Numeric, cell formula =[Book Inventory Amount]-[Actual Count Amount], not editable, decimal places 2
K3 - Numeric, cell formula =[Actual Count Amount], decimal places 2
L3 - Text
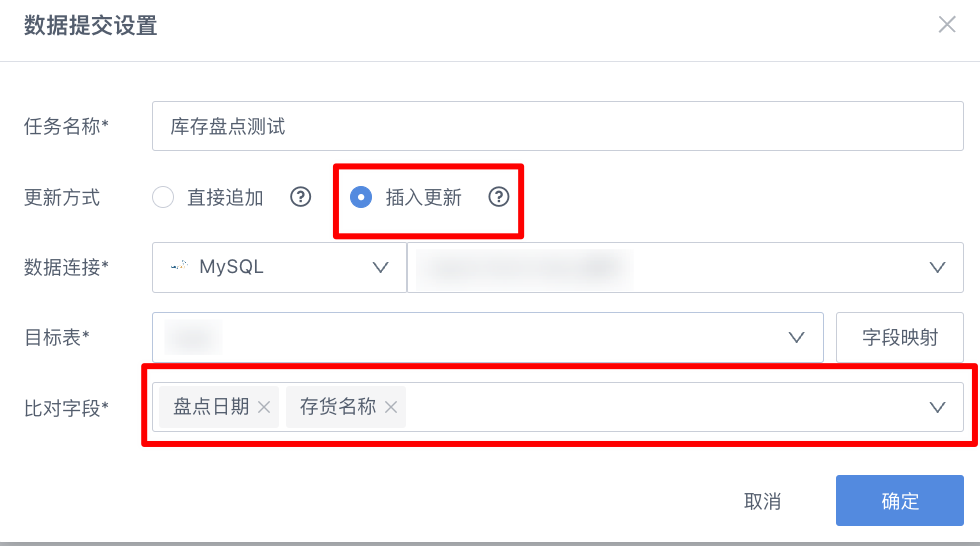
Fourth step, after table configuration is complete, perform data submission settings: "Data tab - Data Submission Settings", select submission method as "Insert-Update", and set comparison fields as "Count Date", "Inventory Name".
Fifth step, beautify the table settings and modify the card name, and after completion, save the card.