Generate BI User Group Hierarchies Based on Company Department Hierarchies
Requirement Background
Background: A customer company has been established for many years, has a complex department hierarchy, and has a large number of employees.
Requirement 1:
When BI goes online, the company needs to use its existing department hierarchy as a reference to plan and process the corresponding BI user group hierarchy. Employees in each department should belong to the corresponding user groups.
For example, all employees in Retail Zone 1 and Retail Zone 2 are assigned to the Retail Group 1 user group, and all employees in Retail Zone 3 and Retail Zone 4 are assigned to the Retail Group 2 user group.
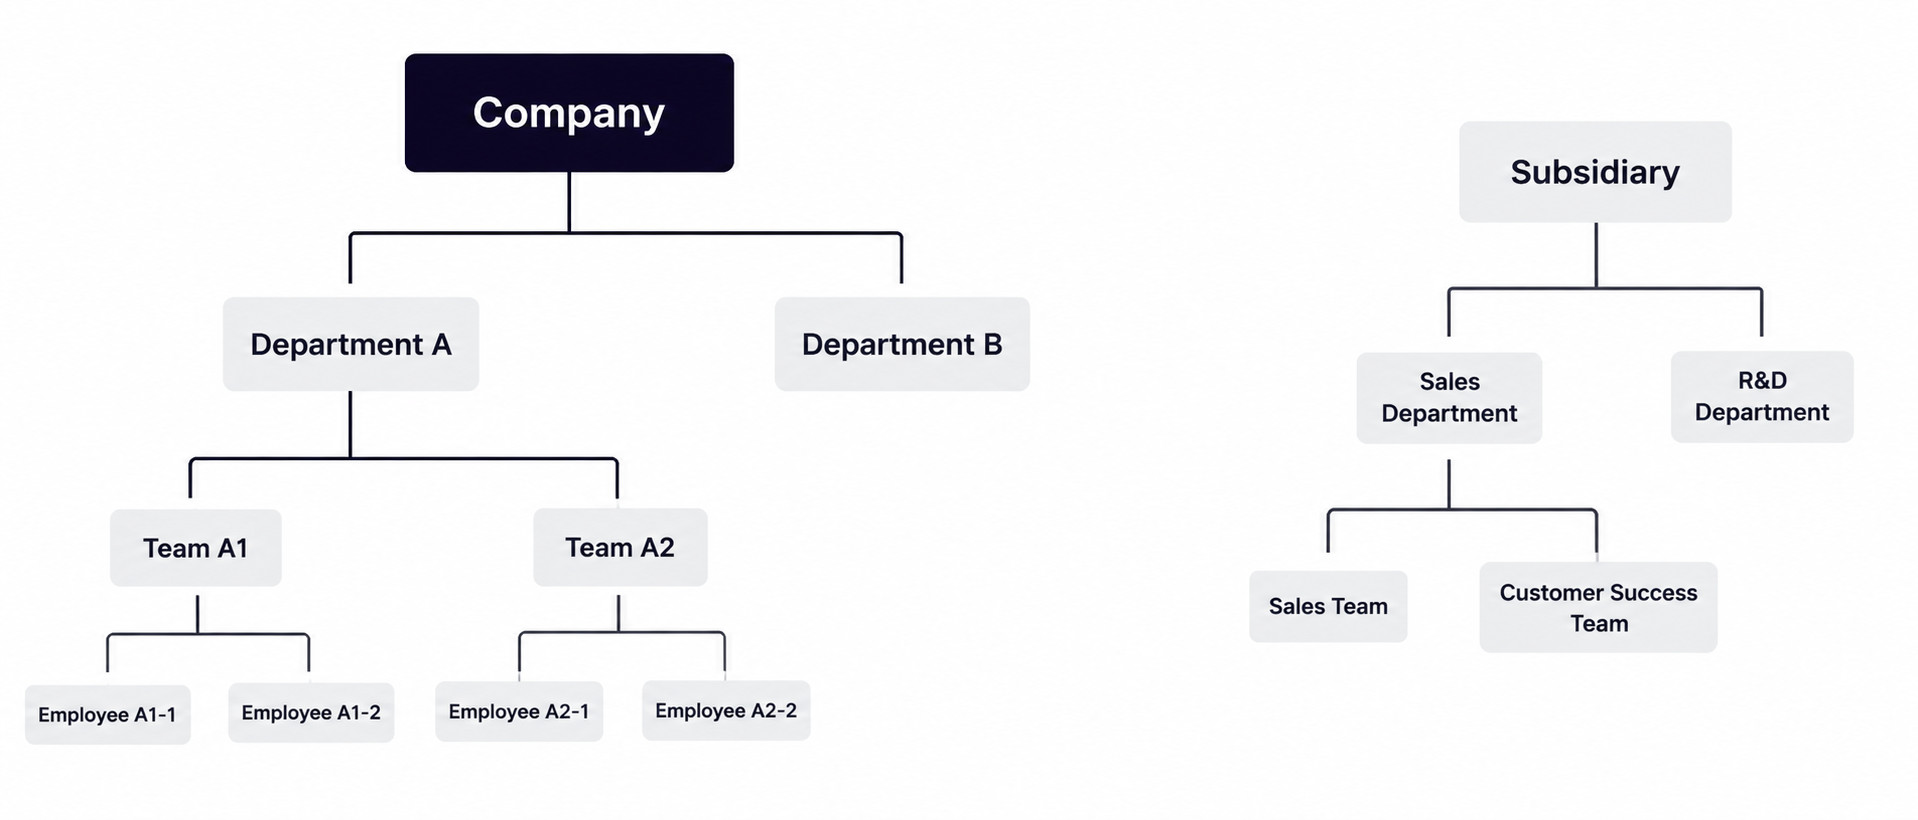
Figure 1. Example of company department hierarchy and BI user group hierarchy
Requirement 2:
When personnel changes occur in the company, such as onboarding, resignation, or job transfer, the user groups that BI accounts belong to should also change accordingly to reduce the cost of manually maintaining user groups.
Base Data Sources and Target Datasets
Base Data Sources
First, use the Account Dataset feature to obtain the company's department hierarchy. This produces two tables: an employee table and a company department hierarchy table, as shown in Table 1 and Table 2. The employee table records information such as each employee's employee ID, name, email address, and department. The department hierarchy table records the company's department hierarchy and contains fields such as deptid, name, and parent_id.
| name(Name) | userid(Employee ID) | email(Email) | deptid(Department ID) |
| Zhang San | A001 | zhangsan@guandata.com | retail101 |
| Li Si | A002 | lisi@guandata.com | retail101 |
| Wang Wu | A003 | wangwu@guandata.com | retail101 |
| Zhao Qi | A004 | zhaoqi@guandata.com | retail201 |
| Qian Ba | A005 | qianba@guandata.com | retail201 |
Table 1. Company employee table
| deptid(Department ID) | name(Department Name) | parent_id(Direct Parent Department) |
| retail101 | Retail Zone 1 | retail1 |
| retail102 | Retail Zone 2 | retail1 |
| retail103 | Retail Zone 3 | retail2 |
| retail104 | Retail Zone 4 | retail2 |
| retail1 | Retail Dept 1 | retail |
| retail2 | Retail Dept 2 | retail |
| retail | Retail Department | all |
| all | Entire Company | null |
Table 2. Company department hierarchy table
Target Datasets
Based on the requirement background, base data sources, and Account Sync feature, two target datasets can be designed and produced: BI user group hierarchy and employee master information, as shown in Table 3 and Table 4.
| BI User Group ID | BI User Group Name | BI Parent User Group ID |
| BI_001 | Root User Group | null |
| BI_002 | Retail Group | BI_001 |
| BI_003 | R&D Group | BI_001 |
| BI_004 | Retail Group 1 | BI_002 |
| BI_005 | Retail Group 2 | BI_002 |
Table 3. BI user group hierarchy
The BI user group hierarchy in Table 3:
- Is organized based on customer requirements and represents the BI user group hierarchy that the customer needs.
- Is used in Account Sync to create user groups at each hierarchy level in BI.
| name | userid | Department | parent*1 | parent*2 | parent*3 | BI User Group ID | BI User Group Name |
| Zhang San | A001 | Retail Zone 1 | Retail Dept 1 | Retail Department | Entire Company | BI_004 | Retail Group 1 |
| Li Si | A002 | Retail Zone 2 | Retail Dept 1 | Retail Department | Entire Company | BI_004 | Retail Group 1 |
| Wang Wu | A003 | Retail Zone 3 | Retail Dept 2 | Retail Department | Entire Company | BI_005 | Retail Group 2 |
| Zhao Qi | A004 | Retail Zone 4 | Retail Dept 2 | Retail Department | Entire Company | BI_005 | Retail Group 2 |
| Qian Ba | A005 | Retail Dept 1 | Retail Department | Entire Company | null | BI_004 | Retail Group 1 |
| Sun Jiu | A006 | Retail Dept 2 | Retail Department | Entire Company | null | BI_005 | Retail Group 2 |
| Li Shi | A007 | Retail Department | Entire Company | null | null | BI_002 | Retail Group |
| Zhou Er | A008 | Entire Company | null | null | null | BI_001 | Root User Group |
Table 4. Employee master information table
The employee master information table in Table 4:
- Employee information such as name, userID, and department comes directly from the company employee table shown in Table 1.
- parent1, parent2, parent*3, and so on represent the employee's parent department, grandparent department, great-grandparent department, and so on. These fields make it easy to see all parent departments of an employee and help customers manage employee information. For how these fields are generated, see the section Organize Company Department Hierarchy Information below.
- Explanation of parentN: it refers to the Nth-level parent department of a department. In Table 4, for example, the parent1 of Retail Zone 1 is Retail Dept 1, parent2 is Retail Department, and parent3 is Entire Company. The parent1 of Retail Dept 1 is Retail Department, and parent2 is Entire Company.
- parentN_id refers to the Nth-level parent department ID of a department, and parentN_name refers to the Nth-level parent department name of a department.
- The BI user group ID and name that an employee belongs to are used in Account Sync to assign the employee to the corresponding BI user group. For how these fields are generated, see the section Assign Employees to BI User Groups below.
Requirement 1 Implementation
Step 1: Organize Company Department Hierarchy Information
The company department hierarchy table in Table 2, containing deptid, name, and parent_id, is suitable for storing all company department hierarchy relationships. However, it is not convenient for users to quickly and intuitively view all parent department levels of a department. The display format in Table 4, with Department, parent1, parent2, and parent*3, is closer to user habits.
How can the department hierarchy table in Table 2 be transformed into the display format in Table 4?
There is currently no perfect method. We recommend the following method for now. If you have a better approach, feel free to add it:
Use the relationship between dept_id and parent_id. Left join parent_id with dept_id to obtain parent2_id. Similarly, you can obtain parent3_id, parent4_id, parent5_id, and so on up to parent*N_id. The general process is shown below.
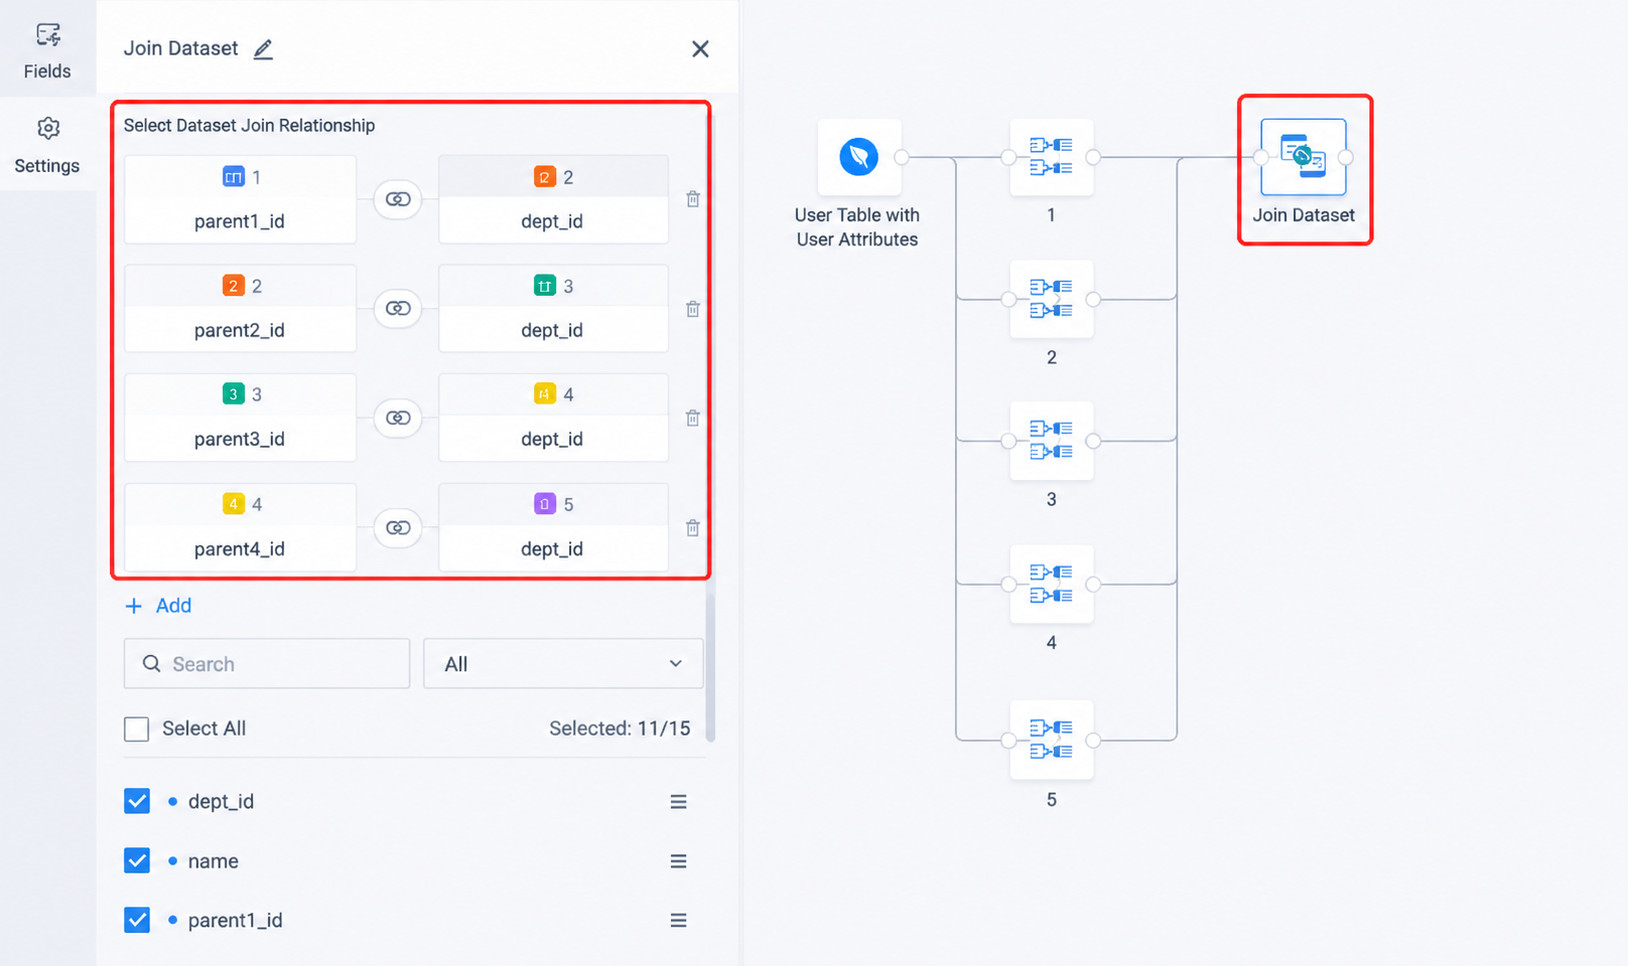
Figure 2. Organizing company department hierarchy information
However, the value of N cannot yet be determined. If N is too small, not all upper-level departments of a department can be obtained.
To determine N, first identify the current number of organization hierarchy levels for the customer. Perform several additional left joins until the values of a certain parent*N_id are all null. At that point, N is the customer's current organization hierarchy depth. In Figure 2, the organization hierarchy depth is 4, so N=4.
Actual reference: One customer's DingTalk user base exceeded 18,000 users, and its company department hierarchy depth was 9, so N=9.
In general, organization hierarchies are relatively stable and do not change significantly. To handle possible future adjustments such as adding organization levels, add several extra levels on top of the current hierarchy depth N, such as N+5. This usually ensures that all values of parent*N+5_id are null, and then the complete upper-level department hierarchy of each dept_id can be obtained.
At this point, the formula for summarizing all upper-level department levels can be written as:
concat(Department Name, parent1_name, parent2_name... parentN_name... parentN+5_name)
Step 2: Assign Employees to BI User Groups
There are two implementation methods.
Method 1: Use fuzzy matching.
If a user's department or any upper-level department hierarchy contains a certain keyword, the user belongs to a certain user group. For example, if the upper-level department hierarchy of a department contains the keyword "Retail Group 1", the department belongs to the "Retail Group 1" user group.
For example: upper-level department hierarchy = concat(Department Name, parent1_name, parent2_name, parent*3_name...)
The fuzzy matching formula is: case when Upper-Level Department Structure like "% Retail Group 1%" then " Retail Group 1 " else ... end
This directly produces the mapping relationship between userid, department, and BI user group name.
- Advantages of this method:
- If a new department that belongs to Retail Group 1 appears in the future, it can be automatically assigned to the Retail Group 1 user group through fuzzy matching on the upper-level department hierarchy, saving manual maintenance effort.
- Disadvantages:
- Department name changes invalidate the condition. For example, if Retail Group 1 is renamed Sales Group 1, the fuzzy matching condition must also be changed.
- After the product goes online, customers usually maintain fuzzy matching conditions themselves. This requires customers to have basic SQL writing ability, mainly for case when statements. Some customers do not have this ability, and their learning capacity may make it difficult to master.
- In small companies or companies with simple user group hierarchies, fuzzy matching can be used to maintain user groups. However, in large companies or companies with complex user hierarchies, there are many user groups, which means many conditions and a very long case when statement, such as: case when Upper-Level Structure like "% Retail Group 1%" then " Retail Group 1 " when Upper-Level Structure like "% Retail Group 2%" then " Retail Group 2 " ... else ... end. Long statements are inconvenient to maintain in ETL.
Method 2: Manually organize a mapping table between department IDs and user group IDs, as shown below, and match this relationship with the company employee table, Table 1, to obtain the BI user group that each employee belongs to.
| deptid | Company Department Name | BI User Group ID | BI User Group Name |
| dept_8 | Entire Company | BI_001 | Root User Group |
| dept_7 | Retail Department | BI_002 | Retail Group |
| dept_9 | R&D Department | BI_003 | R&D Group |
| dept_5 | Retail Dept 1 | BI_004 | Retail Group 1 |
| dept_1 | Retail Zone 1 | BI_004 | Retail Group 1 |
| dept_2 | Retail Zone 2 | BI_004 | Retail Group 1 |
| dept_6 | Retail Dept 2 | BI_005 | Retail Group 2 |
| dept_3 | Retail Zone 3 | BI_005 | Retail Group 2 |
| dept_4 | Retail Zone 4 | BI_005 | Retail Group 2 |
Table 5. Mapping table between department IDs and user group IDs
- Advantages of this method:
- No SQL statements need to be written.
- The relationship with user groups is maintained using department IDs rather than department names, avoiding problems caused by later department name changes.
- Disadvantages:
- When a new department is added, the mapping relationship between the new department ID and the user group must be maintained manually. It cannot be automatically assigned to a user group based on the upper-level structure.
- Maintaining relationships with department IDs is not as intuitive as using department names.
In an actual project implementation, after careful consideration, we concluded that the company's organization structure was generally mature and unlikely to change frequently, so the second method was selected.
Requirement 2 Implementation
After the two target datasets are created, configure Account Sync in the BI backend. The system automatically generates BI user groups and configures basic personnel attributes. Account Sync help document: Account Sync.