Form Entry FAQ
How do I implement control linkage, also called cascading filters?
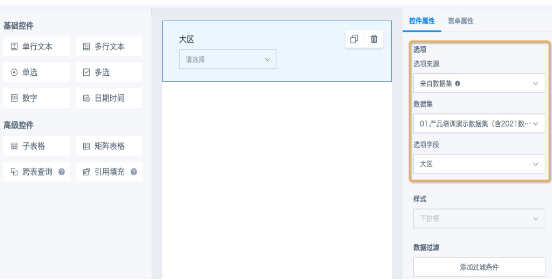
Answer: First, configure the primary linkage control. Select the single-select control that has been dragged into the form. In Control Properties - Options - Option Source on the right, select From Dataset, and then select the Dataset and Option Field below. Second, configure the linked control in the same way, and add a filter condition under Data Filtering - Add Filter Condition.
Scenario example. Click to expand and view.
Use Region - Province - City cascading filters as an example.
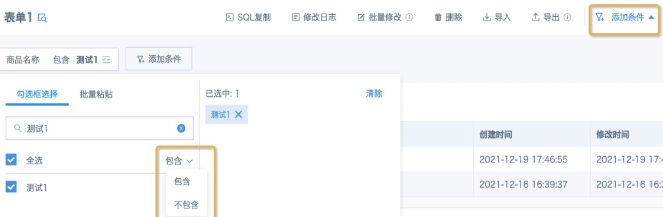
- Create a single-select control titled Region, and select the Region field in the dataset as the option field.
When the option source is a dataset, only the Dropdown style can be selected.
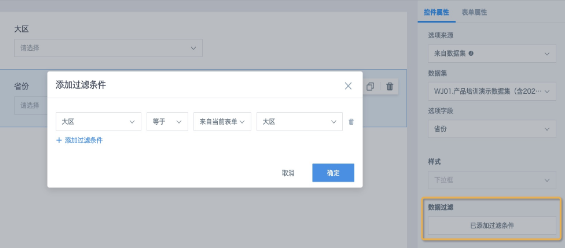
- Create the second selection control. Use a single-select control, or multi-select if needed, and name it Province. For Option Source, select the corresponding field from the same dataset. Then click Add Filter Condition. Set Region in the source dataset of the current field to equal Region from the current form, and click OK to save.
Effect: If East China is selected as the region, the province field can select only provinces in East China. After Zhejiang is selected, the city field can select only cities in Zhejiang Province.
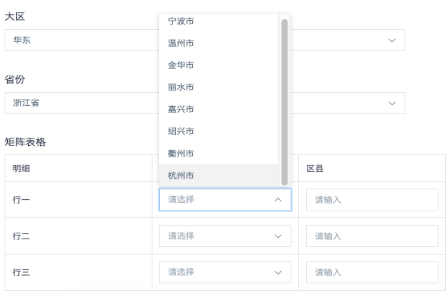
Subtables, matrix tables, and reference fills in advanced controls all support filter conditions for cascading filters. However, cascading fields can select only basic controls, not filter fields in advanced controls. In the following example, City options can link with Region and Province above, but District/County cannot link with City.
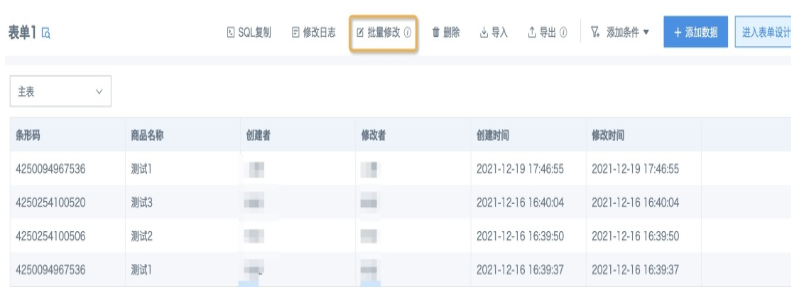
How do I batch modify form entry records?
Answer: Form entry provides a Batch Modify feature. Refer to the following examples for different scenarios.
No filter condition needed
-
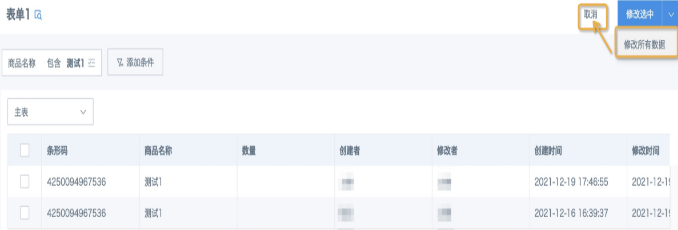
On the form page to modify, click Batch Modify.
-
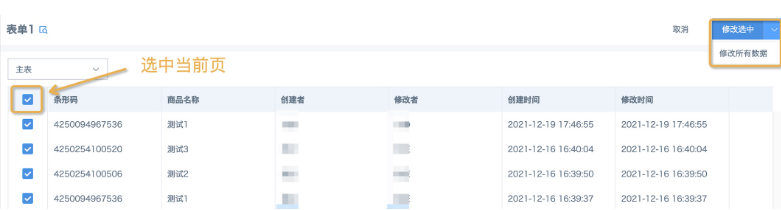
When not selecting all data, select the data to batch modify on the current page. The select-all checkbox in the upper-left corner of the table header selects only all data on the current page. To modify part of the data across multiple pages, change the number of rows displayed per page at the bottom of the form, or modify one page at a time. Then click Modify Selected in the upper-right corner. When selecting all data, you do not need to select any row. Directly select Modify All Data in the upper-right corner.
-
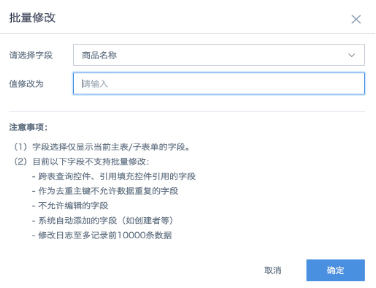
In the pop-up window, select the field to modify from the dropdown menu, manually enter the target content to replace uniformly, and click OK. Return to the modified form page and click Cancel in the upper-right corner. The modification succeeds.
Filter condition needed
-
Click Add Condition at the top to add filter conditions. You can add multiple filter conditions. Text fields support Contains and Does Not Contain. Numeric and date fields support comparison and range filters. Batch paste can also be used to filter data.
-
Click Batch Modify and directly select Modify All Data. In the pop-up window, select the field to modify from the dropdown menu, manually enter the target content to replace uniformly, and click OK to save. Finally, click Cancel to return to the form homepage.
-
Field selection shows only fields in the current main form or subform.
-
The following fields currently do not support batch modification:
- Fields referenced by cross-table query controls or reference fill controls
- Fields used as deduplication primary keys where duplicate data is not allowed
- Fields that cannot be edited
- Fields automatically added by the system, such as creator
- Modification logs record at most the first 10,000 rows
How do I import form entry data into BI for use?
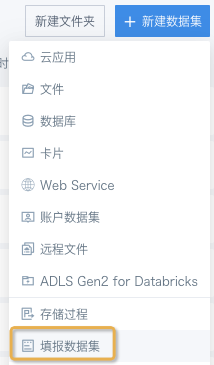
Answer: In Guandata BI - Data Center, create a Form Dataset, search for the main form name, and select the required main form or subforms inside the main form. Multiple selections are supported. Then set the update method and save path. Main forms and subforms are stored separately. To merge them into one table, associate them in ETL.
Where is form entry data stored? Can it be called directly from the database?
Answer: Form entry data is stored in a Guandata dedicated PostgreSQL database. The database is located on the server where the BI environment is deployed and is not directly open for access currently. To call data locally, create a Form Dataset and export Excel/CSV files locally, or use an API to export data. If you use the Guandata data development platform, form data can be written directly to other databases. See Write Back Data to a Database.
How do I quickly modify form-entered content from BI?
Display effect: The BI table directly displays form-entered content. Clicking a link jumps to the modification page for the corresponding row. See the following figure.

Steps:
1. In the top menu bar, go to Data Center -- Create Dataset -- Form Dataset to create a form dataset.
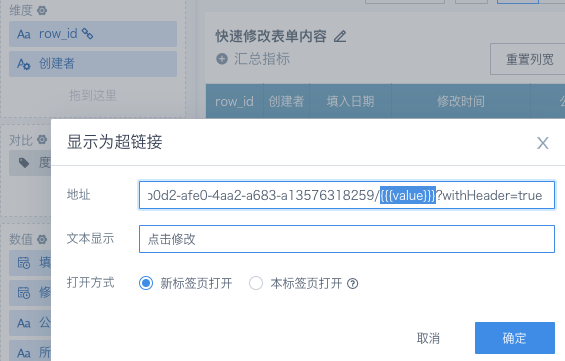
2. Create a table card. Drag row_id into the dimension area, set the display type to hyperlink, put the form modification link into the address, and replace the specific row_id value with {{{value}}}.
For example, the original form modification link is: https://uat.guandata.com/survey-engine/survey/8946b0d2-afe0-4aa2-a683-a13576318259/c8583657-2fb8-4162-852d-f4b5119be4aa?withHeader=true
Change the hyperlink to: https://uat.guandata.com/survey-engine/survey/8946b0d2-afe0-4aa2-a683-a13576318259/{{{value}}}?withHeader=true
How do I update form datasets promptly after data is submitted?
For server resource control, Guandata BI does not support triggering form dataset updates whenever a form is updated. However, you can use the dataset URL Trigger feature to update form datasets promptly and frequently.
Implementation: Go to the dataset Data Update tab, select URL Trigger, and obtain the link. Use it together with the card Jump or Display as Hyperlink feature in BI. After the jump, if the new page shows {"result":"ok","response":true}, the update was triggered successfully. You can combine this with Question 5 above, "How do I quickly modify form-entered content from BI?", or write it into an external script and schedule the script to trigger the URL for high-frequency updates.

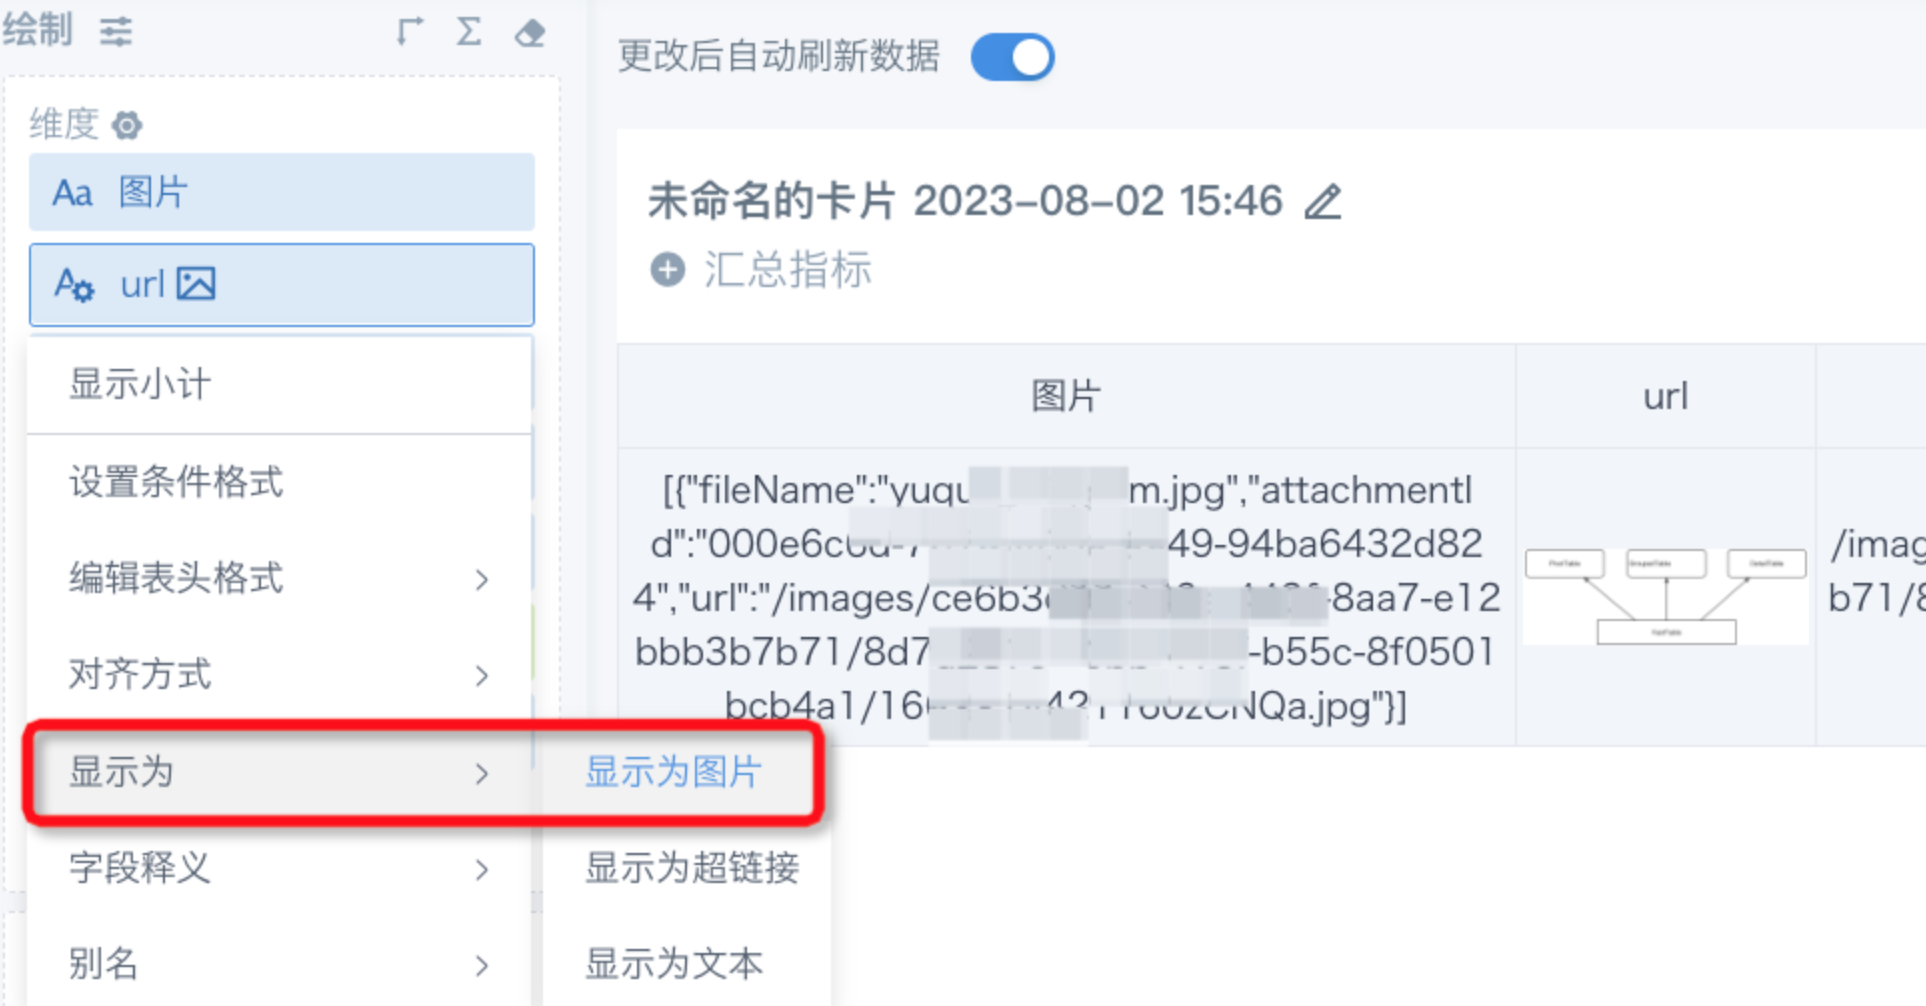
How do I display images from a form on a BI dashboard?
Because the image field value obtained from the form dataset in BI is the storage path of the image, it cannot be displayed directly as an image on a card. Create a new field, concatenate the path again, and then display it as an image. Use this format: CONCAT('https://\{domain}/survey-engine/api',get_json_object(replace(replace([Image],'[',''),']',''),'$.url'))