System Settings
1. Overview of System Settings
System settings are the settings for basic system operations by administrators. They mainly include login settings, security settings, general settings, multilingual configuration, etc.
Entry: Management Center > System Settings
2. Login Settings
Login settings include two parts: the first part is general settings, including login page settings, logout settings, account security policies, etc.; the second part is admin backend authorization, mainly for temporary authorization of the admin backend.
Entry: Management Center > System Settings > Login Settings
2.1 General Settings
Supports setting login methods and browser-related configurations.
| Feature | Description |
|---|---|
| Single Login Setting | For users with unlimited accounts, "Single Login Setting" is visible in Management Center > System Settings > Login Settings; for users with limited accounts, single login is enabled by default; when enabled, an account can only be logged in on one mobile, desktop, and other device each; when disabled, there is no multi-device login restriction. |
| Browser Login Setting | When enabled, closing the browser or all Guandata pages in the browser will automatically log out the Guandata account. |
| Desktop Guandata Account Login | If enabled, the login page shows the Guandata account login method; if disabled, it does not. |
| Desktop Default Login Method | Default login methods include account/password, WeCom, Feishu, DingTalk, and custom login methods. |
| Custom Login Method | Supports configuring custom login methods, including login name, icon (only 1:1 images, as icons are displayed as circles), and redirect link. After configuration, enable the switch to display on the login page. Example: If some users use DingTalk login and others use OAuth2.0 SSO, configure both. Step1: Complete DingTalk login configuration (see [DingTalk Full Integration Solution](../6-System Open & Integration/1-Common OA Integration Solutions/1-DingTalk Full Integration Solution.md)); Step2: Complete SSO configuration (see [Single Sign-On-OAuth 2.0](1-Single Sign-On/1-Single Sign-On-OAuth%202.0.md)); Note: No need to configure default login address in this case. Step3: Configure custom login method: Name, icon, redirect link (use the default SSO login address, usually ${BI service address}/standard-oauth2/authenticate). Enable the switch. Step4: Check the login page effect. |
2.2 Account Security Policy
Password Policy:
Supports setting password policies for Guandata account login to enhance password security.
| Feature | Description |
|---|---|
| Password Length Range | Supports any value between 1-50; prompts on user creation or password edit. |
| Complexity Setting | Supports multiple selections; must include uppercase, lowercase, numbers, or limited special characters; prompts on user creation or password edit. |
| Force Password Change on First Login | When enabled, users must change their password on first login; suitable for environments with random or unified initial passwords. |
| Password Validity Setting | When enabled, can set password validity and reminder date. |
| Password Reset Method | Before login, password can be reset via email. If account is locked, resetting password will automatically unlock. |
Lock Policy:
Supports two lock policies: lock after multiple incorrect password attempts, and lock after long-term inactivity.
| Feature | Description |
|---|---|
| Lock Inactive Accounts | Set inactivity period (days) and self-unlock method; when account is inactive for set days, it is locked; unlocking: if password reset is enabled, resetting password will automatically unlock. |
| Login Lock | When enabled, supports setting error lock count and lock time; when incorrect attempts reach the limit, account is locked; unlocking: after lock time or self-unlock. |
| Self-Unlock Method | In both cases, users can self-unlock via the login page (if password reset is enabled), or automatically unlock after password reset. |
Dynamic Account Verification:
After entering the correct password, a dynamic code via SMS or email is required to enhance security.
| Verification Method | Description |
|---|---|
| SMS | Prerequisite: configure in "Management Center-System Integration-SMS Service". Code: valid for 5 minutes, cannot be requested again within 1 minute, only the latest code is valid. |
| Prerequisite: configure in "Management Center-System Integration-Email Service". Code: valid for 5 minutes, cannot be requested again within 1 minute, only the latest code is valid. |
Note: If not configured in SMS/Email service, the options are grayed out.
2.3 Admin Backend Authorization
By obtaining an authorization code, access to the admin backend is allowed within the validity period. The admin backend is mainly for version upgrades, feature toggles, and operation log queries.
- Obtain Authorization Code
Validity period is required, range [1, 168]. Purpose is recommended.
After clicking [Get Authorization Code], you will get the code. Re-clicking or refreshing will invalidate the previous code.
- Use Authorization Code
Admins can apply for a code within the validity period to log in to the admin backend. Users can log in with a valid code; after expiration, they will be logged out. Use the admin backend with caution; it affects the whole system. Only visible in the main domain in multi-domain environments. Records can be viewed in Audit Log - System Operations.
2.4 LDAP, Azure
For LDAP, see [LDAP Login Integration Solution](../6-System Open & Integration/1-Common OA Integration Solutions/6-LDAP Login Integration Solution.md). For Azure, see [Microsoft Azure AD Integration Solution](../6-System Open & Integration/1-Common OA Integration Solutions/5-Microsoft Azure%20AD Integration Solution.md)
3. Security Settings
Entry: Management Center > System Settings > Security Settings
3.1 Data Masking
When using data masking, if data management is not standardized and there are multiple field names for the same field, you can tag sensitive fields to associate detection rules with masking rules, reducing configuration complexity.
For example: If the "ID number" field has different names in different datasets (e.g., "ID", "identity card", "ID card num", "证件号"), you can tag "ID number".
Step 1: Go to "Management Center > System Settings > Security Settings > Data Masking", click "Add".
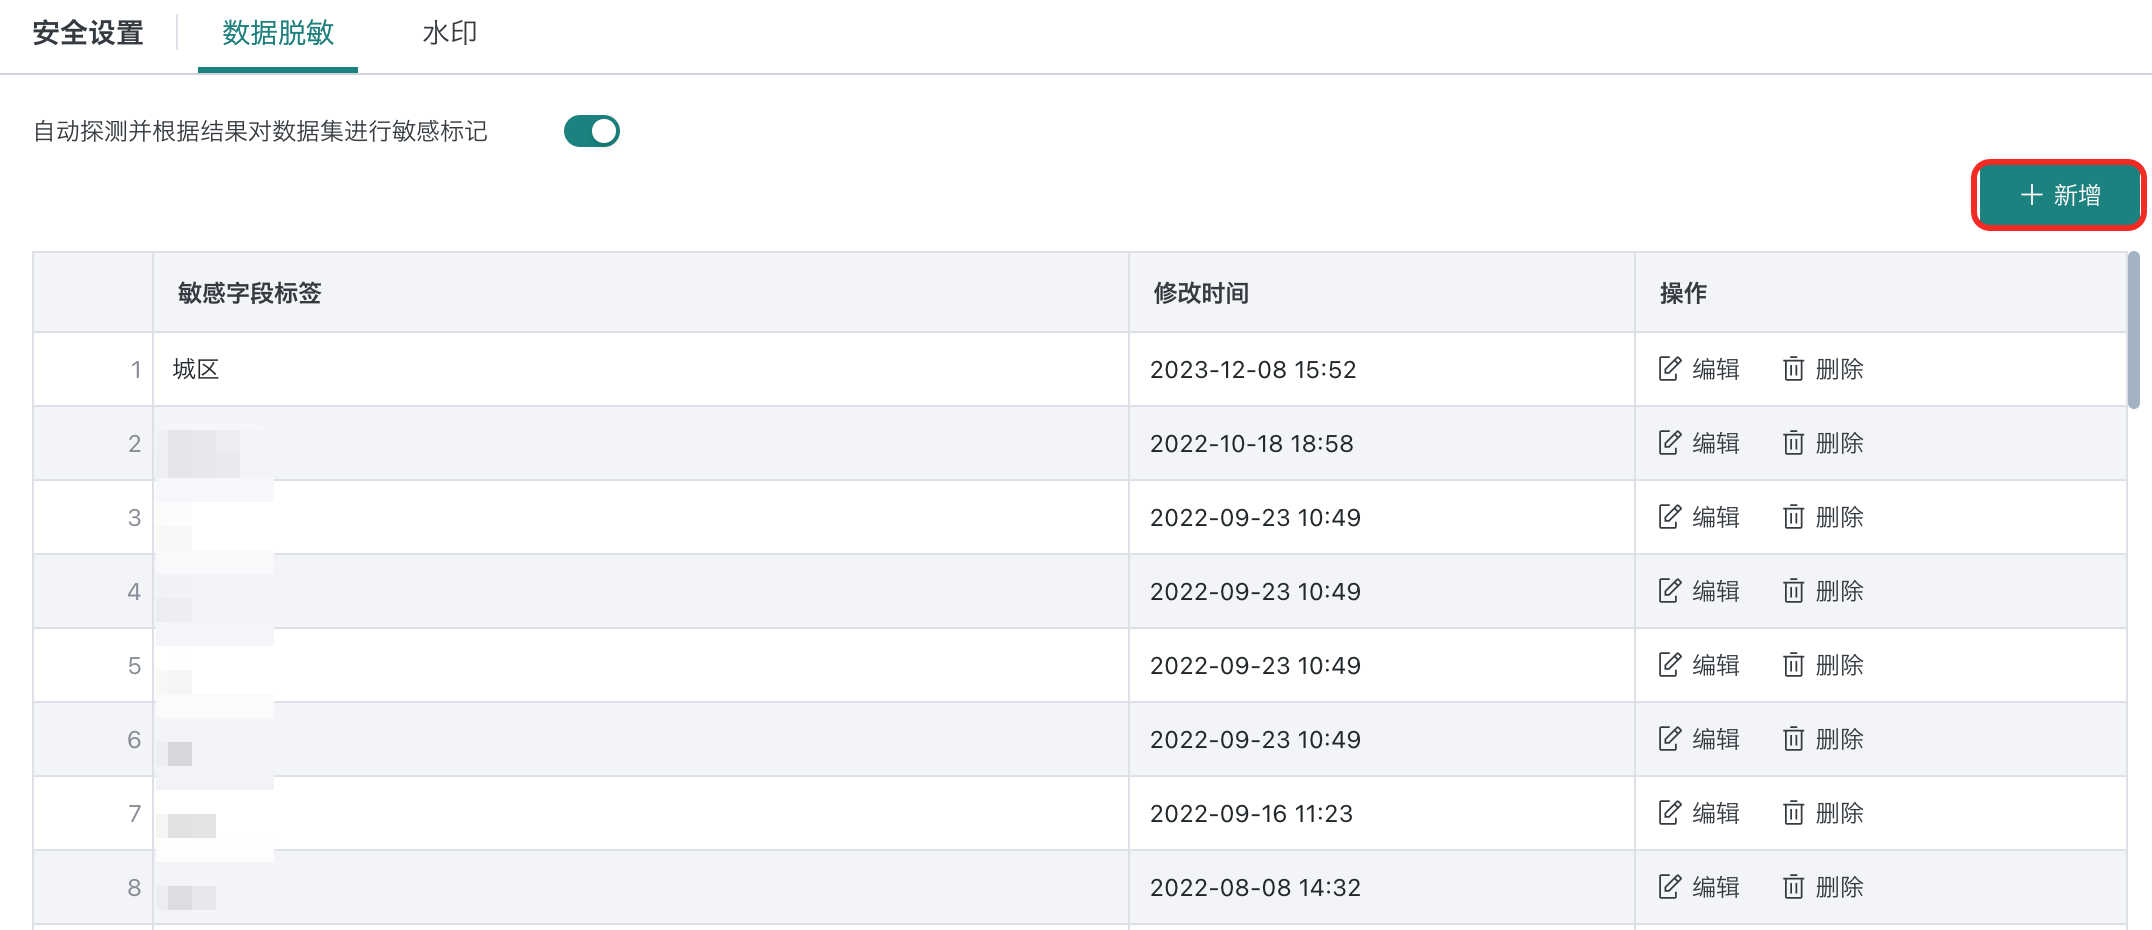
Step 2: Enter the sensitive field tag, click "OK".
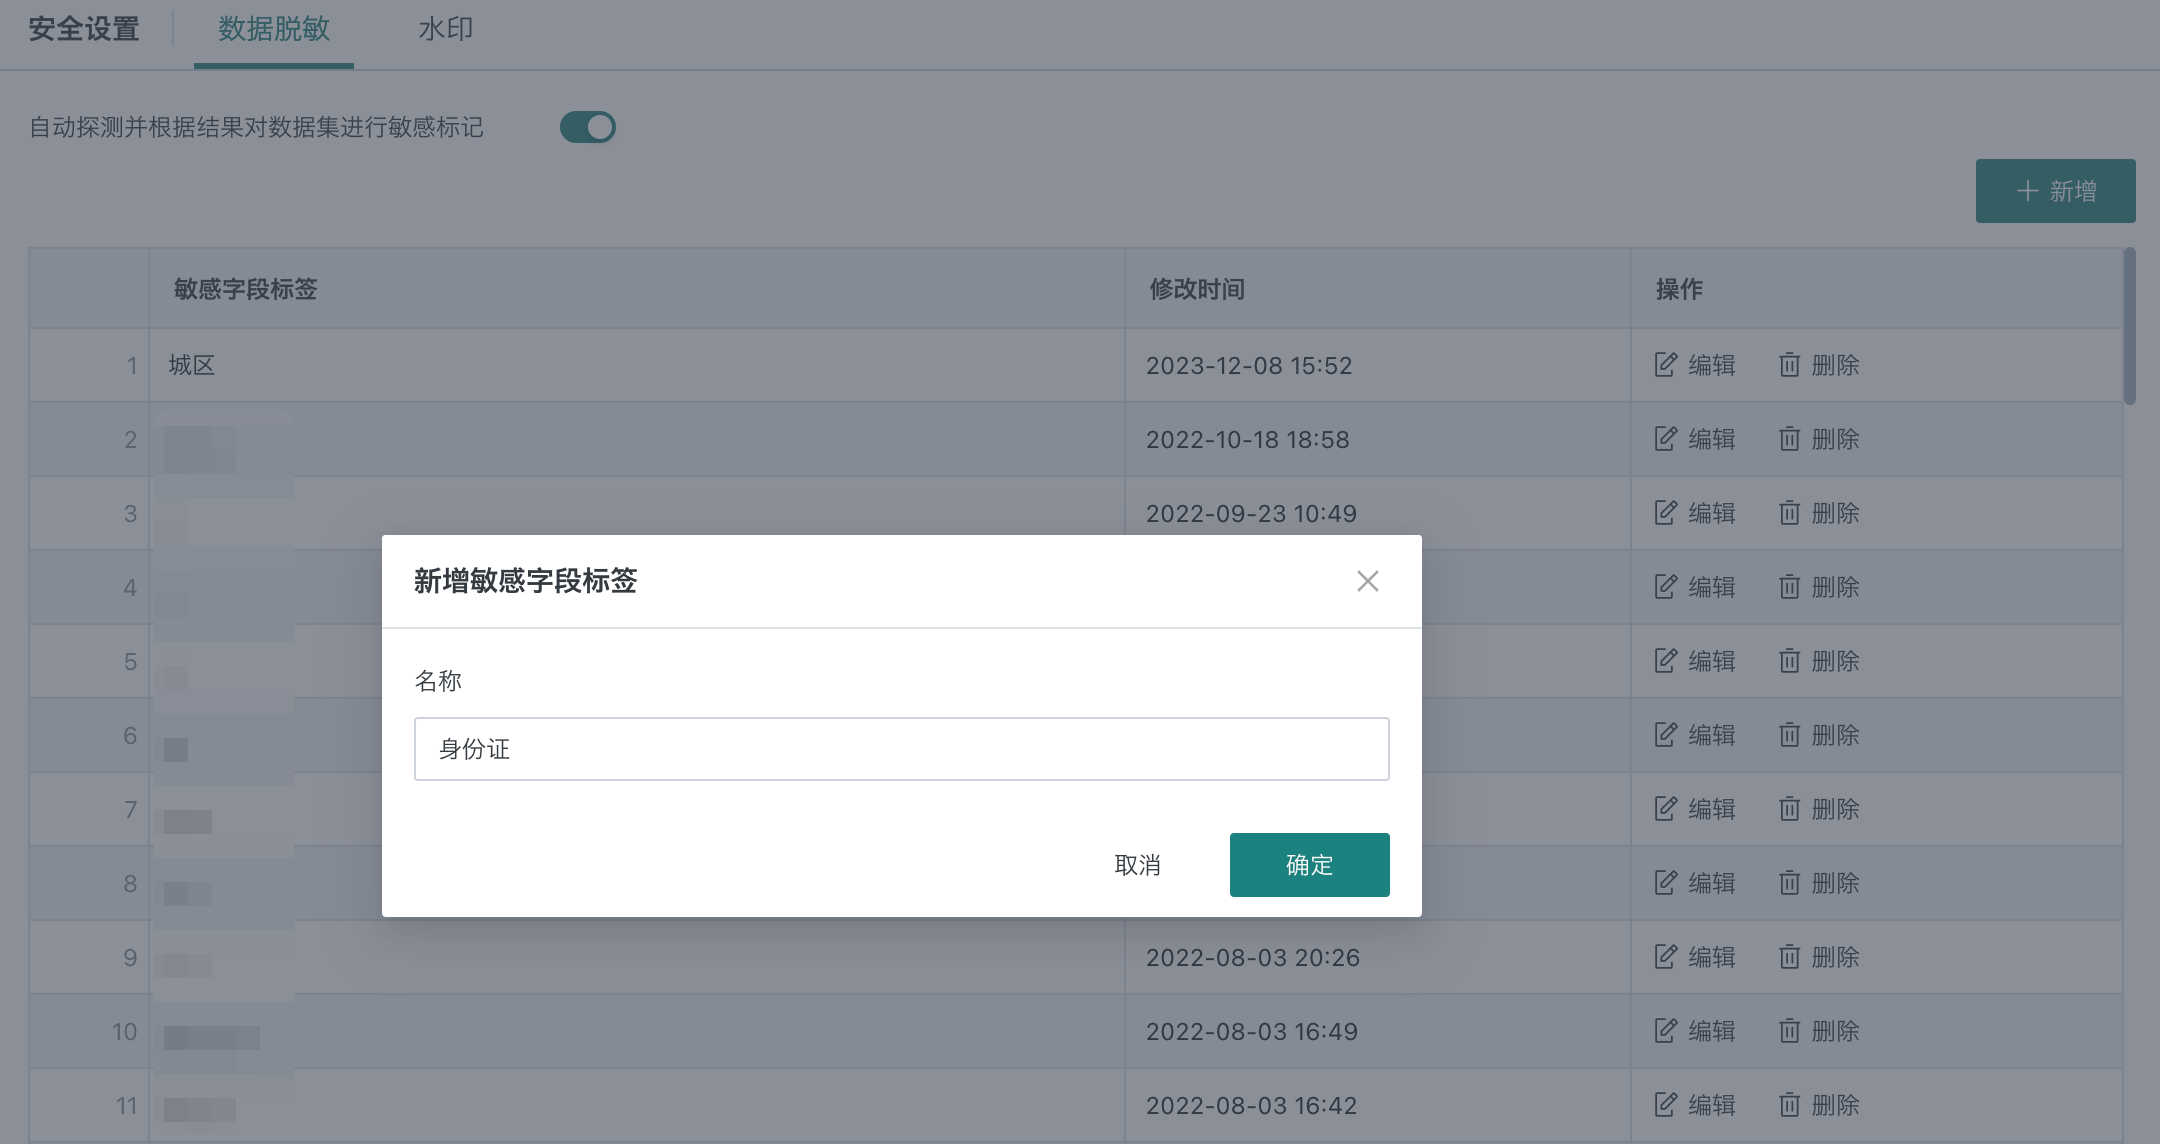
Enable auto-detection and marking: when enabled, the system will auto-detect and mark sensitive fields during data masking.
3.2 Watermark Settings
For watermark info, see [Watermark Settings](../4-Enterprise Configuration/1-Enterprise Settings.md#2.2%20Watermark%20Settings).
4. General Settings
Entry: Management Center > System Settings > General Settings
4.1 System Rule Settings
Entry: Management Center > System Settings > General Settings > System Rules
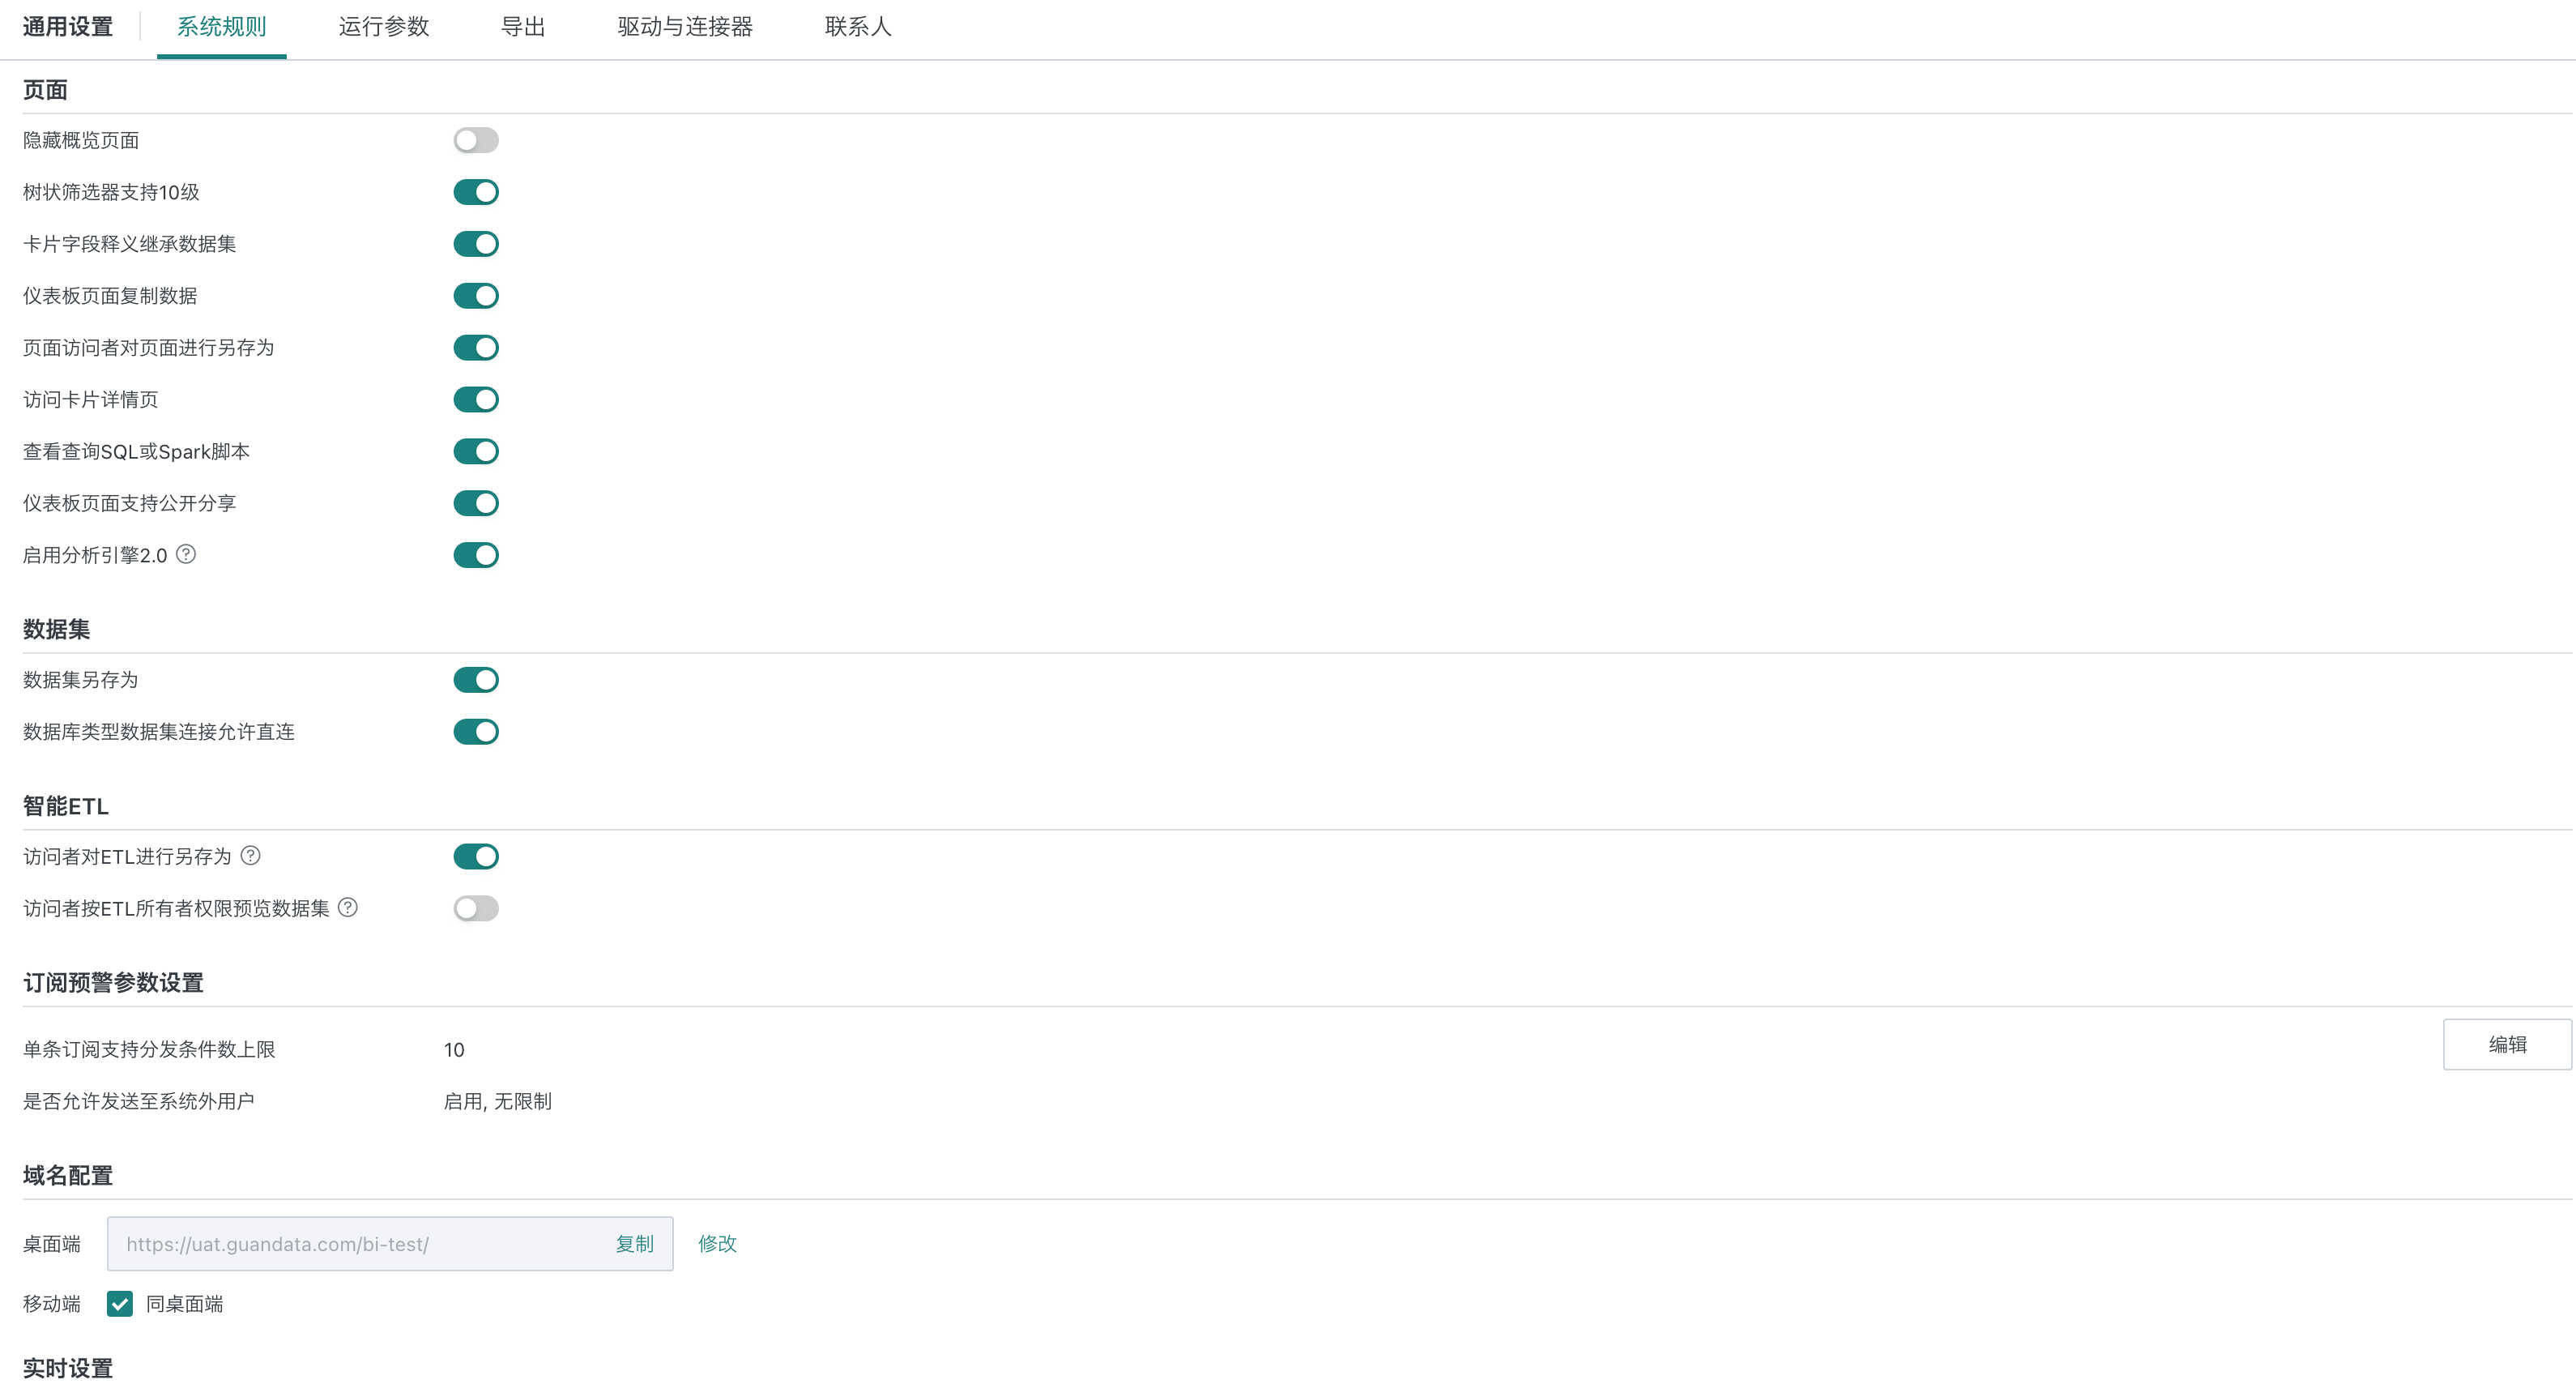
For differentiated data security, the product provides various switches for admins to enable/disable as needed:
- Page
- Allow hiding overview page
- Allow tree filter up to 10 levels
- Card field definition inherits from dataset
- Allow copying data from dashboard page
- Allow page visitors to save as page
- Allow users to access card details page
- Allow viewing query SQL or Spark script
- Dashboard page supports public sharing
- Enable Analysis Engine 2.0
- Dataset
- Allow dataset save as
- Allow direct connection for database-type dataset
- Allow extraction for database-type dataset
Note:
- For database types that only support extraction (MongoDB, SAP BW, DLI, Spark, Access), the "Allow extraction" switch does not apply.
- The "Allow direct connection" and "Allow extraction" switches cannot both be off.
- Smart ETL
- Allow ETL visitors to save as ETL
- Allow visitors to preview data as ETL owner
Supports configuring environment domain names, affecting auto-generated links for light apps, subscriptions, alerts, and third-party integrations. For clients with different domains for mobile and PC, you can set both here. Note: This is environment-level; in multi-domain, changes affect all domains. Only main domain can configure.
- Subscription & Alert Parameter Settings
- Max number of conditions per subscription: up to 100.
- Allow sending to external users: if enabled, supports sending via email to external users; you can specify allowed email suffixes or select "unlimited".
- Real-time Settings
Set default cache duration for direct-connection datasets, dashboard real-time refresh frequency, and data screen real-time refresh frequency. Direct-connection datasets in real-time mode can set cache duration in minutes; dashboard refresh matches dataset cache; data screen refresh can be set in seconds.

4.2 Runtime Parameter Settings
Runtime parameter configuration includes ETL, Spark, card, dataset, database, and recycle bin parameters.
Usually, users focus on data during the day, so stricter timeout control is needed. To avoid ETL running during the day and affecting performance, set stricter parameters for daytime (e.g., kill after 5 minutes). At night, with fewer users, set looser parameters (e.g., kill after 120 minutes).

- Max task runtime: can set special periods; after checking, set parameters for special periods as needed.
- Direct card run timeout (seconds): if exceeded, system cancels the run.
- Default max connections per direct database: default for data account initialization.
- Card database query result rows: number of result rows from database (not original table, but aggregated result).
- Card query result space (MB): controls data size per card (default 50MB, max 1024MB). If exceeded, card data is not loaded, error shown, admin can adjust in [Management Center > Operation & Maintenance Management > Parameter Config > Card Parameter Settings]. Card export is not affected.
Note:
- Increase with caution, ensure enough disk space!
- Supported in this and later versions.
- Card data default precision: up to 15 digits.
- Dataset preview default precision: up to 15 digits.
Special Note:
- Default max task runtime and Spark single job timeout are unlimited, max 120 minutes.
- Special periods can be set to hour/minute/second (server time).
4.3 Export Settings
When export control is enabled, you can configure export parameters for cards and datasets.
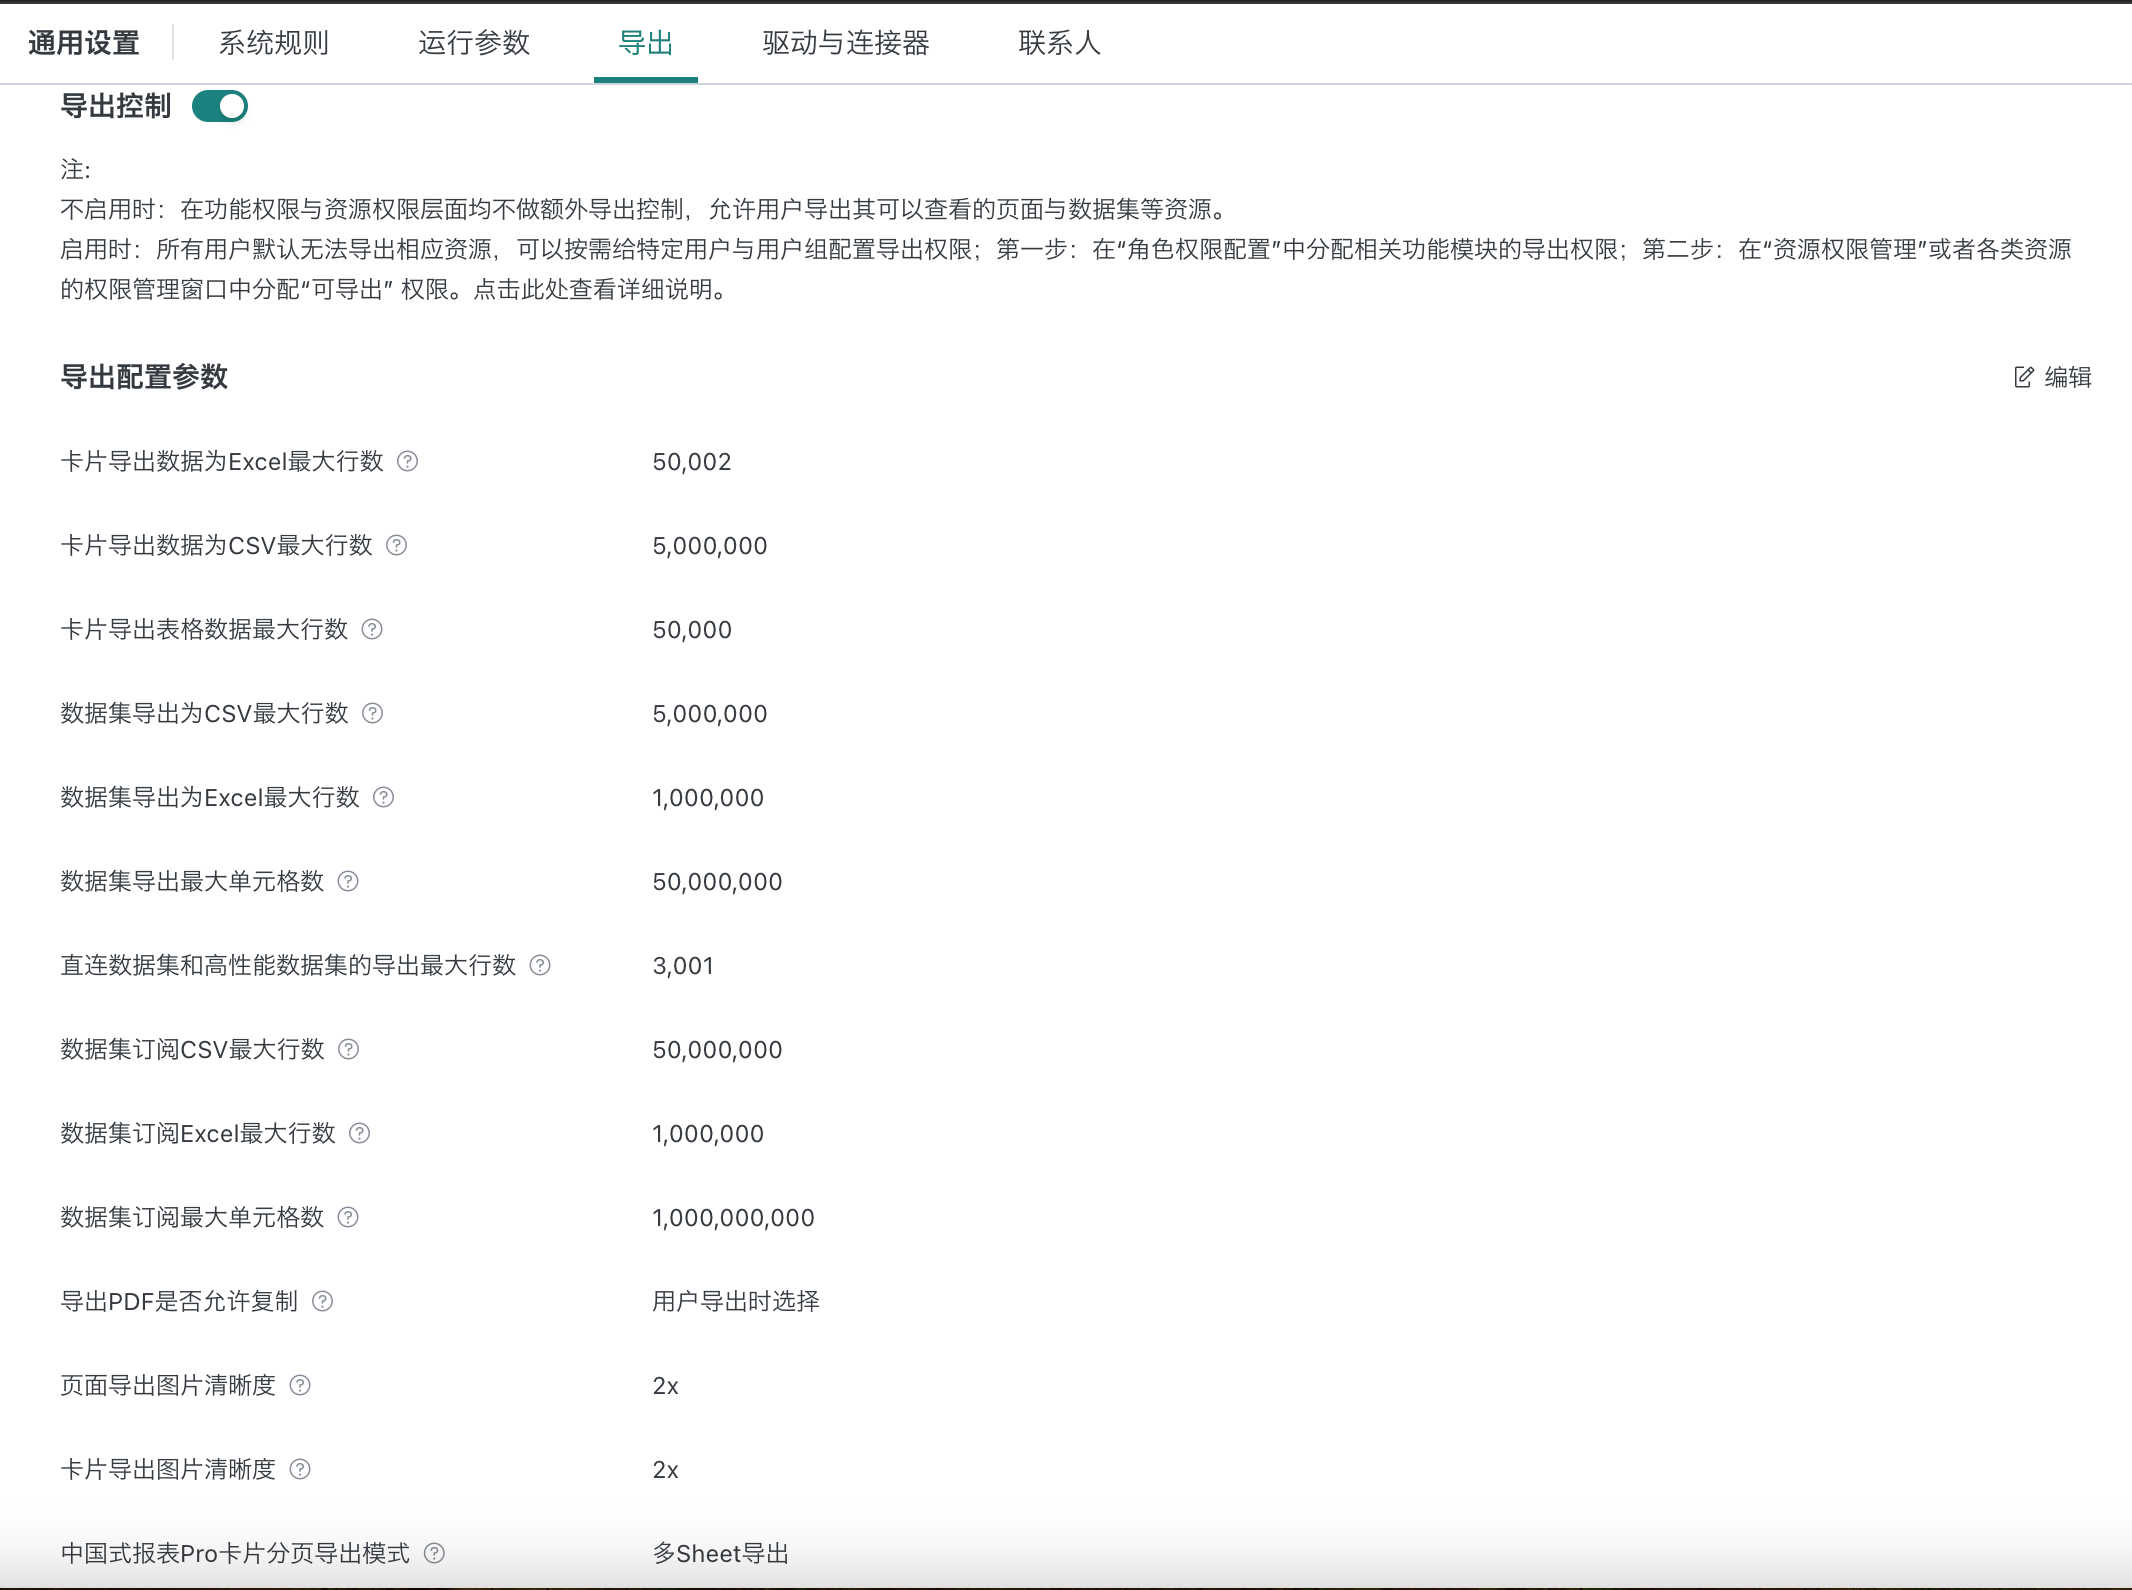
- If export control is off: no extra export control at feature/resource level, users can export any resource they can view.
- If export control is on: all users cannot export by default; you can assign export permissions to specific users/groups. Step 1: Assign export permission in "Role Permission Config"; Step 2: Assign "exporter" in "Resource Permission Management" or resource permission window. See details here.
- To prevent missing data due to large exports, dataset subscription export row limit is configurable and independent from dataset export row limit.
Example: To export a dataset, a user must have "export" permission for the "dataset" module and be an "exporter" for that dataset.
.png)
.png)
Notes:
- Supported modules: dashboard, dataset, ETL.
- When enabled, admin role has export permission by default; normal/read-only users do not, but admin can change.
- Dashboard/dataset have "exporter" setting per resource; ETL owner is exporter by default.
- If not enabled, all users can export; no "export" option in role config; no "exporter" in dashboard/dataset.
4.4 Admin Contact Settings
When enabled, the help entry on the login page and navigation bar will show the contact. You can edit, delete, and add contacts here.
